ReCon slides – "Packer Genetics: The Selfish Code" & Bochs+Python

July 16th, 2010

A few days ago Jose and Ero presented in ReCon some of the latest ideas they have been working on regarding unpacking. We have put our slides up for your viewing pleasure here:

[slideshare id=4757587&doc=recon2010-100714205302-phpapp01]

Our slides are also available for download here. Beware that they are merely a visual aid to our live presentation. We will try to remember to announce when the ReCon video comes out so you can follow them there.

In addition, Jose will be presenting on the topic in SysCan Taipei on August 20th. That will be another good chance to catch the info fresh and live.

Bochs and Python

Bochs and our custom Python extensions were one of the fundamental tools onto which we built our research.

Ero has been keeping the Python extensions up to date for a few years and they are something we use a lot at zynamics. We have attempted to make them public in a few occasions (an old patch is available in the Bochs mailing list) but those attempts failed to make them known to more users. We are frequently reminded at conferences that people would love to play with them, so this time we are making them available through a zynamics GitHub project. The plan is to keep them in sync with all major releases of Bochs. In the GitHub page you can find basic instructions on how to get them working. The patch to apply to the current public version of Bochs (2.4.5 at this time) can be found here

We will add usage examples to the GitHub wiki as time allows. Also if there are special requests we will try to provide exemples on how to use the extensions for those cases. Download them, play with them and let us know your thoughts.

We are hiring a new BinNavi developer

July 15th, 2010

After we have already hired Tim and Jose this year to join zynamics as full-time employees, we are now looking to extend our team once again. This time we are looking for a software developer who wants to join the BinNavi team.

BinNavi is a binary code reverse engineering tool that enables reverse engineers to analyze binary code. Customers of BinNavi are primarily vulnerability researchers from companies and governmental organizations of many different nations that try to find new 0-days in closed-source software.

Working on BinNavi means you will be working on a large application with more than 500.000 lines of code. The majority of that code is written in Java (the whole main program), a few ten-thousand lines of code are written in C++ (the debuggers and the IDA Pro plugin to get disassembly data from IDA Pro into a MySQL database). You are a good candidate if you know how to write clean code and you have a reverse engineering background that gives you an idea about what features are useful to our customers.

It is also crucial that you are self-motivated and have a clear idea of where development should be going. At zynamics, there is very little management from above. Rather, the individual teams (like the BinNavi team) decide themselves what features to prioritize next and when to schedule the next release of a project.

There are a few perks that make working for zynamics really pay off. There is the obvious one: you will work on the cutting edge of reverse engineering tool research and development. However, there are others. For example, you can attend as many IT security conferences as you want to provided you give a talk there and the organizers pay for your flight and hotel (which nearly all IT security conferences do, so just submit somewhere and be accepted to speak). There is a nearly unlimited budget for computer science books (all employees know the password to the corporate Amazon account and can buy at will). You will meet many of our customers who come from all walks of life and have amazing stories to tell.

Of course there are downsides to the job, too. The primary issue we face again and again when filling job positions is that we do not want any remote workers. You would have to move to Bochum, Germany for the job and work from our office (working from home two times a week or so is OK). Since we want to fill this position quickly (preferably you would start August 1st but no later than August 15th) we can not consider candidates that require a work permit that takes longer to process. Except for this, we welcome applications from software developers of all backgrounds.

Please note that this is not a reverse engineering job. On the job you will most likely not be doing a lot of reverse engineering beyond what is required to test BinNavi. What you can do, however, is to implement new code analysis algorithms that improve the usefulness of BinNavi to our customers.

If you are interested in this job, please send an email to info@zynamics.com to request more information. Or just send your resume and some piece of code you wrote that makes us want to hire you.

Las Vegas & the zynamics team

July 14th, 2010

Along with RECon, the single most important date in the reverse engineering / security research community is the annual Blackhat/DefCon event in Las Vegas. Most of our industry is there in one form or the other, and aside from the conference talks, parties and award ceremonies, there’s also a good amount of technical discussions (in bars or elsewhere) that takes place.

This year, a good number of researchers/developers from the zynamics Team will be present in Las Vegas — alphabetically, the list is:

  1. Ero Carrera
  2. Thomas Dullien/Halvar Flake
  3. Vincenzo Iozzo
  4. Tim Kornau

So, if you wish meet any of the team to discuss reverse engineering, our technologies, our research, or the performance of the Spanish or German football team at the last world cup, do not hesitate to drop an email to info@zynamics.com — Vegas is always chaotic, and scheduling a meeting will minimize stress for everyone that is involved.

Specifically, the following topics are specifically worth meeting over:

  1. Chat with Ero over our unpacking engine (just presented at RECon) — and how it fits into the larger scheme of things (e.g. VxClass)
  2. Meet with Tim or Vincenzo to discuss automated gadget-finding for ROP, or anything involving the ARM/REIL translations
  3. Meet with Thomas/Halvar to discuss VxClass, automated malware clustering, automated generation of “smart” malware signatures etc.

Aside from this, if you are interested in …

  • … boosting your reverse engineering performance by porting symbols from FOSS software into your closed-source disassemblies (BinDiff)
  • … becoming faster at finding bugs by leveraging differential debugging, the REIL intermediate language and static analysis frameworks (BinNavi)
  • … enhancing team-based reverse engineering by pooling accumulated knowledge and sharing information (BinCrowd)
  • … automatically correlating and clustering malware and forensically obtained memory dumps, and automatically deriving detection mechanisms (VxClass)
  • … analyzing malicious PDF files including the embedded JavaScript code (PDF Dissector)

then do not hesitate to drop us mail — we’ll gladly show/explain what our tools/technologies can do.

See you there !

ReCon slides – How to really obfuscate your PDF malware

July 13th, 2010

Last Friday I was at ReCon in Montreal to give a talk about obfuscated PDF malware. I got the idea for the talk during my work on PDF Dissector where I saw a lot of obfuscated PDF malware. The obfuscation I saw in the wild was mostly very limited and the malware authors did not seem to think things through to the very end. I took the opportunity to think a bit further about the whole topic of PDF malware obfuscation and a few of the result of these thoughts can be seen in the slides below. If you do not have Flash enabled, click here to download the slides.

[slideshare id=4745445&doc=howtoreallyobfuscateyourpdfmalware-100713095253-phpapp01]

BinNavi 3.0 Beta 2 released

July 7th, 2010

Today we have released the second beta of BinNavi 3.0. We are now planning to release the final version on August 1st.

The main thing we changed since the first beta version was to improve the MySQL database format to handle large files better. This became necessary as more and more of our customers try to analyze really big images, like Cisco router dumps, with BinNavi. The second major change was to add compatibility with the new IDA Pro 5.7 which is now the preferred data source for BinNavi disassembly data.  Of course we have also fixed various minor bugs that have been reported by our busy beta testers since the first beta was released.

Not many features were added since the first beta was released. You can see the most important new features of BinNavi 3 in this blog post I wrote when the first beta was released. To learn more about BinNavi please check out the manual on our website.

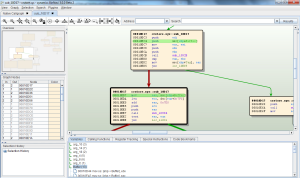
Screenshot of BinNavi 3.0: Highlighting all uses of the local variable Buffer

If you are already a customer of a zynamics product and you would like to get your hands on the BinNavi 3.0 beta, please send an email to support@zynamics.com.

PDF Dissector 1.3.0 released

July 4th, 2010

The 1.3.0 release of our PDF malware analysis tool PDF Dissector is primarily a bugfix release to undo some of the bugs introduced in 1.2.0. However, I have also added a cool new feature.

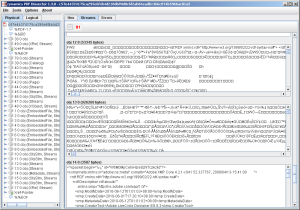
I have added a way to quickly browse through the content of all decoded data streams. This is very useful if you want to quickly see what data streams contain potentially malicious content like embedded Flash files or AcroForms code. To account for binary resources and text resources you can switch between text mode and hexadecimal mode.

The screenshow below shows what the new feature looks like.  You can clearly see the embedded Flash file on object 12 (note the Flash file header starting with FWS).

To learn more about PDF Dissector please check out the manual.

Objective-C reversing (Part II)

July 2nd, 2010

It’s been a long time since the first part about static Objective-C reverse engineering so it’s time for a second one and provide another script to play with. In this second part we will be covering static class reconstruction for Objective-C binaries. Some class reconstruction was made previously in Cameron Hotchkies’s and itsme’s work, but those were for Mac OS X binaries and as we said in the first part, the structure of the binaries changed, as well as the internal structures that contain information about classes. Along this post and all its examples, we will use DigiClock as an example for our analysis. Given that the application comes with source code, it will be useful to verify our findings.

Our first step is to look into the __objc_classlist section. As the name says, this section contains a list of the classes defined inside the binary. Note that general classes as NSObject are not included even if used/referenced in the source code, just the classes we implement. Each DWORD in this section points to an address in __objc_data where the class definition is stored. For example:


00004980 DCD _OBJC_CLASS_$_DigiClockAppDelegate
00004984 DCD _OBJC_CLASS_$_FlipsideView
00004988 DCD _OBJC_CLASS_$_MainView
0000498C DCD _OBJC_CLASS_$_MainViewController
00004990 DCD _OBJC_CLASS_$_RootViewController
00004994 DCD _OBJC_CLASS_$_FlipsideViewController

And going to _OBJC_CLASS_$_DigiClockAppDelegate:


000040D8 _OBJC_CLASS_$_DigiClockAppDelegate DCD _OBJC_METACLASS_$_DigiClockAppDelegate
000040DC DCD 0
000040E0 DCD 0
000040E4 DCD 0
000040E8 DCD dword_43AC

Here we have our first struct, that we can define as (all fields are size 4 bytes):

Offset Description
0 Pointer to Meta-Class
4 Pointer to Super-Class
8 Pointer to class cache
12 Pointer to vtable related struct
16 Pointer to class definition

As you can see (if you’re looking into the binary while reading this, which you should) there’s always a meta-class but in this case we have no super-class. Super-class are usually references to high level classes like NSObject, UIViewController, UITableViewController, etc.

The cache and vtable struct are also empty so let’s move to the class definition:

Offset Description
0 Boolean that indicates if it’s a meta-class
4 Instance size (disk?)
8 Instance size (memory?)
12 Always zero?
16 Pointer to class name (ASCII)
20 Pointer to method struct (list of implemented methods)
24 Pointer to protocol struct (inherited protocols)
28 Pointer to ivar names (list of declared variables)
32 Always zero?
36 Pointer to properties struct (list with encoded types)

First of all, about the two “instance size” fields, it is unclear which one refers to either disk or memory size but my guess is inside parenthesis.

Method struct

This one is a simple struct that contains a lot of useful information. The struct works like an array of method definitions. That way the first two fields indicate the size of each “method definition” (or field) and the second one the total number of fields. Following the example, DigiClockAppDelegate has 6 methods:


00004314 dword_4314 DCD 0xC
00004318 DCD 6
0000431C DCD aSetwindow ; "setWindow:"
00004320 DCD aV12048 ; "v12@0:4@8"
00004324 DCD __DigiClockAppDelegate_setWindow__+1
00004328 DCD aWindow ; "window"
0000432C DCD a804 ; "@8@0:4"
00004330 DCD __DigiClockAppDelegate_window_+1
00004334 DCD aSetrootviewcon ; "setRootViewController:"
00004338 DCD aV12048 ; "v12@0:4@8"
0000433C DCD __DigiClockAppDelegate_setRootViewController__+1
00004340 DCD aRootviewcontro ; "rootViewController"
00004344 DCD a804 ; "@8@0:4"
00004348 DCD __DigiClockAppDelegate_rootViewController_+1
0000434C DCD aDealloc ; "dealloc"
00004350 DCD aV804 ; "v8@0:4"
00004354 DCD __DigiClockAppDelegate_dealloc_+1
00004358 DCD aApplicationdid ; "applicationDidFinishLaunching:"
0000435C DCD aV12048 ; "v12@0:4@8"
00004360 DCD __DigiClockAppDelegate_applicationDidFinishLaunching__+1

The information stored in every field is, in order: the method name, an encoded string that specifies the function prototype (return value and parameter types), and the method address. The encoded prototype can look a bit tricky at first but with the help of some available information we can see how setWindow prototype would be something like:

void setWindow(self@0, id@8)

We know that id is a class instance, but we don’t know which one. And that’s all about methods for now.

Protocol struct

The protocol struct has two parts. The first one specifies how many protocols that class inherits:


0000437C dword_437C DCD 1
00004380 DCD dword_49B8

In this case, as shown by the first DWORD is only one protocol, and the second field points to the protocol definition:

Offset Description
4 Pointer to name of the class the protocol is inherited from.
8 Pointer to protocol struct (N-th level inheritance)
12 Pointer to a method struct (instance methods)
20 Pointer to a method struct (class methods).

Here we have a recursive reference, where a protocol usually points to higher level protocols. It would be possible to build a hierarchy tree using this information but unfortunately, in most cases protocol information is related to standard classes (UIApplicationDelegate, NSObject…) so the resulting tree uses to be the same or quite similar.

About the difference between instance and class methods, the “Objective-C Programming Language” says:

“Protocols can’t be used to type class objects. Only instances can be statically typed to a protocol, just as only instances can be statically typed to a class. (However, at runtime, both classes and instances will respond to a conformsToProtocol: message.)”

Ivar struct

This struct lists the variables defined inside the interface of the class. In our example, DigiClockAppDelegate defines two variables:


000042E4 dword_42E4 DCD 0x14
000042E8 DCD 2
000042EC DCD _OBJC_IVAR_$_DigiClockAppDelegate.window
000042F0 DCD aWindow ; "window"
000042F4 DCD aUiwindow ; "@\"UIWindow\""
000042F8 DCD 2
000042FC DCD 4
00004300 DCD _OBJC_IVAR_$_DigiClockAppDelegate.rootViewController
00004304 DCD aRootviewcontro ; "rootViewController"
00004308 DCD aRootviewcont_0 ; "@\"RootViewController\""
0000430C DCD 2
00004310 DCD 4

The structure is similar to the one used with methods. First we have a field size (0x14) followed by the total number of fields. Each field contains information about the offset, the variable name and the type. The remaining integer values are related to the size in memory.

Property struct

This is the last struct of the class definition, and again uses the same structure with the first DWORD telling the field size and the second the number of fields. In our example, the properties are applied over the two variables we saw in the previous structure (“window” and “rootViewController”):


00004364 dword_4364 DCD 8
00004368 DCD 2
0000436C DCD aRootviewcontro ; "rootViewController"
00004370 DCD aTRootviewcontr ; "T@\"RootViewController\",&,N,VrootViewCon"...
00004374 DCD aWindow ; "window"
00004378 DCD aTUiwindowNVwin ; "T@\"UIWindow\",&,N,Vwindow"

For properties, fields contain only the variable name and the encoded properties. The encoded string usually follows this format:

T@”VAR_TYPE”,[&N],V_var_name

Where N represents the nonatomic property and “&” the retain property.

Final words

Well, that’s all for this second part. There’s an idapython script that parses all this information on zynamics github. In the third and upcoming parts of Objective-C reversing we will be filling the gaps on the structures and using all this information to reconstruct the application’s header files and to improve the objc_helper script that we introduced on the first part.

Release of PDF Dissector 1.2.0

July 1st, 2010

Today we are releasing version 1.2.0 of PDF Dissector, our PDF malware analysis tool. This release is primarily a bugfix release for the PDF parser. Several of our customers reported issues with specifically crafted PDF malware files which were not correctly parsed by PDF Dissector. A big thank you to all customers who reported these issues!

Here is the detailed change list:

  • Feature: JavaScript code beautifier can now beautify selected text only
  • Feature: Improved the Adobe Reader emulator a bit
  • Bugfix: Improved handling of UTF-16BE encoded strings
  • Bugfix: Fixed a parser bug that led to crashes when parsing certain cross-references tables
  • Bugfix: Fixed a parser bug that led to incorrectly parsed strings that contain escaped parentheses
  • Bugfix: Fixed a parser bug that led to incorrectly parsed strings that contain balanced unescaped parentheses
  • Bugfix: Fixed bugs in the Error reporting dialog that made automated reporting of errors fail

If you want to know more about PDF Dissector, please check out the manual.

ida2sql: exporting IDA databases to MySQL

June 29th, 2010

Today we are finally making it easier to get your hands on ida2sql, our set of scripts to export information contained in an IDA database into MySQL.

As a short recap, ida2sql is a set of IDAPython scripts to export most of the information contained in an IDB into a MySQL database. It has existed and evolved already for a few years and has been the main connection between IDA and BinNavi for the most of the life of the latter.

The last development efforts have been geared towards making the schema a bit more friendly (see below) and making it work in a fair range of IDA (5.4 to 5.7) and IDAPython versions (including some that shipped with IDA which had minor problems, ida2sql will automatically work around those issues). The script runs under Windows, Linux and OSX.

ida2sql is comprised of a ZIP archive containing the bulk of the scripts that simply needs to be copied to IDA’s plugin folder. No need to extract its contents. A second script, ida2sql.py, needs to be run from within IDA when we are ready to export data. You can keep it in any folder, it should be able to automatically locate the ZIP file within the plugins folder. You can download here a ready built package containing the ZIP file, the main script, a README and an example configuration file.

When the main Python file is executed in IDA and if all the dependencies are successfully imported the user will be presented with a set of dialogs to enter the database information. If the database is empty there will also be a message informing that the basic set of tables is about to be created at that point. Once all configuration steps have been completed the script will start processing the database, gathering data and finally inserting it all into the database.

The configuration process can be simplified by creating a config file ida2sql.cfg in IDA’s main directory (or by pointing to it the IDA2SQLCFG environment variable). If ida2sql can find that file it will not ask for any of the configuration options and go straight into the exporting.

Automation

ida2sql has a batch mode that comes handy when you need to export a collection of IDBs into the database. To run ida2sql in batch mode it’s enough to set the corresponding option in the configuration file.

mode: batch

An operation mode of “batch” or “auto” indicates that no questions or other kind of interaction should be requested from the user. (Beware though that IDA might still show dialogs like those reminding of a license or free-updates period about to expire. In those cases run IDA through the GUI and select to never show again those reminders). The batch mode is specially useful when running ida2sql from the command line, for instance:

idag.exe -A -OIDAPython:ida2sql.py database.idb|filename.exe

Requirements

  • mysql-python
  • A relatively recent IDA (tested with 5.4, 5.5, 5.6 and the latest beta of 5.7)
  • IDAPython. Chances are that you already have it if you are running a recent IDA version
  • A MySQL database. It does not need to reside on the same host

The schema

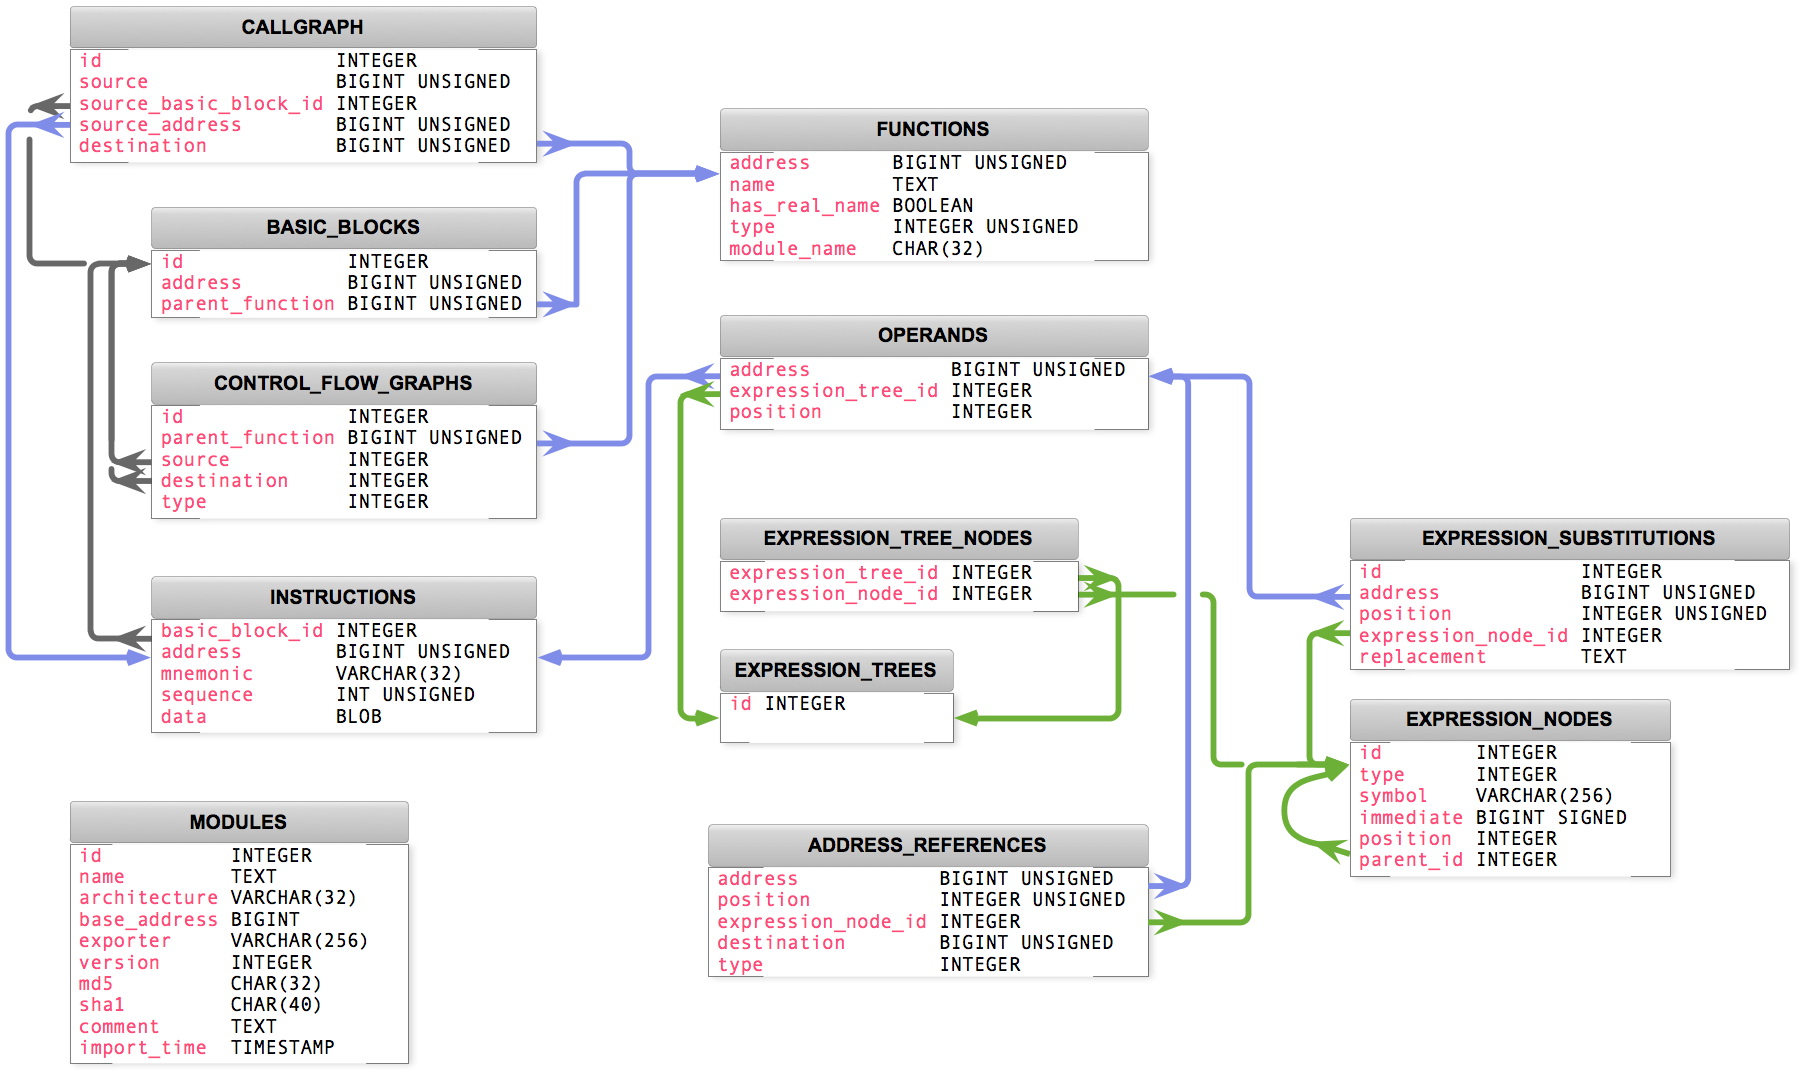
A frequent criticism to the schema design has always been the use of a set of tables per each module. People have asked why not use instead using a common table-set for all modules in the database. While we considered this approach in the original design, we opted for using a set of tables per module. We are storing operand trees in an optimized way aiming at reducing redundant information by keeping a single copy of all the common components of the operand’s expression tree. Such feature would be extremely difficult to support were we to use a different a different schema. Additionally tables can easily grow to many tens of millions of rows for large modules. Exporting hundreds of large modules could lead to real performance problems.

The table “modules” keeps track of all IDBs that have been exported into the database and a set of all the other tables exists for each module.

BinNavi DB Version 2

BinNavi DB Version 2

The following, rather massive, SQL statement shows how to retrieve a basic instruction dump for all exported code from an IDB. (beware of the placeholder “_?_”)

[sourcecode language=”sql”]
SELECT
HEX( functions.address ) AS functionAddress,
HEX( basicBlocks.address ) AS basicBlockAddress,
HEX( instructions.address ) AS instructionAddress,
mnemonic, operands.position,
expressionNodes.id, parent_id,
expressionNodes.position, symbol, HEX( immediate )
FROM
ex_?_functions AS functions
INNER JOIN ex_?_basic_blocks AS basicBlocks ON
basicBlocks.parent_function = functions.address
INNER JOIN ex_?_instructions AS instructions ON
basicBlocks.id = instructions.basic_block_id
INNER JOIN ex_?_operands AS operands ON
operands.address = instructions.address
INNER JOIN ex_?_expression_tree_nodes AS operandExpressions ON
operandExpressions.expression_tree_id = operands.expression_tree_id
INNER JOIN ex_?_expression_nodes AS expressionNodes ON
expressionNodes.id = operandExpressions.expression_node_id
ORDER BY
functions.address, basicBlocks.address,
instructions.sequence, operands.position,
expressionNodes.parent_id,
expressionNodes.position;
[/sourcecode]

Limitations and shortcomings

The only architectures supported are x86 (IDA’s metapc), ARM and PPC. The design is pretty modular and supports adding new architectures by simply adding a new script. The best way to go about it would be to take a look at one of the existing scripts (PPC and ARM being the simplest and most manageable) and modify them as needed.

ida2sql has been designed with the goal in mind of providing an information storage for our products, such as BinNavi. It will only export code that is contained within functions. If you have an IDB that has not been properly cleaned or analyzed and contains snippets/chunks of code not related to functions, those will not be exported. Examples of some cases would be exception handlers that might only be referenced through a data reference (if at all) or switch-case statements that haven’t been fully resolved by IDA.

The scripts have exported IDBs with hundreds of thousands of instructions and many thousands of functions. Nonetheless the larger the IDB the more memory the export process is going to require. ida2sql’s performance scales mostly linearly when exporting. It should not degrade drastically for larger files. It will also make use of temporary files that can grow large (few hundred MBs if the IDB is tens of MBs in size when compressed). Those should not be major limitations for most uses of ida2sql.

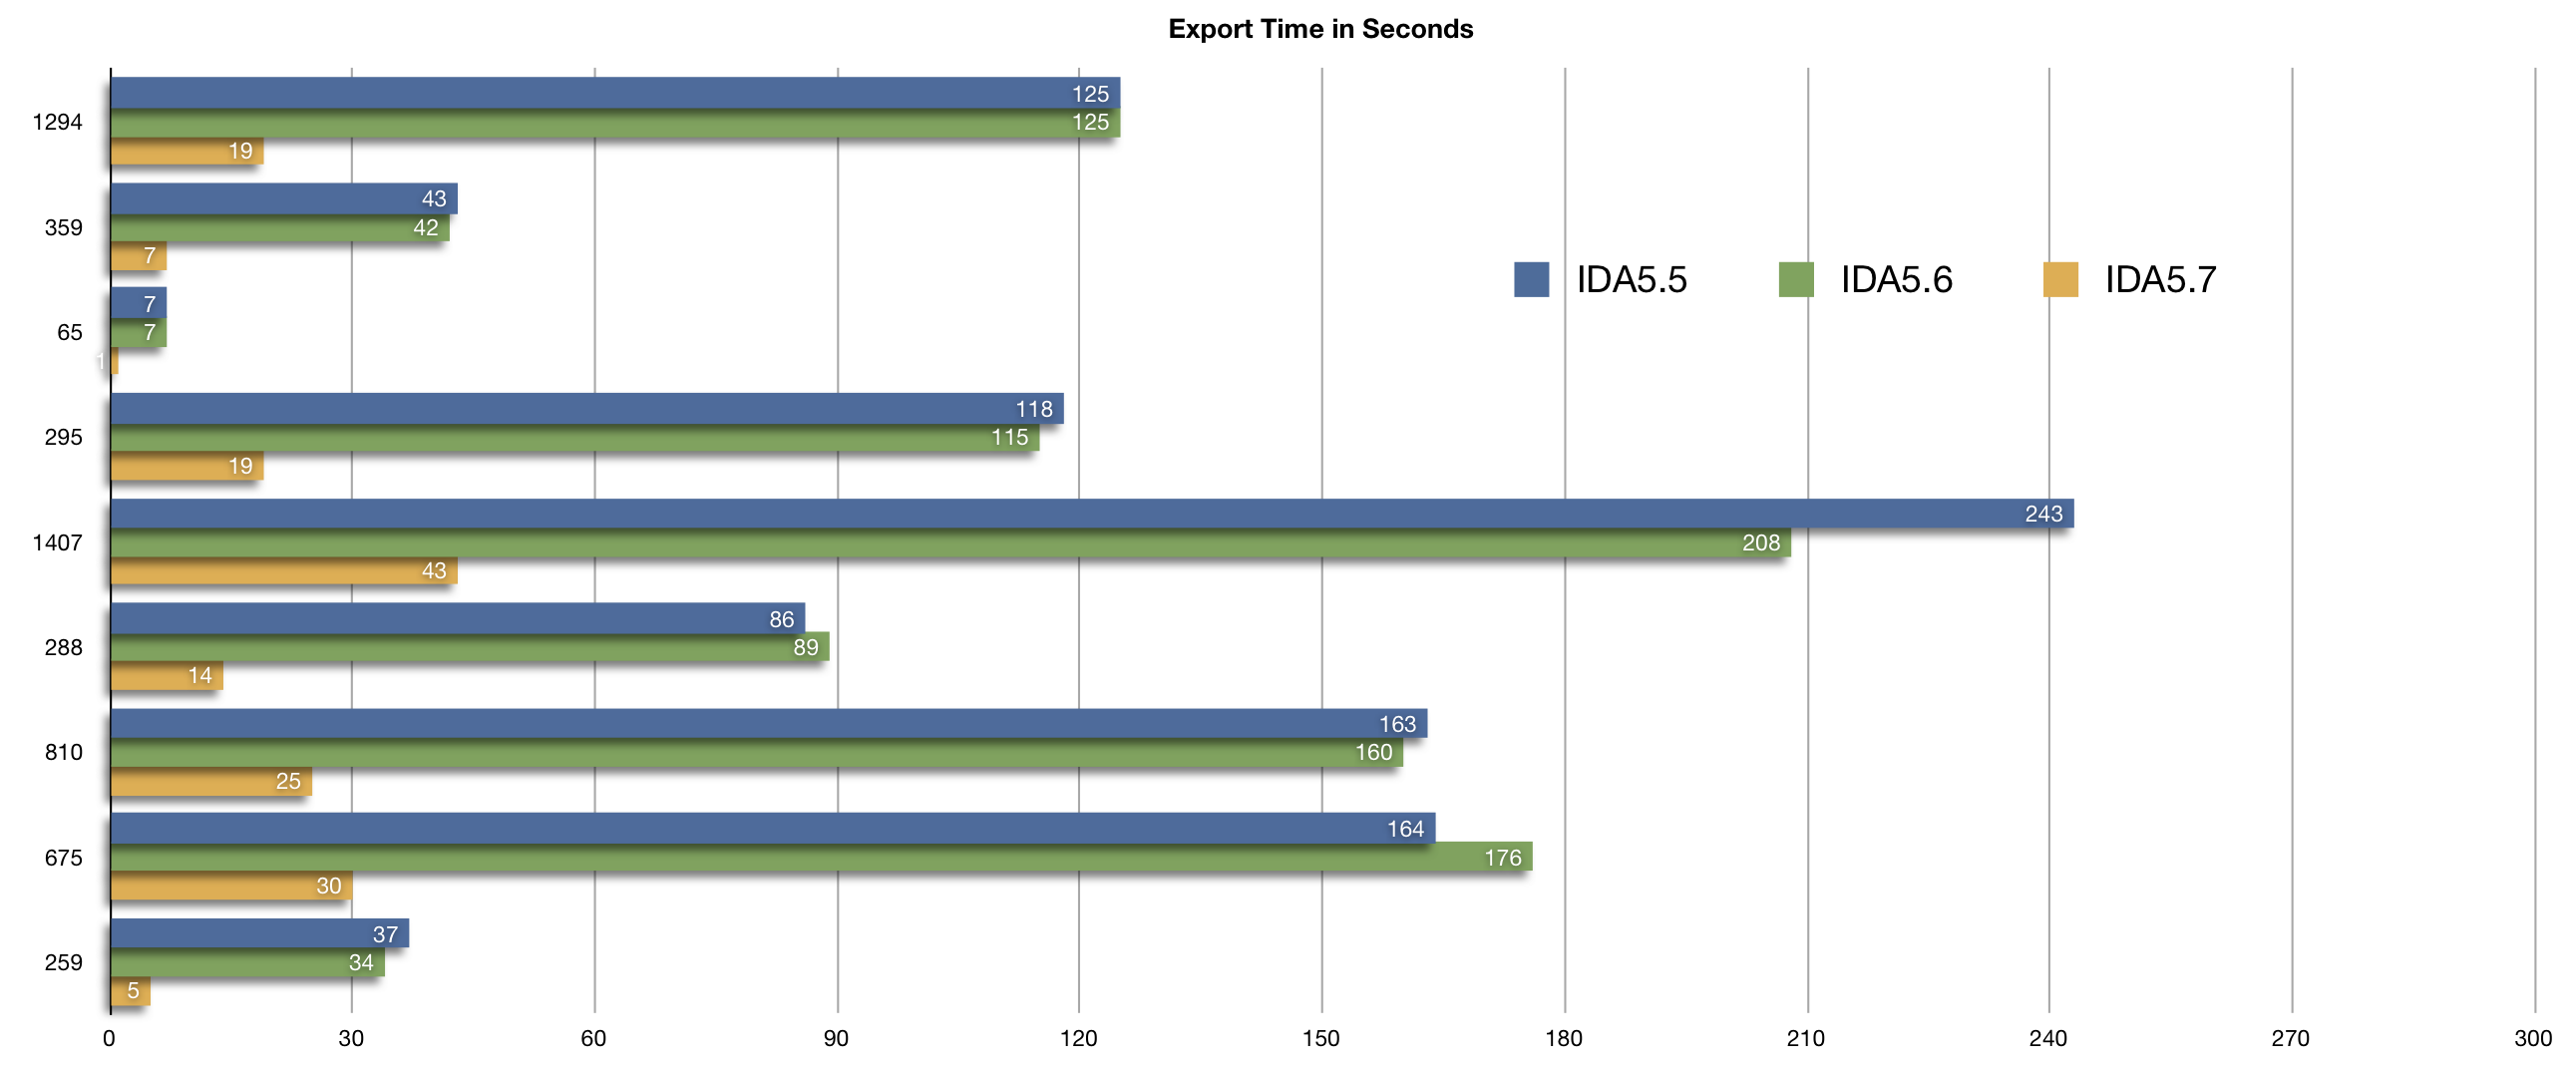
Also it’s worth noting that IDA 5.7 has introduced changes to the core of IDAPython and the tests we have made so far with the current beta the performance of ida2sql has improved significantly. In the following figures you can see the export times in seconds for some IDBs exported with IDA 5.5, 5.6 and 5.7.

ida2sql export times

ida2sql export times for a medium size file

ida2sql export times

ida2sql export times for a set of small IDBs

Summing up. We hope this tool will come handy for anyone looking into automating mass analysis and has been bitten by the opaque and cumbersome IDBs. Give it a spin, look at the source code, break it and don’t forget to let us know how it could be improved! (patches are welcome! 😉 )

The REIL language – Part II

June 22nd, 2010

In the first part of this series I gave a brief overview of the REIL language (Reverse Engineering Intermediate Language), the intermediate language we use in our internal binary code analysis algorithms. I talked about the language in general and what motivated us to create it. In this second part I am going to talk about the REIL instruction set.

As mentioned in the first part of the series, there are only 17 different REIL instructions. We deliberately decided to reduce the instruction set as much as possible without losing too much of the semantics of the original instructions. This was important for us because we primarily use REIL code in abstract interpretation algorithms and the fewer instructions an instruction set has, the less code you have to implement in your abstract interpretation algorithms. It is much easier and faster to write code that processes the effects of 17 different instructions on the program state than it is for 100 instructions.

The REIL instruction set can loosely be divided into five different groups of instructions: Arithmetic instructions, bitwise instructions, data transfer instructions, logical instructions, and other instructions.

Arithmetic instructions

With six different instructions, the group of arithmetic instructions is the biggest group. It contains the instructions ADD (Addition), SUB (Subtraction), MUL (Unsigned multiplication), DIV (Unsigned division), MOD (Unsigned modulo), and BSH (Bitwise shift). Each of these instructions takes two input operands and one output operand where the result of the operation is stored.

[sourcecode]
add eax, 5, ebx // ebx = eax + 5
sub t0, 10, t1 // t1 = t0 – 10
mul t1, 10, t2 // t2 = t1 * 10
div t1, 10, t2 // t2 = t1 / 10
mod t1, 10, t2 // t2 = t1 % 10
bsh t1, -5, t2 // t2 = t1 << 5
[/sourcecode]

ADD and SUB work just like you would expect addition and subtraction to work. The two input operands are added or subtracted and the result of the operation is stored in the output operand.

It is a bit unusual that REIL only supports unsigned multiplication and division operations but it turned out that it is simple to simulate signed multiplication and division using their unsigned counterparts.

The BSH instruction is one of the design mistakes we made in REIL 1.0. We encoded the direction of the shift (bitwise left shift or bitwise right shift) in the sign of the second operand. If the operand is negative, a left shift is executed. If it is positive, a right shift is executed. This makes the interpretation of BSH instructions very difficult especially if the shift-amount is not a constant value (think shl eax, cl on x86) We are planning to replace the BSH instruction with two instructions, LSH and RSH, in future versions of REIL.

Bitwise instructions

The second group of instructions, the bitwise instructions, contains the three instructions AND, OR, and XOR. These instructions behave just the way you expect bitwise AND, OR, and XOR to behave. Each instruction takes two input operands and connects the bits of the input operands using the truth table of the bitwise operation specified in the mnemonic. The result of the bitwise operation is stored in the output operand.

[sourcecode]
and eax, 5, ebx // ebx = eax & 5
or t0, 10, t1 // t1 = t0 | 10
xor t1, 10, t2 // t2 = t1 ^ 10
[/sourcecode]

Data transfer instructions

The third group of instructions, the data transfer instructions, is more interesting again. It contains the instructions STR, LDM, and STM.

The STR instruction (Store Register) copies an integer literal or the content of a register to another register. The source operand is the first operand of the instruction, the target operand is the third operand.

LDM (Load Memory) and STM (Store Memory) are used to access the memory of the simulated process. In the LDM instruction, the first operand specifies the memory address from where a value is loaded. The third operand is the register operand where the loaded value is stored. In the STM instruction, the order of operands is reversed. The first operand specifies the value to be written to memory, the third operand specifies the memory address.

Both LDM and STM can access memory regions of any size in one go. In case of LDM,  the size of the accessed memory equals the size of the REIL operand where the loaded value is stored. In case of STM, the size of the accessed memory equals the size of the REIL operand that contains the value to store.

[sourcecode]
str t0, , t1 // t1 = t0
ldm t0, , t1 // t1 = [t0]
stm 33, , t1 // [t1] = 33
[/sourcecode]

Logical instructions

The fourth group of instructions is the group of logical instructions. With two instructions, BISZ and JCC, this group is rather small.

The BISZ instruction (Boolean Is Zero) takes a value in the first operand and checks whether the operand is zero or not. If it is zero, the output operand of the instruction is set to one. Otherwise it is set to zero.

JCC (Jump Conditional) is the only way to execute a branch in the REIL language. The instruction takes a condition in the first operand and if the condition operand evaluates to anything but zero, control is transferred to the instruction at the address specified in the third operand.

[sourcecode]
bisz t0, , t1 // t1 = t0 == 0 ? 1 : 0
jcc t1, , t2 // jump if t1 != 0
[/sourcecode]

Other instructions

The group of other instructions contains the remaining REIL instructions that do not really fit into any other group.

The first instruction is the NOP instruction (no operation). This instruction does not have an effect on the program state. At first it seems useless to have this instruction in the REIL instruction set but it turned out that having this instruction simplifies the translation process from native assembly instructions to REIL instructions in certain edge cases. Of course, we also could have simulated NOP using the other REIL instructions.

The second instruction of this group is the UNDEF instructions. This instruction is used to indicate that a REIL register has an undefined state. The UNDEF instruction became necessary because there are x86 instructions that leave flags in an undefined state.

The third and last instruction of this group is the UNKN instruction. This instruction is a placeholder instruction that is emitted by the REIL translator every time it encounters a native assembly instruction it can not translate.

[sourcecode]
nop , , // Does nothing
undef , , eax // Marks eax as undefined
unkn , , // Translator found an unknown instruction
[/sourcecode]

A word about operands

In the example code above you have already seen that REIL operands are very simple. In fact, REIL operands can only be of three different types:

  • Integer literals: Decimal, positive integer numbers
  • Registers: String literals like t0 or eax
  • REIL addresses: Two integer literals separated by a period character (400.20)

The purpose of integer literals and register operands is the same for REIL as it is for native assembly instructions. REIL addresses are necessary because there are certain native assembly instructions that contain branches within itself (think of the x86 REP instructions). These internal branches are simulated by REIL JCC instructions with REIL addresses as the third operand. I will talk more about REIL addresses in the third part of this series.

All REIL instructions have three of those operands. However, not all instructions require all three operands to be present. Unnecessary operands have a special type ’empty’ that is not printed when you write down a REIL instruction. That’s why in the example code above you see instructions that have operands separated by commas but without any operand names between the commas. What operands are omitted depends on the functionality of the operands. We have always tried to have the first two operands act as input operands while the third operand is the output operand. The BISZ instruction, for example, has the first and third operand but not the unnecessary second input operand.

That’s it for the second part of this series. In the next part I will talk about translating native code to REIL code.