Challenging conventional wisdom on AV signatures (Part 1 of 2)

April 2nd, 2010

We have all been taught (and intuitively felt) that traditional antivirus signatures are, for the most part, a waste of time. I think I have myself argued something similar repeatedly. One could say that “byte signatures don’t work” is accepted conventional wisdom in the security industry. Especially in the light of the recent (and much-publicized) Aurora-attacks, this conventional wisdom appears to ring truer than ever.

One thing though that I have personally always liked about the security industry was the positive attitude towards challenging conventional wisdom — re-examining the assumptions underlying this wisdom. In this post (and the upcoming sequel), I will do just that: I will examine the reasons why everyone is convinced that traditional byte signatures do not work and ask questions about the assumptions that lead us to this conclusion.

So. Why do we think that traditional antivirus signatures are a waste of time ?

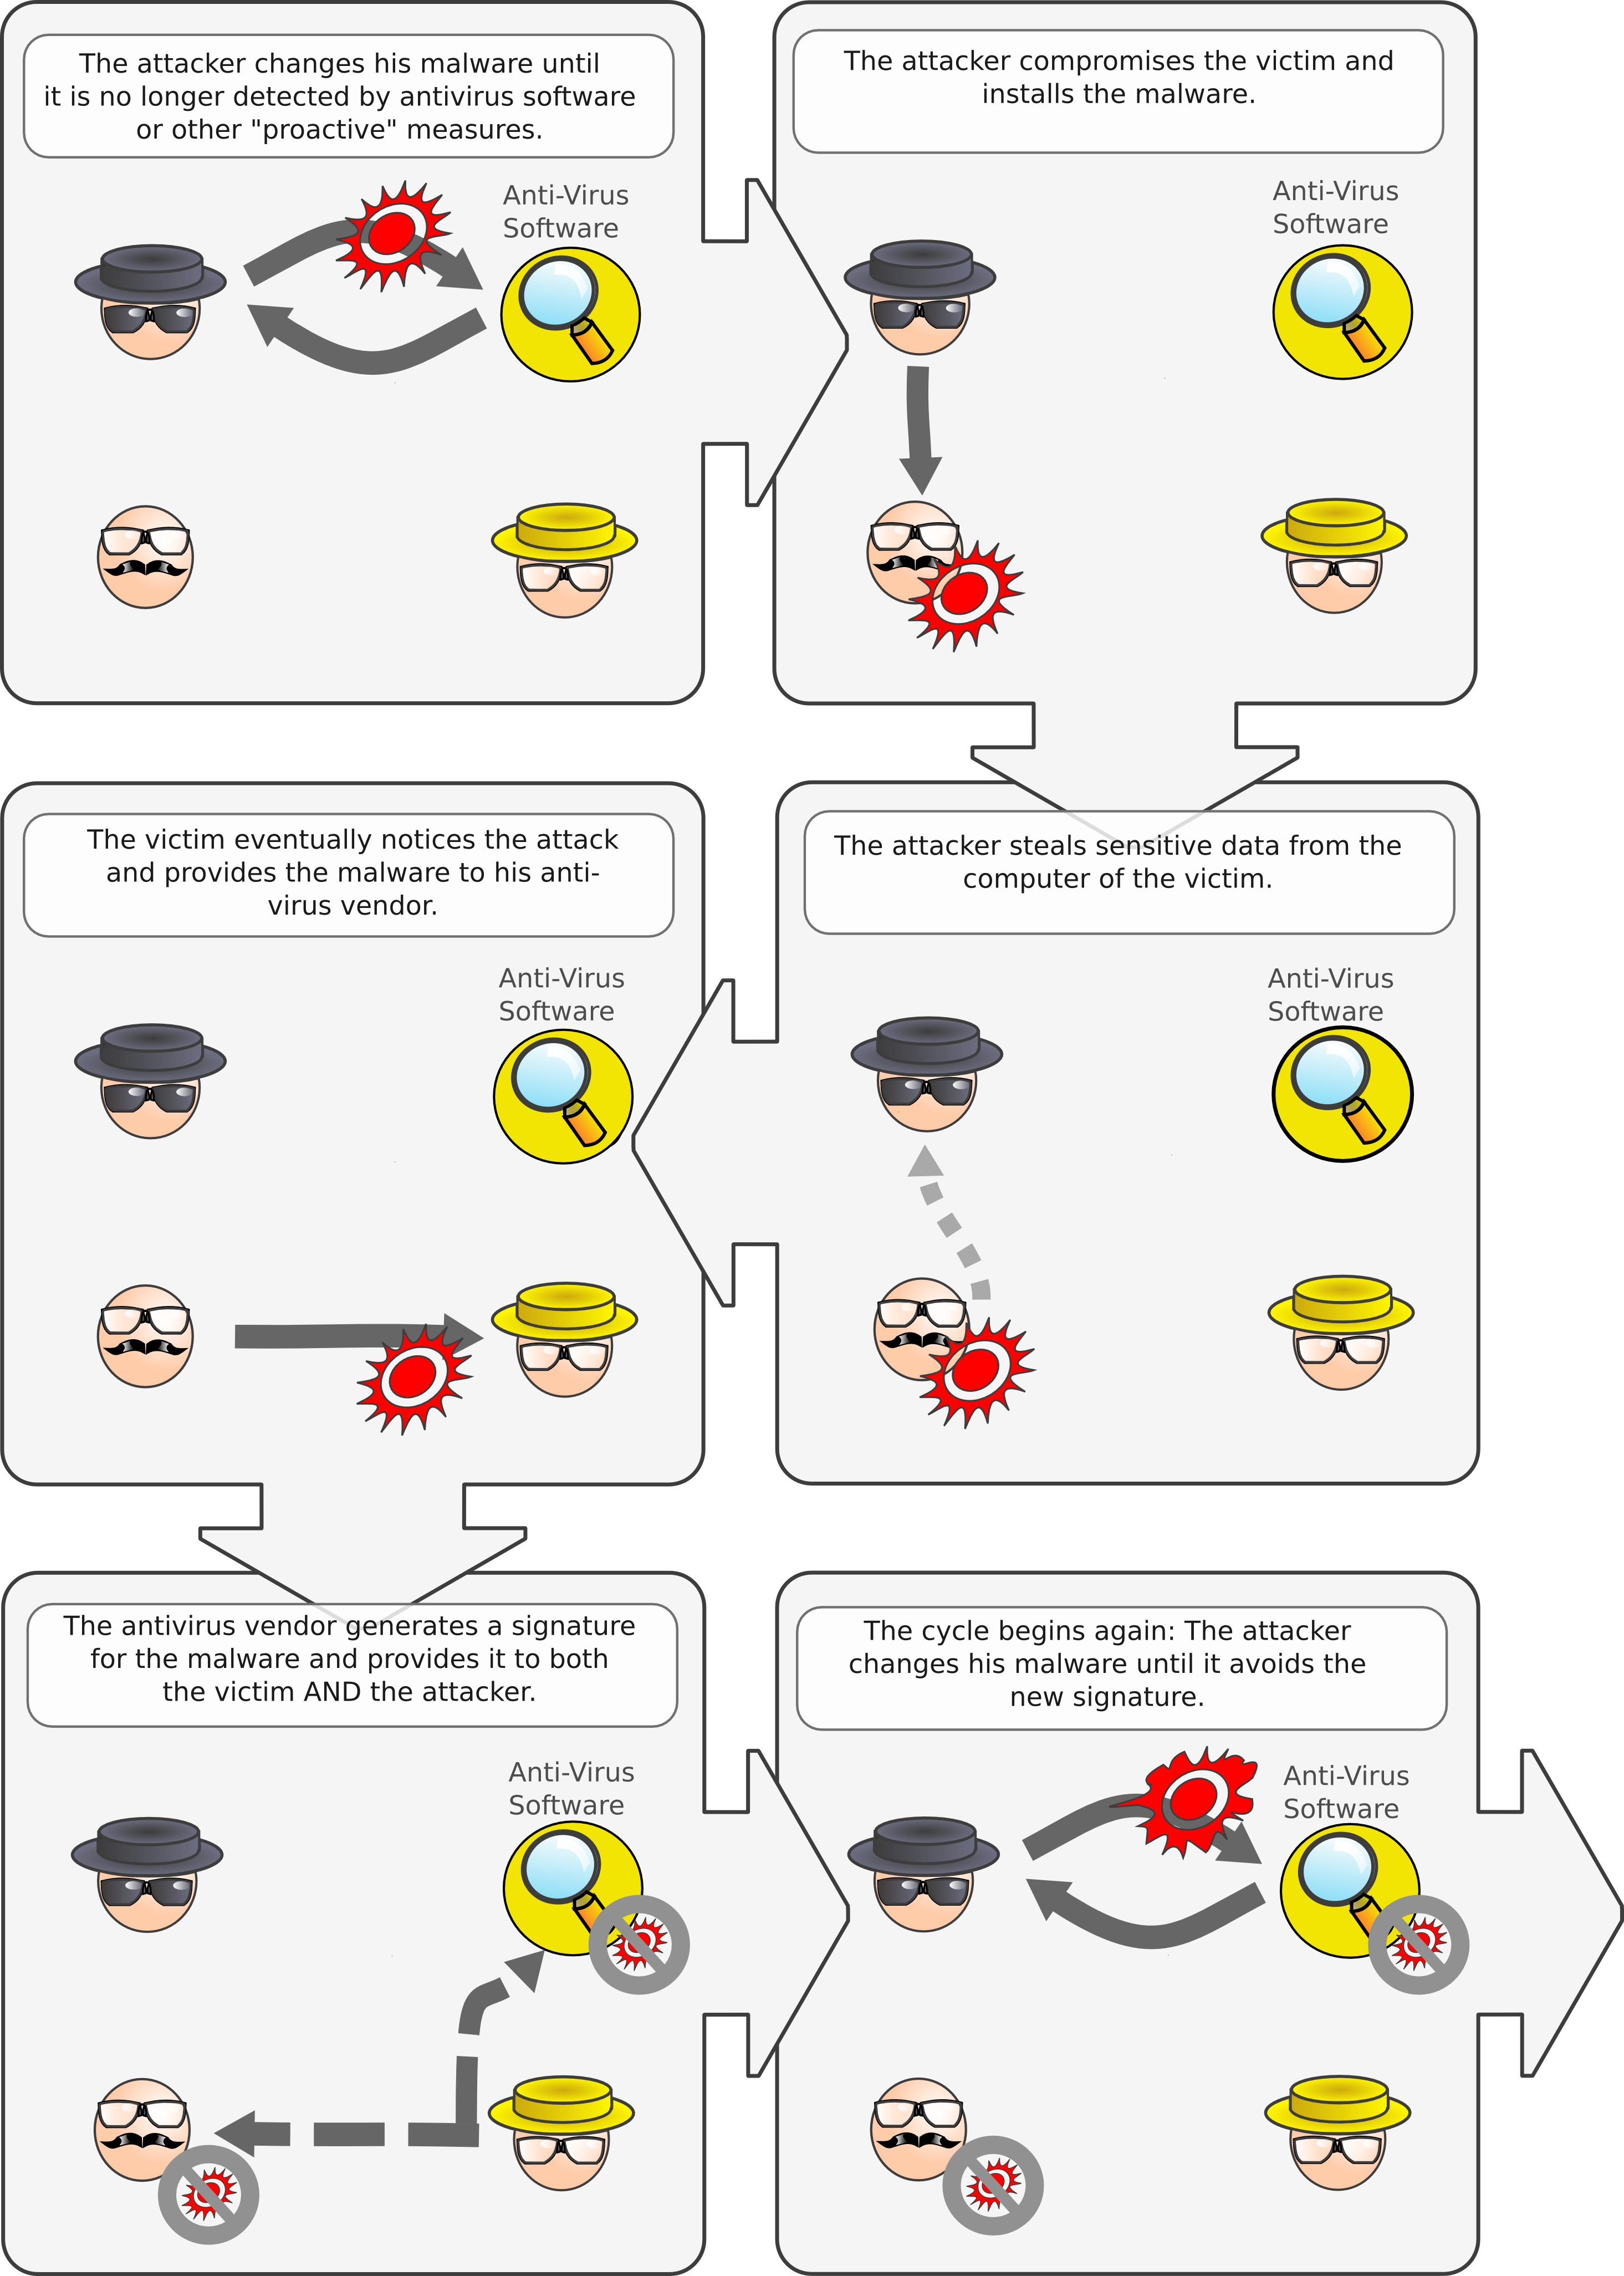
Let’s first recapitulate what the usual cycle in a targeted attack consists of:

  1. The attacker writes or obtains a backdoor component
  2. The attacker writes or obtains an exploit
  3. The attacker tests both exploit and backdoor against available AV tools, making sure that both are not detected
  4. The attacker compromises the victim and starts exfiltrating data
  5. The defender notices the attack, passes the backdoor to the AV company, and cleans up his network
  6. The AV company generates a signature and provides it to both the attacker and defender
  7. Goto (2)

This entire cycle can be clarified with a few pictures:

Let’s look at this diagram again. What properties of “byte signatures” does the attacker exploit in immunizing his software ? Well … none, really, except the fact that he fully knows about them before launching his attack. There is no information asymmetry: The attacker has almost the exact same information that the defender has. Through this, he is provided with a virtually limitless number of trial runs of his attack, and he can adapt his attack arbitrarily, over long time periods, until he is reasonably certain that it will be both successful and undetected.

The implication of this is that the underlying problem is not a feature of byte signatures, but rather a generic problem inherent in all security systems that provide identical data to both attackers and defenders and that have no information asymmetry at all.

In the next post, I will examine two approaches how this problem could be addressed to give the defender an advantage.

ShaREing is Caring – Announcing the free BinCrowd community server

March 25th, 2010

Hi everyone,

today at CanSecWest Thomas and I gave a talk where we announced the BinCrowd community server which zynamics makes available to the reverse engineering community for free. BinCrowd is a collaborative reverse engineering tool that can be used by reverse engineers to keep a repository of reverse engineered information and share this information with friends and colleagues.

The core technology behind BinCrowd is basically a huge database of function information which can be accessed using BinDiff-style algorithms. This allows you to efficiently store information about disassembled functions in a database and to use that database to compare functions from different binary files.

Imagine you are a reverse engineer hunting for new vulnerabilities. Here is what BinCrowd can do for you:

  • You can use BinCrowd to look up whether anybody else in the BinCrowd community has analyzed a particular file before. If the file is already in the database, you can download reverse engineering information like function descriptions or argument names from the database. Due to the fuzzy matching algorithms behind BinCrowd even different versions of the target file are considered.
  • BinCrowd tells you what static libraries are used by the file. If BinCrowd determines that your file is linked against an open-source library you can start reading the original source code instead of the disassembled code.
  • BinCrowd tells you what version of a library is used. If BinCrowd tells you that a vulnerable version of zlib is used in your file, you can go down that path during your audit.
  • You can reverse the lookup process too. If you have a vulnerable function you can ask BinCrowd in what other files this function is used. This will potentially give you many more vulnerable programs without any effort.

Or maybe you are a malware analysis specialist. Your workflow probably differs from that of a vulnerability researcher. Nevertheless, BinCrowd is very useful for you too.

  • You can use BinCrowd as a repository of malware information. If you have identified and documented a certain rootkit hiding technology you can import information from your earlier analysis to new pieces of malware that use the same code.
  • You can use BinCrowd to share information with colleagues from your malware analysis team and even with people from outside your team.
  • If you are working on a team where information flow is restricted by clearance levels you can use BinCrowd as a central information repository. BinCrowd access roles will take care that people with a lower clearance can not download information entered into the system by people with a higher clearance.

There are potentially many more uses for BinCrowd since we are only at the beginning of a long road of creating a repository for reverse engineered information. If you are interested on joining us on that road you can sign up to the community server for free at http://bincrowd.zynamics.com.

To use BinCrowd you only need

Happy shaREing and caring!

Finally, here are the slides Thomas and I used for our talk.

[slideshare id=3856188&doc=shareingiscaring-100325164546-phpapp01-100426045802-phpapp01]

Ralf-Philipp Weinmann & Vincenzo Iozzo own the iPhone at PWN2OWN

March 24th, 2010

Hey all,

this is just a quick announcement that Ralf-Philipp Weinmann (a postdoctoral researcher at the University of Luxembourg) and Vincenzo Iozzo (a researcher at zynamics :-)) owned the iPhone at PWN2OWN today.

A bug in Safari was exploited that extracted the SMS database from the phone and uploaded it to a server.

Vincenzo will write more about the payload construction process once the dust settles — fittingly, the payload used chained return-into-libc (“return oriented programming”) on ARM to execute in spite of code signing. As far as we know, this is the first public demonstration of chainged return-into-libc on thre ARM platform.
I am happy and proud to be able to work with great people (Ralf happens to be a BinNavi/BinDiff user, and Vincenzo is “our youngest” employee).  Now we’ll celebrate for a bit and then prepare tomorrow’s talk.

Here’s a press release and ZDI’s blog post about pwn2own.

Cheers,

Halvar

A gentle introduction to return-oriented programming

March 12th, 2010

Hi,

As I have promised in my last post I will start a series about return-oriented programming. I start with a short introduction about the topic. The introduction covers the origin of return-oriented programming, describes what return-oriented programming is and ends with a definition of return-oriented programming which I will use in the future posts. I will also take some of the recent discussions on Twitter into account which showed that even though I thought I did my history research pretty well, there were still some mailing list post missing from my time-line.

Why do we need return-oriented programming ?

Return-oriented programming is a technique which allows an attacker to execute code in the presence of the following defensive measures.

  • Non executable memory segments
  • Code signing

Where does return-oriented programming come from ?

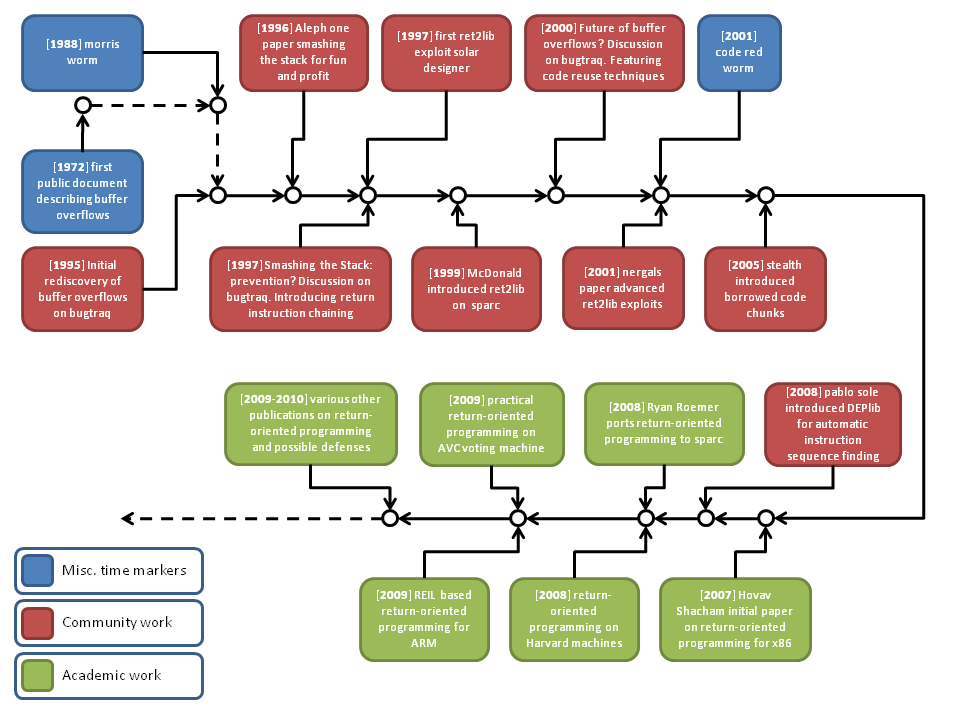
Return-oriented programming is a recently coined term which describes a technique that has been developed in an iterative process in the security community. The terminology return-oriented programming is used for a subset of techniques which can be referred to as code reuse techniques. To understand where return-oriented programming comes from I show some of the milestones of the techniques history.

Buffer overflows were first publicly documented in the Computer Security Technology Planning Study in 1972 (Appendix 1. Incomplete Parameter Checking). To put this in perspective one must remember that even though we now know that this document was published at the time only a small circle of individuals had access to the document then.

A buffer overflow is, in the original form, a very simple error that is introduced if a function does not perform proper bounds checking for the accessed memory. Basically this means the function receives more input data than it can store. Assuming that the overflowed buffer was located on the stack, the attacker can now write a certain amount of data onto the stack where other variables and the return address might be located. Therefore the attacker can hijack the control flow of the current process and perform an arbitrary computation.

The first major attack which used a buffer overflow as the targeted vulnerability was the Morris worm in 1988. But it was not until the late 90s that major operating systems started to have any protection against buffer overflows. For Microsoft operating systems a form of protection against buffer overflows was only added after the Code-Red and Slammer worms had changed their security mindset in 2004.

One of the defensive measures which have been developed to defend against buffer overflows is the option to mark data memory segments as non-executable. This lead to the next evolutionary step towards return-oriented programming.

Return-into-library technique

The return-into-library technique is the root on which all return-oriented exploit approaches are based.

A return-into-library exploit works as follows: After the attacker has hijacked the control flow, a library function he chooses is executed. The attacker has made sure that the stack pointer points into a memory segment he controls. The attacker has set up the data in the memory segment in a way that it provides the right arguments to the library function of his choice. Through this he can execute a function with the needed arguments.

The technique of return-into-library exploits was initially presented publicly by Solar Designer in his 1997 posting to the Bugtraq mailing list. In this mail the groundwork for return-into-library exploiting was presented. The next milestone in the development of the technique was the Phrack article by Nergal which summarized the known techniques and broadened the attack vector by introducing esp shifting which allowed unlimited chaining of function calls to be used within return-into-library exploitation.

Borrowed code chunks technique

With the introduction of hardware-supported non-executable memory segments in combination with the support of 64 Bit CPUs the game changed again and traditional return-into-library exploits ceased to work. This was due to an ABI change which now required that the arguments to a function must be passed in registers rather than on the stack. Stealth developed a new approach that uses chunks of library functions instead of the call to the function itself to still be able to exploit buffer overflows on machines that employed the newly introduced defense. The approach is designed around the idea to locate instruction sequences which pop values from the stack into the right registers for function calls. By using his approach an attacker can use return-into-library exploits with the new ABI. A library which uses this technique in an automated fashion is DEPLib which has been developed by Pablo Sole. This library completely automates the return-oriented approach for Windows operating systems but it lacks support for loops and conditional branches (which is from a practical point of view negligible).

Return-oriented programming

The return-oriented programming technique broadens the attack vector even further by introducing loops and conditional branches for the return-oriented approach. The first academic work published in the field of return-oriented programming is Hovav Shacham’s ”The Geometry of Innocent Flesh on the Bone: Return-into-libc without function Calls (on the x86)” It describes the two major points which get addressed by return-oriented programming in contrast to the rest of the return-into-library techniques.

  • The return-into-library technique has no support for loops and conditional branching.
  • The removal of functions from libraries does not provide any security against return-oriented programming.

For the x86 the approach he uses to find suitable instruction sequences is based on the fact that the x86 uses a variable length instruction set. Therefore it is possible to search for single binary opcodes which alter control flow such as the return instruction (0xC3) and disassemble the binary from this position backwards. Because x86 uses a variable length instruction set the bytes before the return instruction can provide many possible instruction sequences. Shacham also defined the term gadget which describes one useful instruction sequence which performs one useful operation such as addition.

One assumption which Shacham made is that he thought a fixed length instruction set would make the application of return-oriented programming unfeasible. This was shown not to be the case by Ryan Roemers work which targeted the SPARC architecture which can be seen as the anti-thesis to the x86 architecture. One change which he needed to incorporate into his gadget set was that only memory could be used to pass information between gadgets. This is due to the way SPARC passes information in registers by shifting the register window.

The most practical work which has been published in the field of return-oriented programming is the recent work which targeted the AVC Advantage voting system. This work has provided proof that return-oriented programming is a valid tool for the offensive security researcher as no other technique would have been as useful against the Harvard-type architecture upon which the AVC Advantage is build.

What did we learn ?

Return-oriented programming is a recently coined term but the underlying technology has a long history which is based on the work of many security researchers. We have started with its roots in return-into-library attacks and showed how it evolved until today.

In the next post on return-oriented programming I will explain the first steps of my approach to make return-oriented programming platform independently.

Tim

The REIL language – Part I

March 7th, 2010

If you have followed the development of BinNavi over the last two years you might know that we are making heavy use of something called REIL to provide features backed by advanced static code analysis. REIL is short for Reverse Engineering Intermediate Language and at its core it is a platform-independent pseudo-assembly language that can be used to emulate native assembly code.

A few years ago, Thomas spent some time thinking about making reverse engineering tools scale (check out the slides of his Black Hat Windows 2004 talk to learn more). Software today is larger and more complex than it was in the past and there are many more interesting platforms to consider as a security researcher (just think of Mac OS, iPhone, Android, Blackberry, Cisco routers, wireless devices, …). Platform-independent automation of common reverse engineering tasks seemed like the way to go. If you manage to develop powerful tools that help you find interesting parts of binary files without manual intervention you can fight growing complexity and reduce its associated costs. We created REIL as one of the key technologies for our path towards this goal.

We designed REIL with one thing in mind: Create a language that can model the effects of real assembly code but – unlike real assembly code – is very easy to analyze programmatically. To achieve this we carefully designed a minimal instruction set of just 17 different instructions and we made sure that the structure of the instruction operands is regular and comprehensible. We also made sure that all REIL instructions have exactly one obvious purpose because we wanted to avoid side effects like setting flags or implicitly accessing memory. Furthermore we have designed a very simple virtual machine (REIL VM) for REIL code to define the semantic behaviour of REIL code.

In the next few posts I will show you what the instruction set of REIL looks like, how the semantic model behind REIL interpretation works, how to use REIL in BinNavi and what the future of REIL will look like.

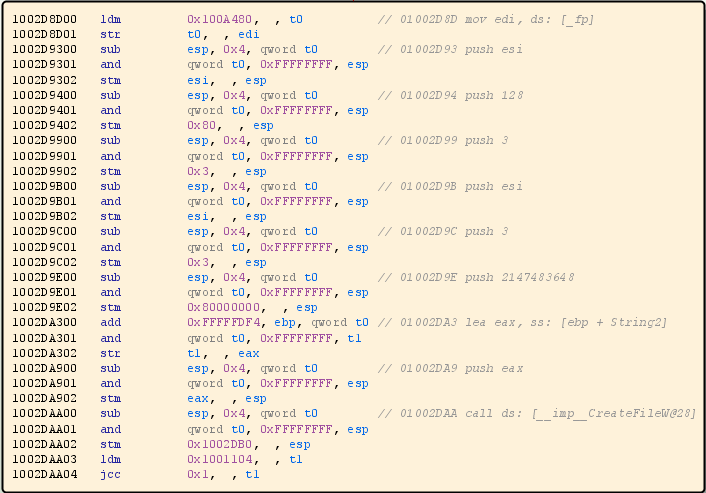
For now I am going to finish this post with a screenshot that shows some REIL code in BinNavi (click to enlarge). Notice the MIPS-like regularity and simplicity of the instructions. The original x86 instructions that were the source of the REIL code are shown as gray line comments.

A basic block of REIL code

If you already want to learn more about REIL you can check out the BinNavi manual. Here you can find everything that is necessary to understand the REIL language and its use in BinNavi.

BinNavi 3.0 Feature Preview

March 1st, 2010

Hi everyone,

this week we launched the first beta of BinNavi 3.0 to select customers. We are planning to have a beta phase of 8 weeks with the final release of BinNavi 3.0 coming May 1st 2010.

Existing customers who want to get their hands on the beta version please send an email to support@zynamics.com.

In BinNavi 3.0 we have added many valuable features that once again make it faster and easier for you to complete your reverse engineering jobs. You can find the complete list of new features in the manual on our website. It’s quite lengthy so I only want to talk about the Top 10 new features in this post.

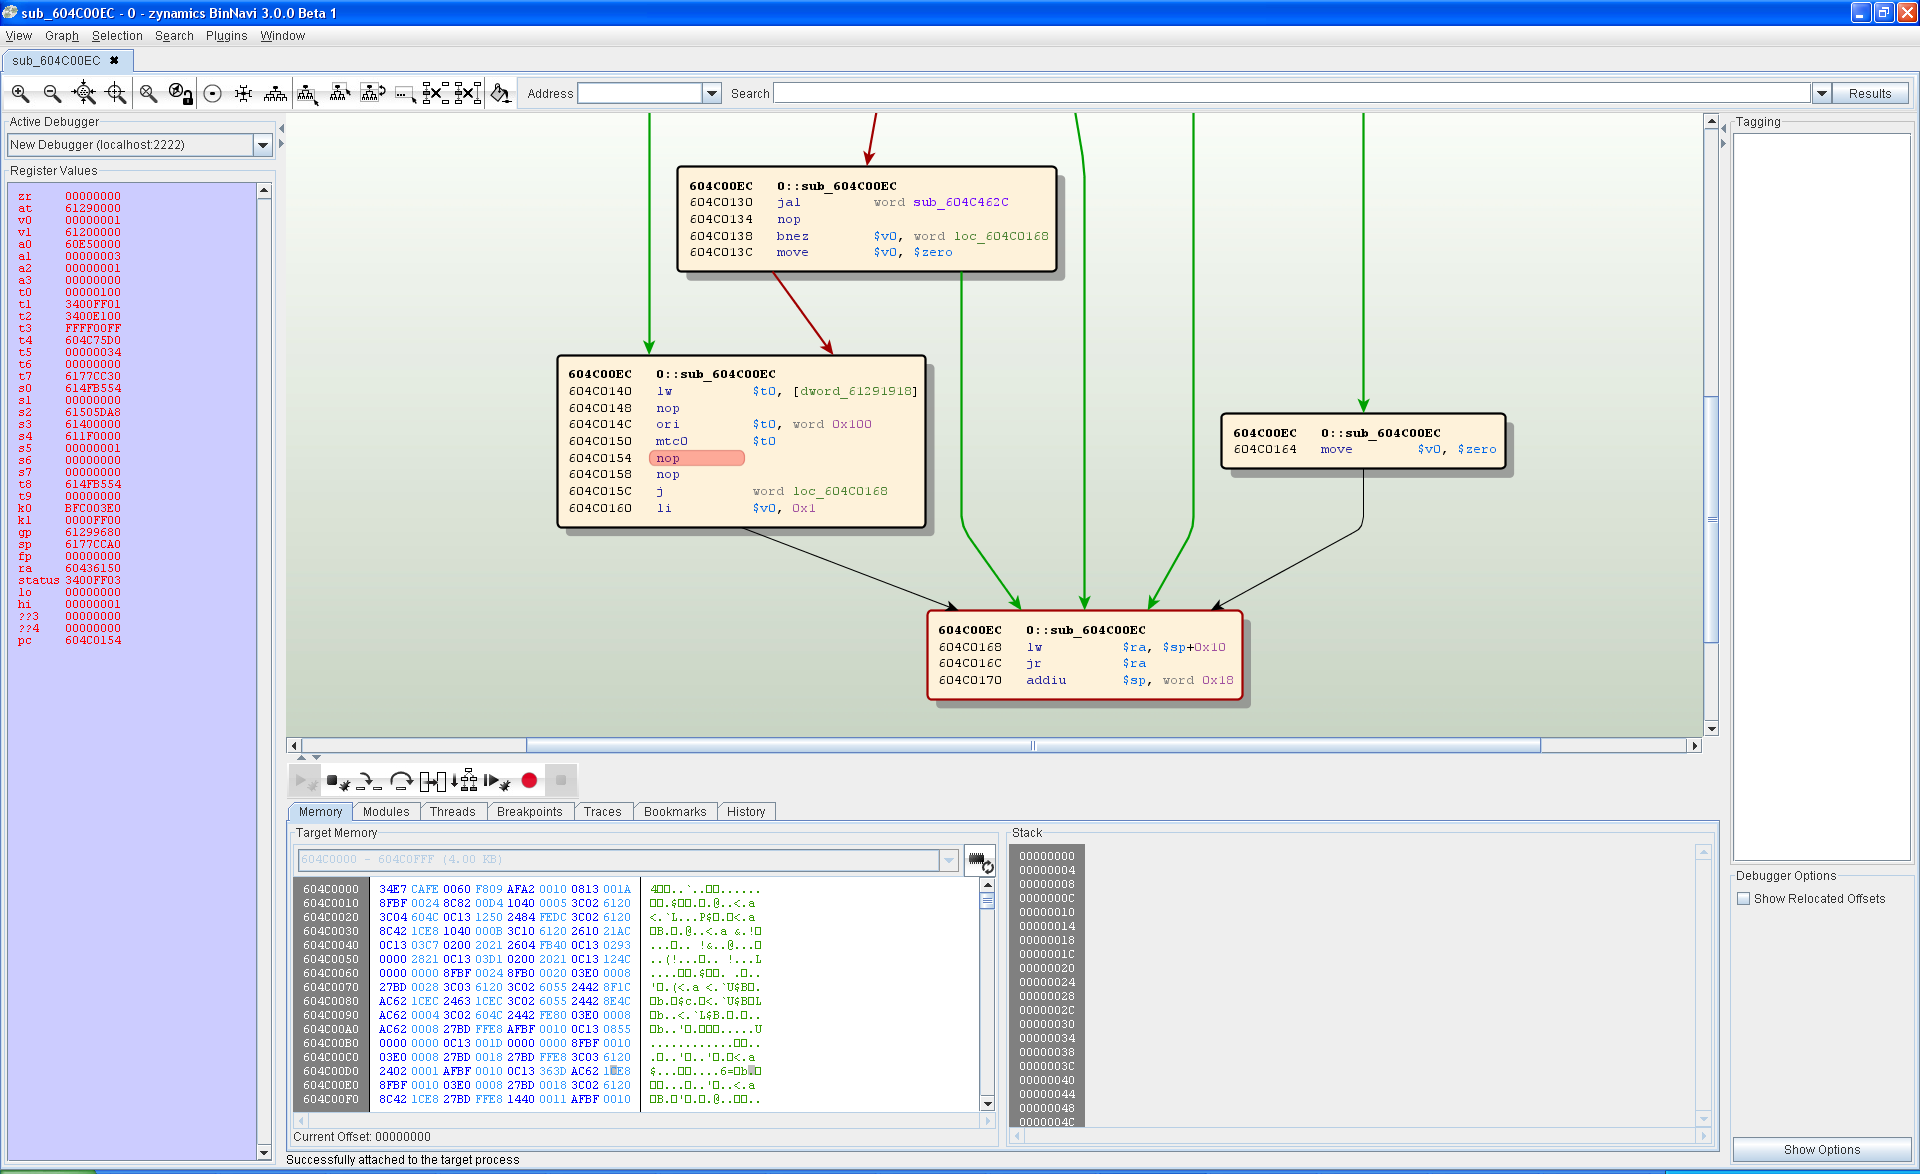
Analyze code of MIPS-based devices

In previous versions of BinNavi it was possible to analyze x86 code, ARM code, and PowerPC code. In BinNavi 3.0 we have added support for MIPS code because MIPS was by far the platform we received most requests for.

Of course we have also added MIPS support to our static code analysis language REIL so your platform-independent analysis algorithms work on MIPS code too.

If you are a customer of our GDB Agent add-on, you can also debug MIPS-based Cisco routers like those of the 3600 family now.

Reverse Engineering MIPS code with BinNavi

Rename local and global variables to understand code

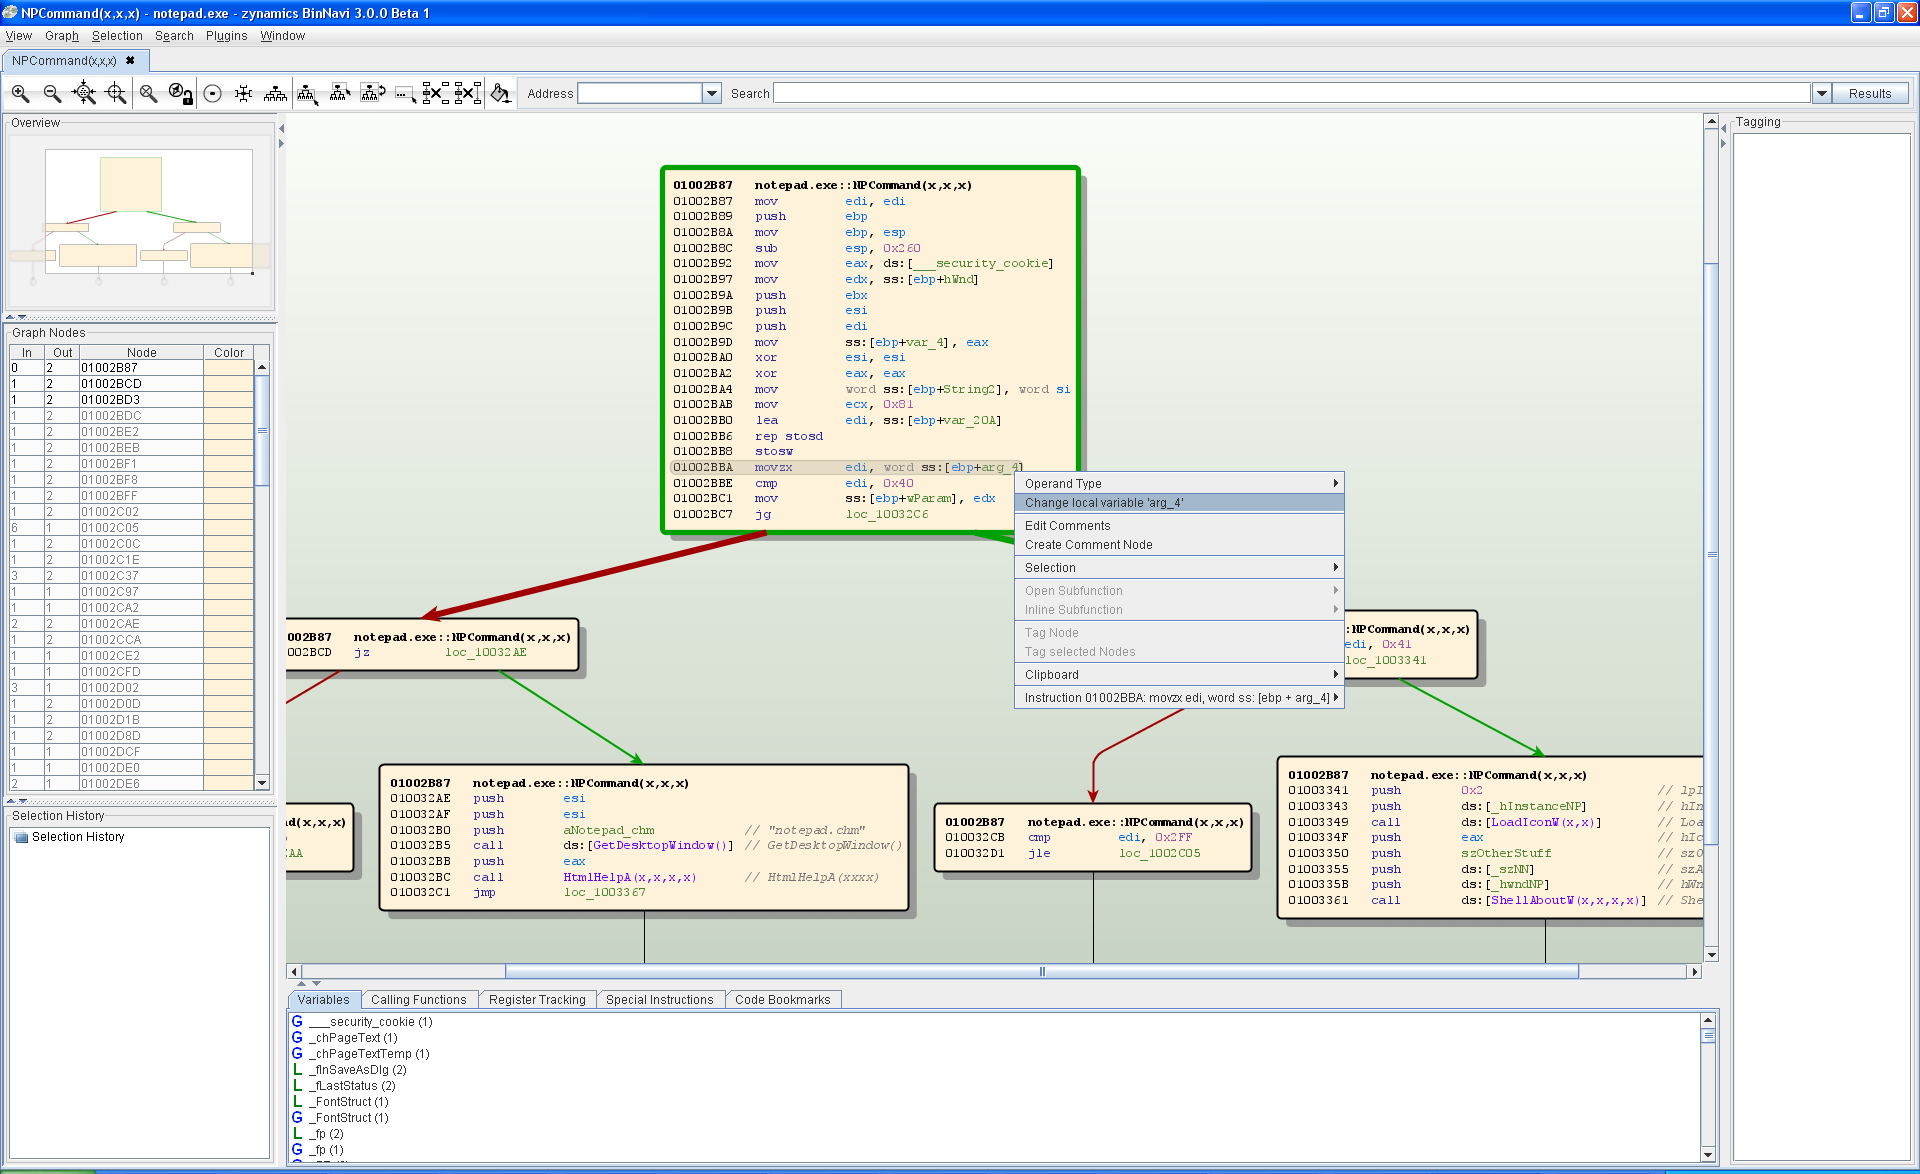
For the longest time BinNavi has had support for fancy stuff like abstract interpretation but not for basic stuff like variable renaming. In BinNavi 3.0 you can now rename local and global variables. This helps you understand code better than with previous versions of BinNavi.

Renaming variables with BinNavi

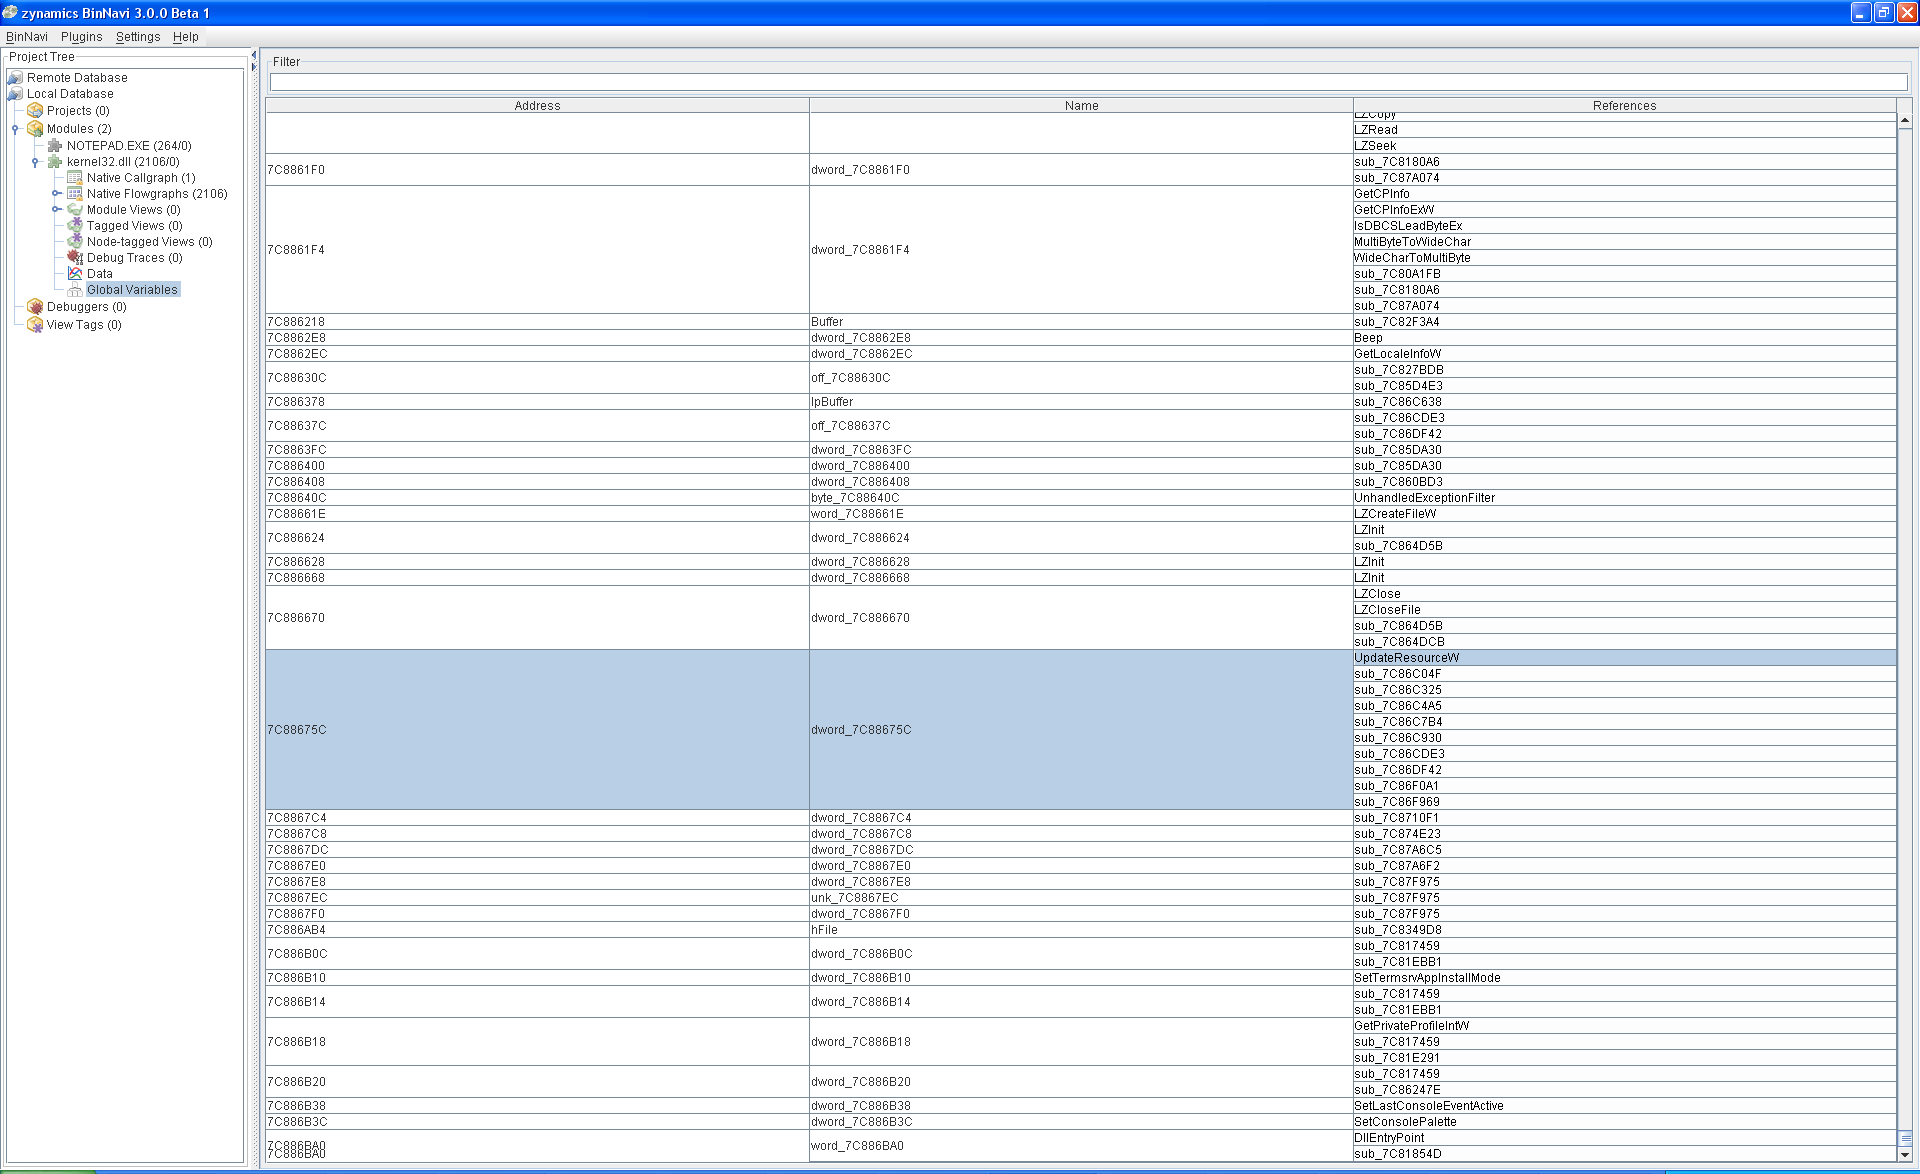
Find out where global variables are used

While improving support for variables we have also added a new view where you can see all global variables of a module and the functions that access them. This is very useful for tracking inter-function side-effects stored in global variables.

Cross-references to global variables

Quickly get back to your favourite projects, modules, and views

The ability to mark projects, modules, and views (like functions) as favorites is a really simple feature which turned out to be incredibly helpful in practice. With just two clicks you can now “star” items you consider important. Starred items have a small star next to their names and they always show up on top of tables. This makes it very simple to find functions again which you previously considered interesting.

Favorite functions are shown on top of the list

Use a faster disassembly data exporter to get started

Before BinNavi 3.0 we used a Python-based exporter to import disassembly from IDA Pro into our BinNavi MySQL databases. This exporter was really slow and required a lot of additional software packages to be installed. In BinNavi 3.0 we have switched to a C++-based exporter which is blazingly fast (we managed to export more than 80,000 functions per hour here) and does not require any additional installs. Once you realize that your exports now go more than twice as fast as they used to you will love this exporter.

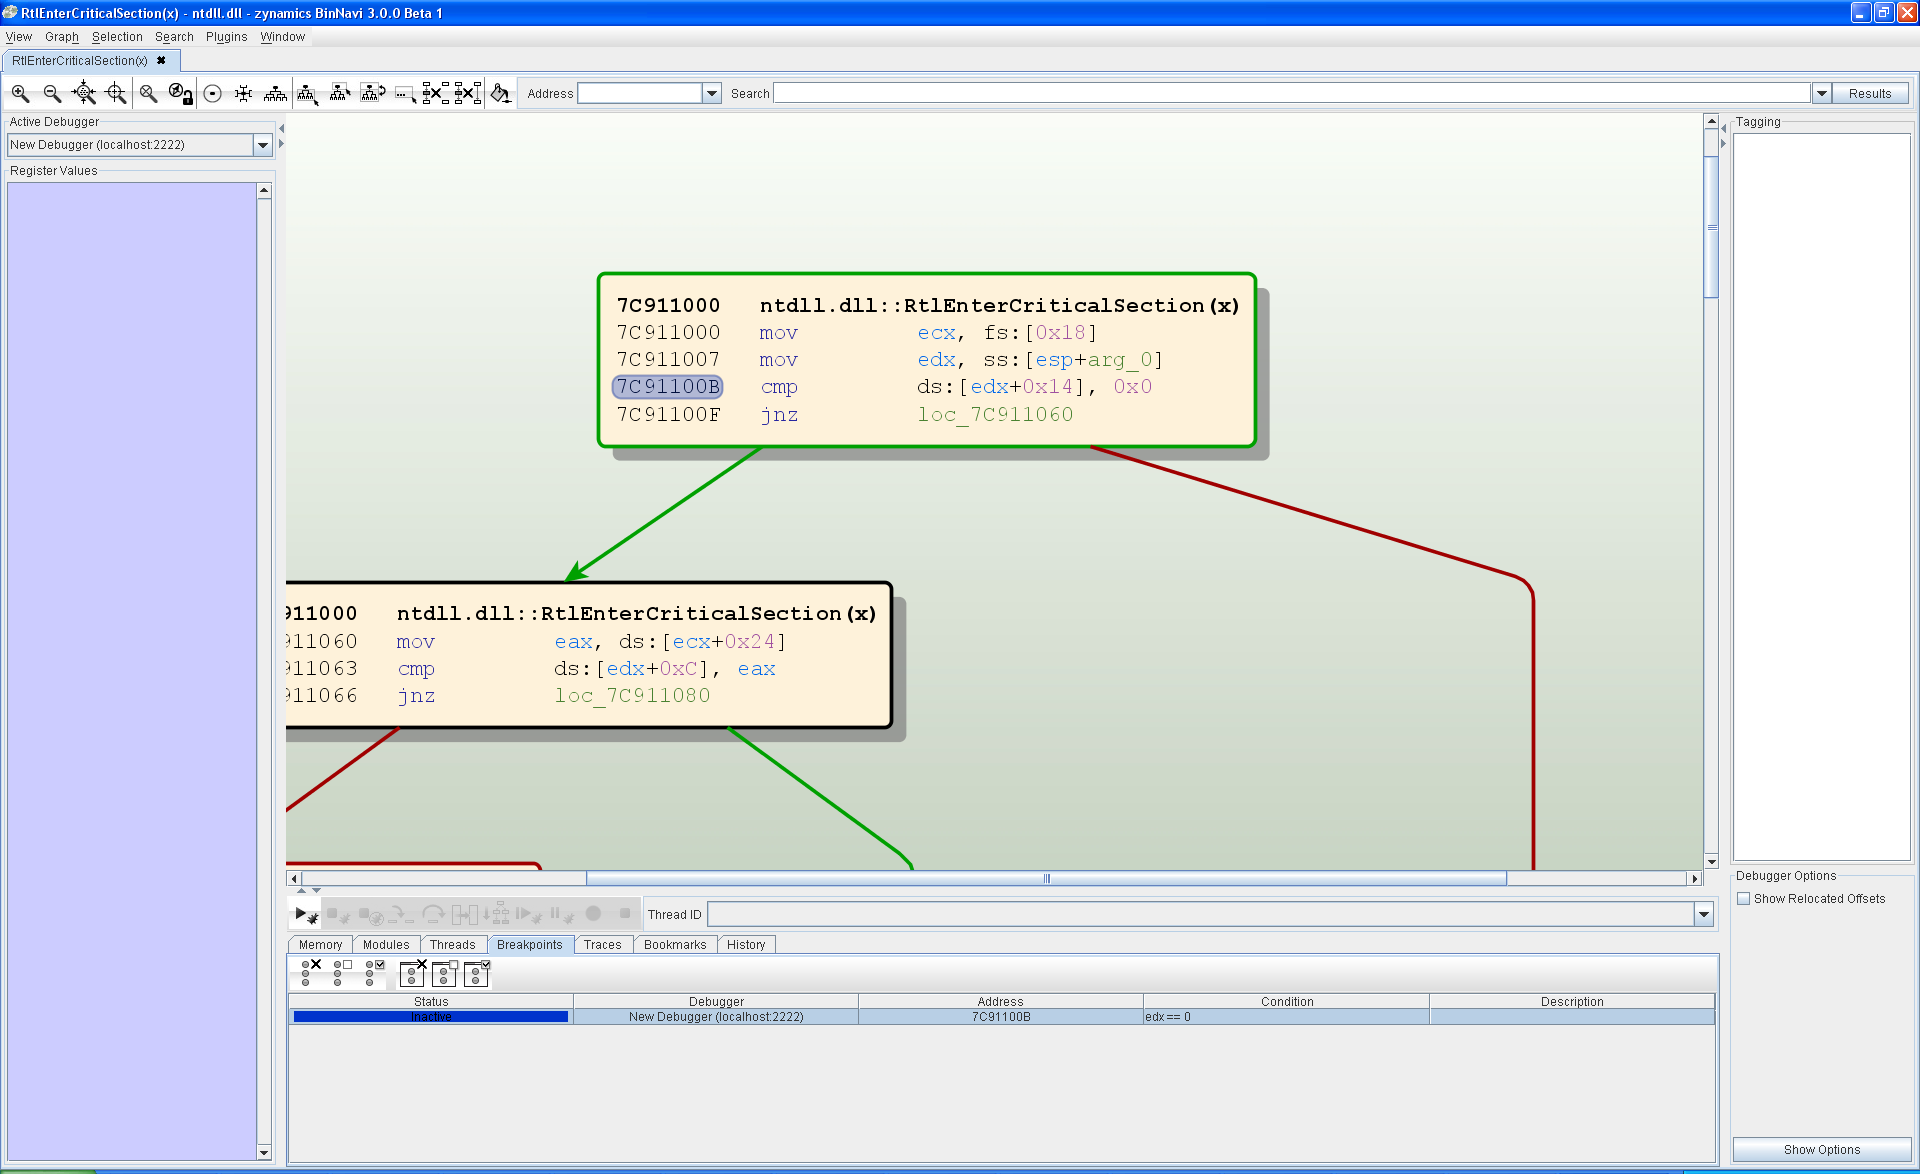
Set conditional breakpoints to make debugging more efficient

Another really useful feature, conditional breakpoints were added to BinNavi 3.0 to allow you to enable or disable breakpoints depending on the current program state.

Breakpoint conditions can include checks for register, flags, and memory values as well as for thread IDs.

Configuring conditional breakpoints

Edit the target process memory to test small patches

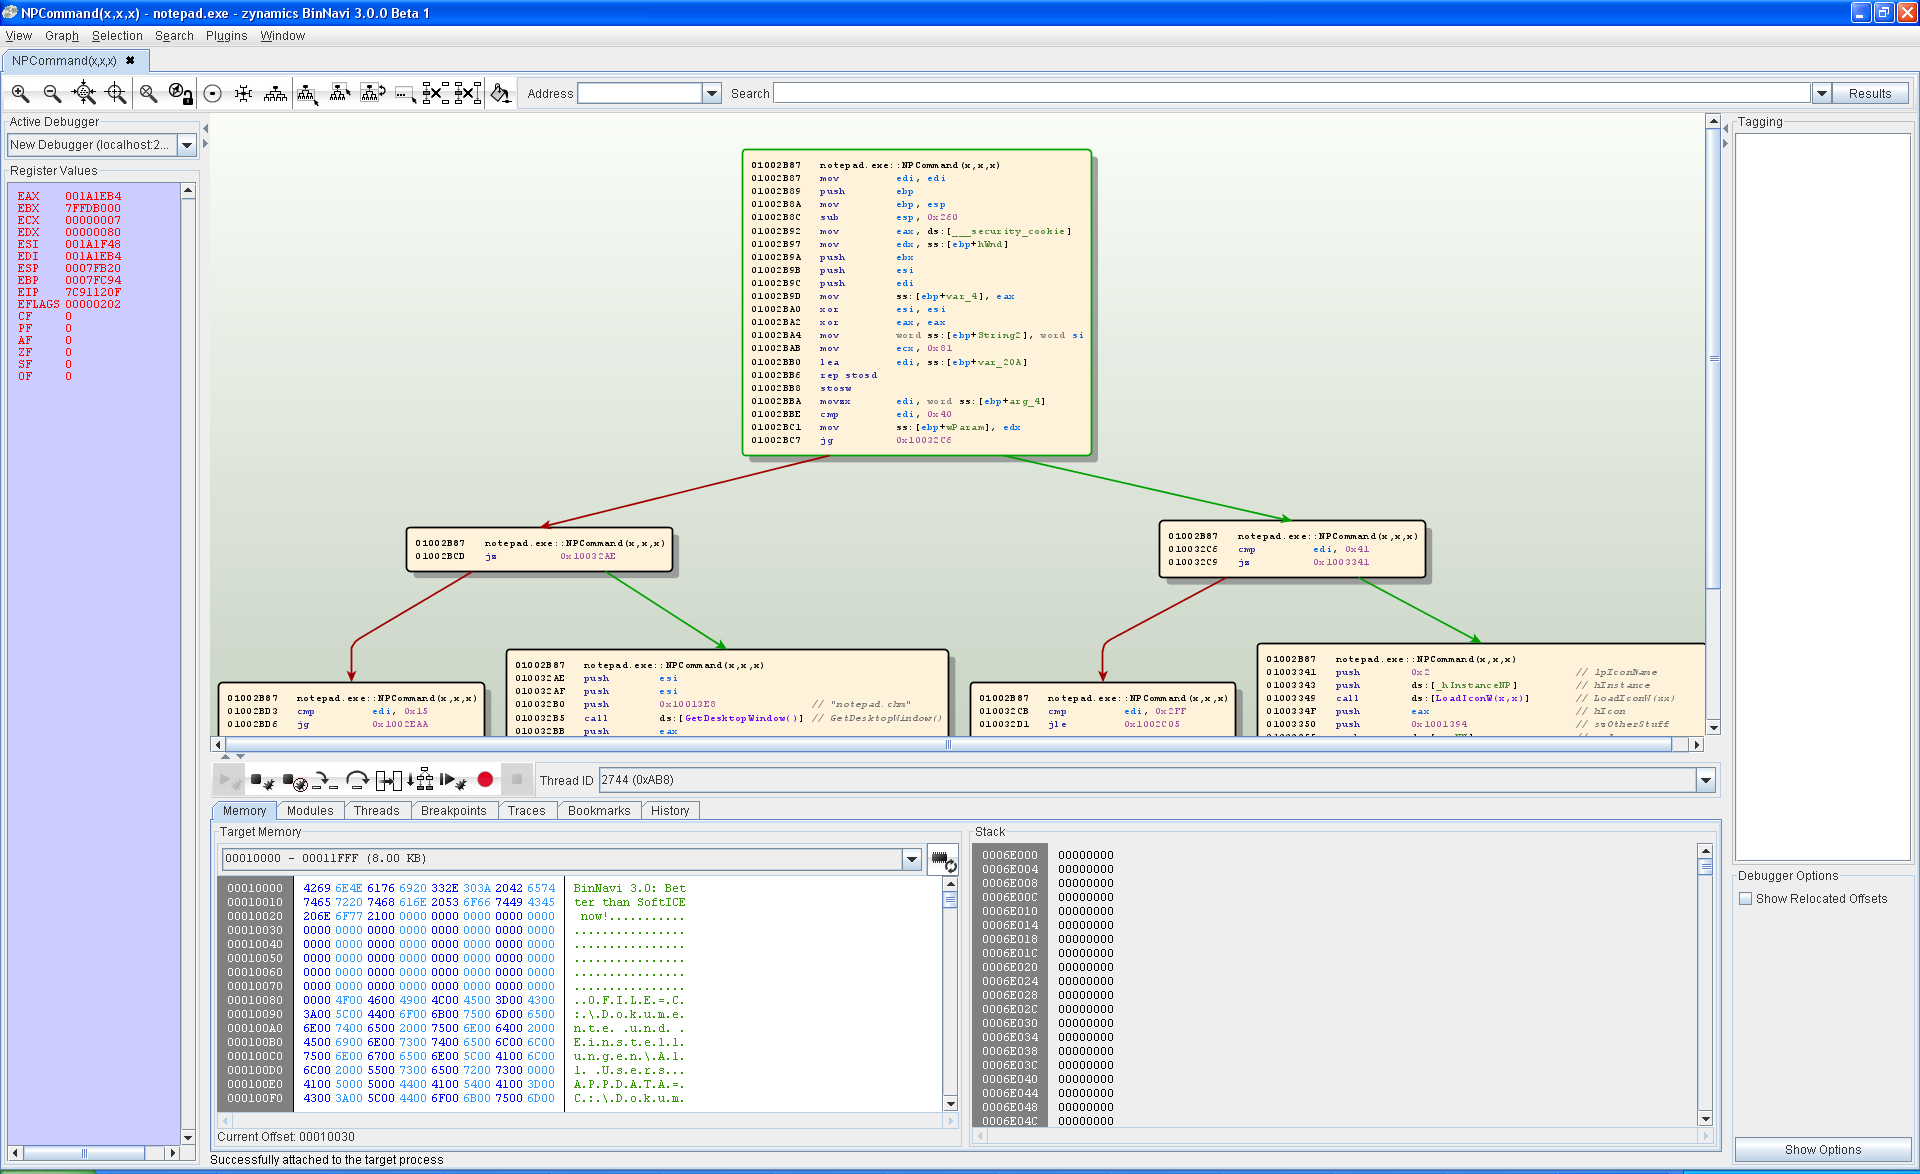
Editing the memory of the target process was previously not possible in BinNavi. In BinNavi 3.0 you can edit the memory of whatever process you are debugging using either the GUI or the plugin API.

Editing target process memory

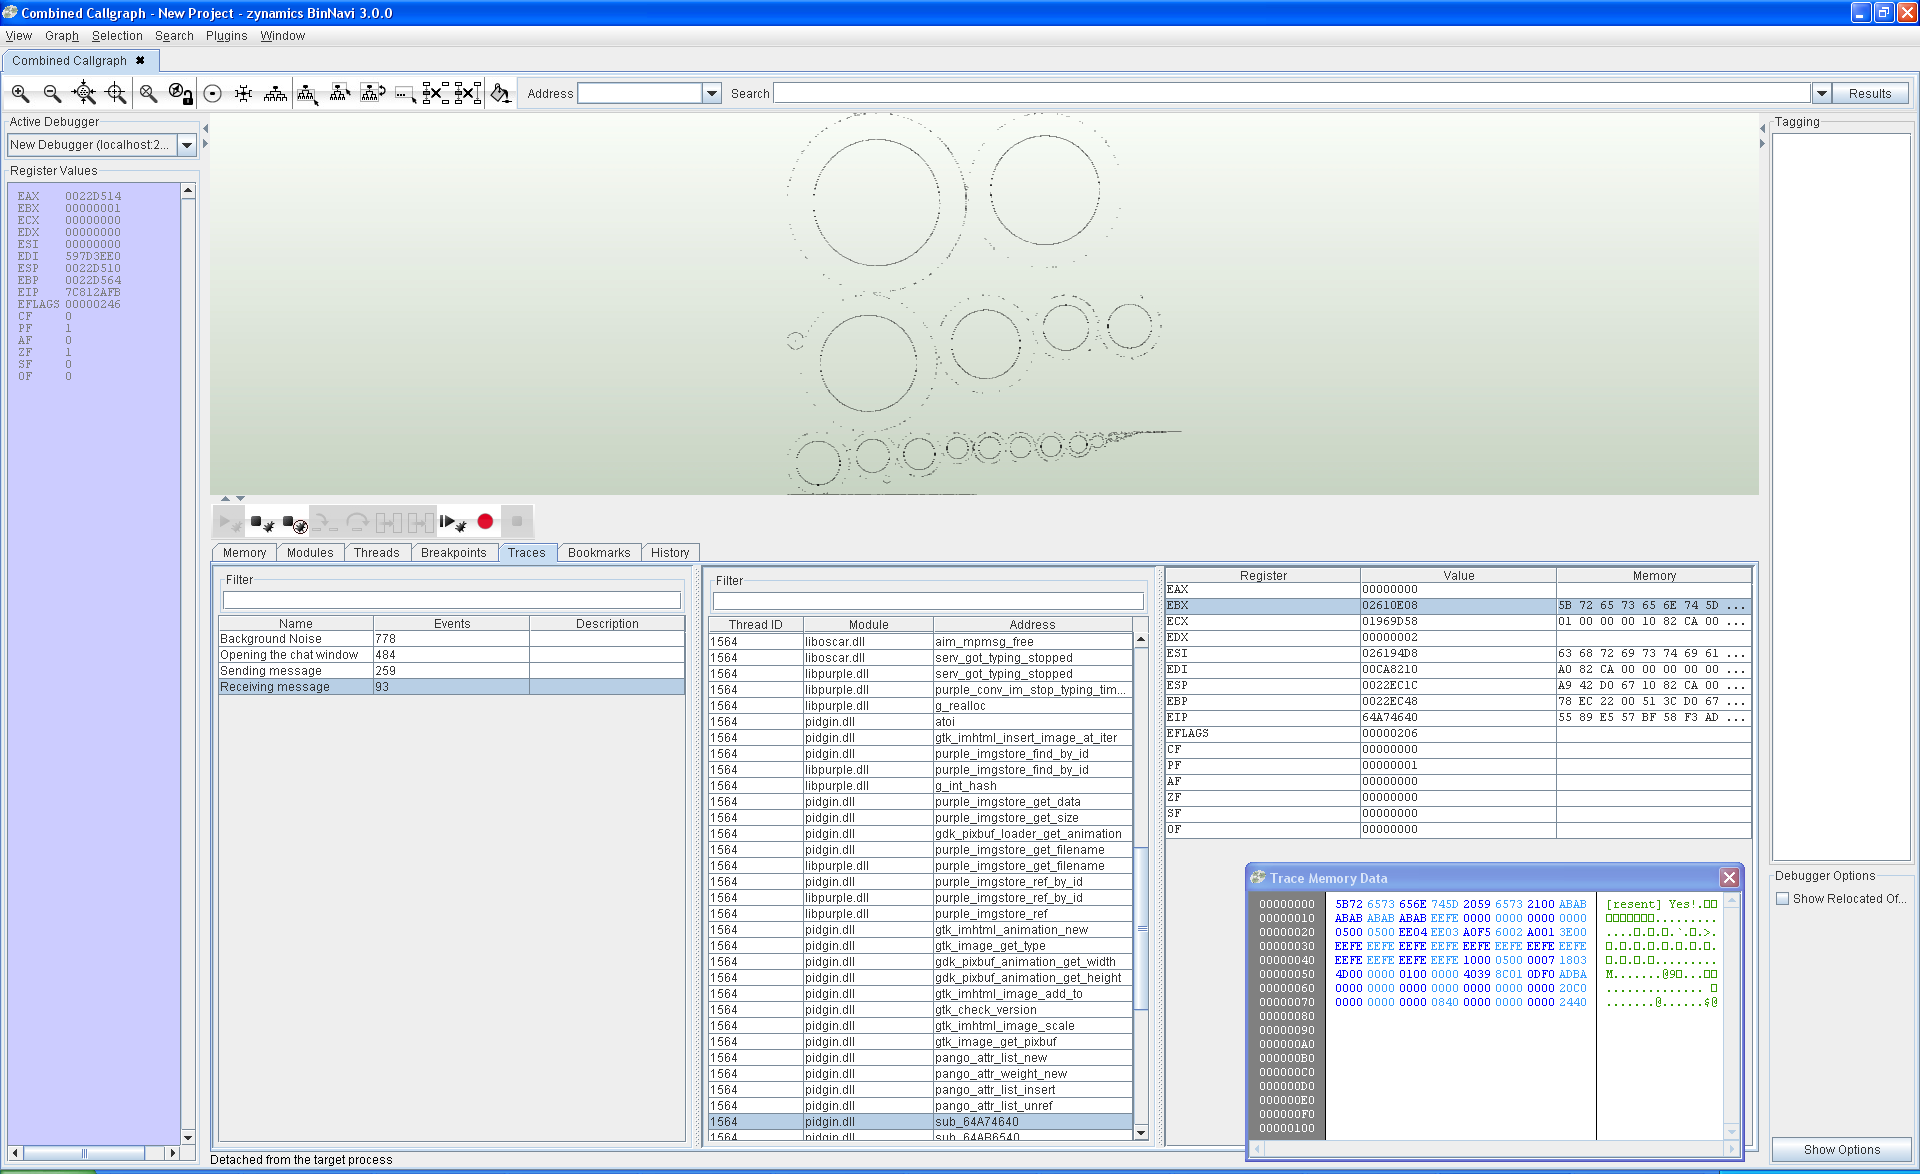
Isolate code quickly using the improved trace mode

I have already written two posts on this blog dedicated to this new feature (see here and here). In essence, we have found a great way to help you find relevant code while debugging.

Improved differential debugging

Quickly see where variables are used

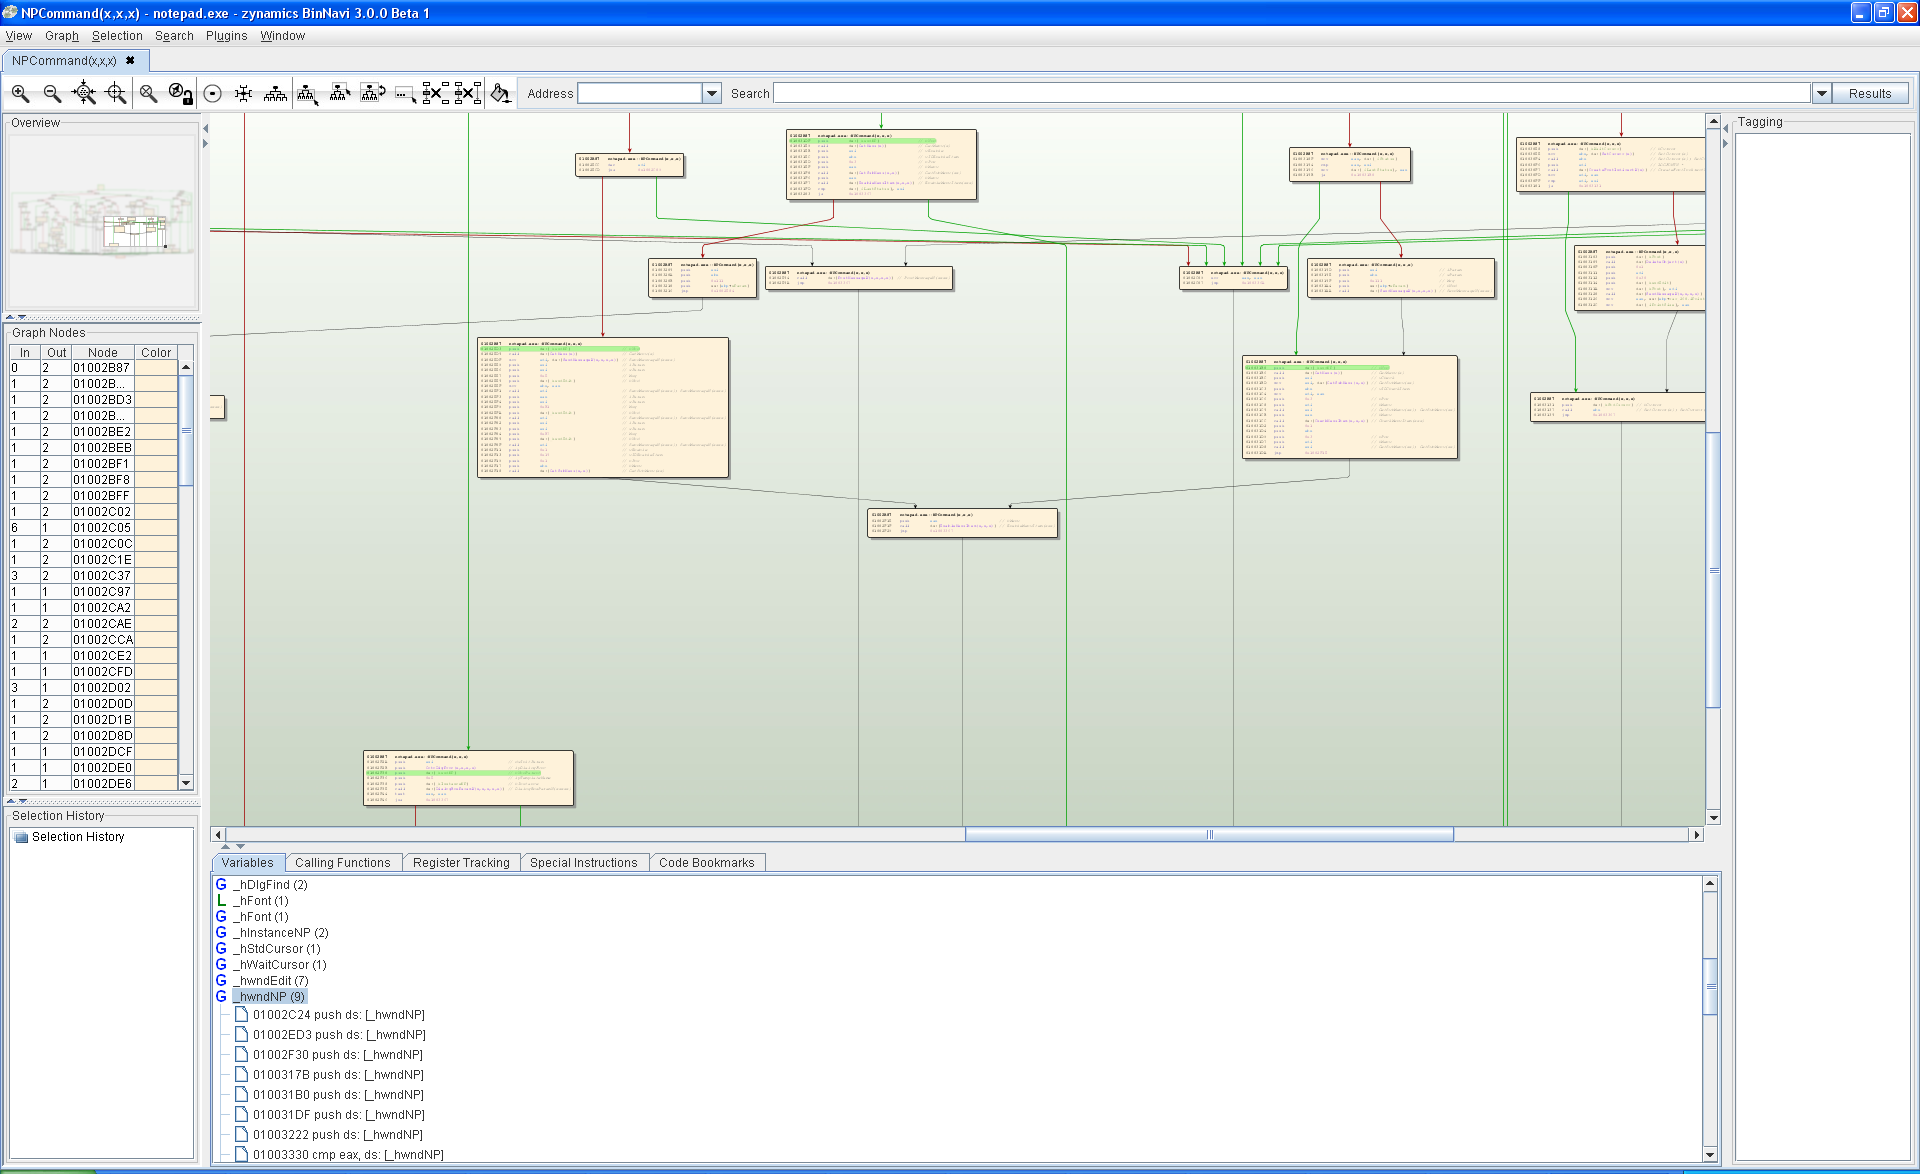
You can now highlight instructions that use a given variable. This helps you quickly see where variables are used in a function.

Highlighting all instructions that access the _hwndNP variable

Quickly recognize special instructions

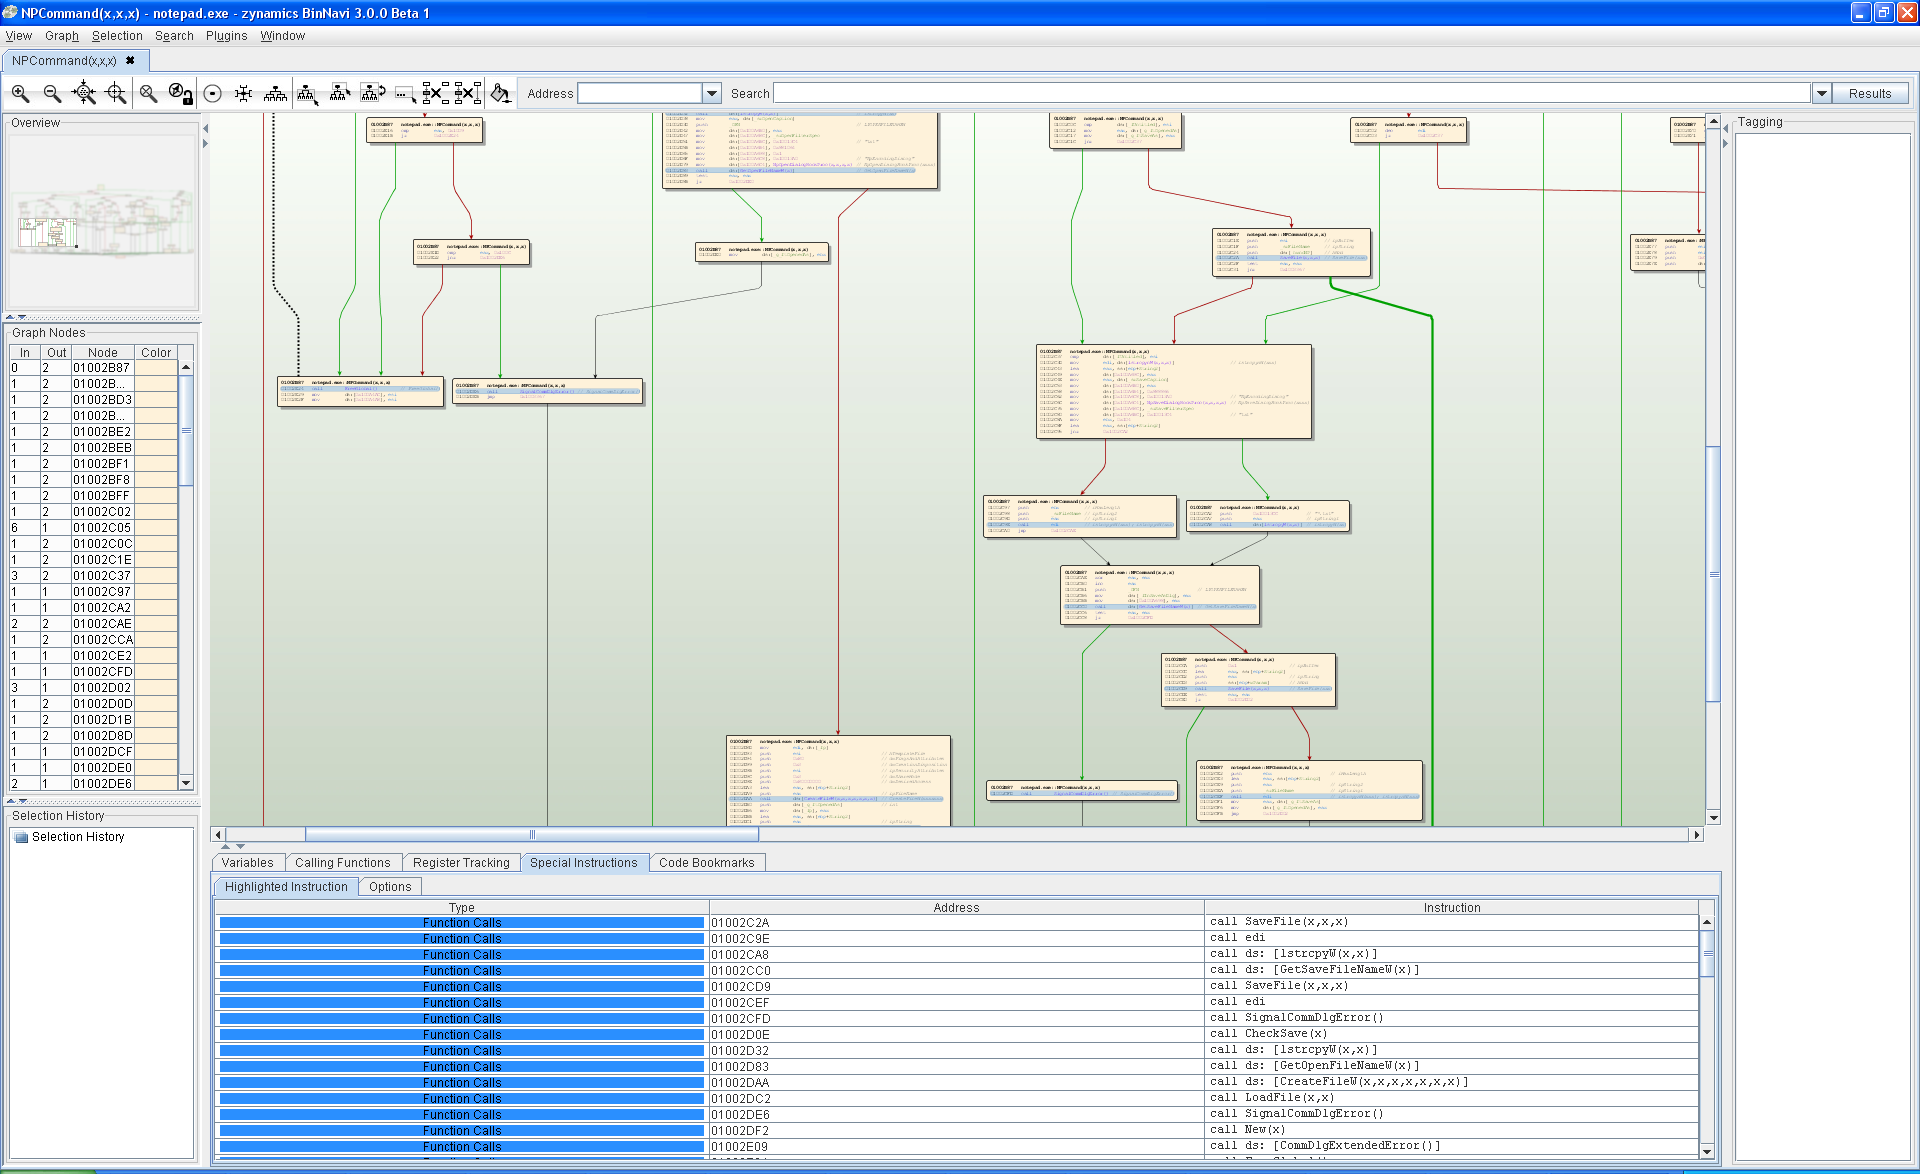
You can also highlight special instructions now. In this release “special” means either function calls, instructions that read from memory, or instructions that write to the memory. Especially the function call highlighting turned out to be really useful while reverse engineering code. We will probably extend this feature in the future.

Highlighting all function call instructions

So, to wrap this up. Once again, many new features were added and many older features were improved. It was really difficult to pick a Top 10 for this blog post and if you have looked through the list of changes in the manual you might consider other improvements to be more important than the ones presented here.

VxClass, automated signature generation, RSA 2010

February 24th, 2010

Everybody is convening in San Francisco next week for RSA2010 it appears — the big annual cocktail & business card exchange event. If you are interested in any of our technology (automated malware classification, automated signature generation, BinDiff, BinNavi) and would like to meet up with me, please contact info@zynamics.com 🙂

Reverse Engineering & Bug Hunting Trainings Class @ CSW

February 21st, 2010

Hey all,

Sebastian and me will be teaching a bug hunting / reverse engineering trainings class at CanSecWest. With the increased sophistication of both exploitation mitigations and simple static checkers, aquiring an understanding of a piece of software when performing vulnerability research is getting more and more important. In our class, we’ll teach techniques that help you become faster and more productive when reverse engineering. Concrete examples will be worked through for every abstract concept.

Things that we’ll do in this class:

  • Generate full UML class diagrams from Acrobat Reader (UML generation from RTTI information)
  • Understand Acrobat Readers Javascript implementation – by porting information from Spidermonkey (Symbol Porting)
  • Isolating complicated parsing code through differential debugging
  • Use lots of Python to extend both IDA and BinNavi – use REIL to perform common tasks
  • Read security updates

You can sign up for the class here.

Automating AV signature generation

February 17th, 2010

Hey all,
I finally get around to writing about our automated byte signature generator. It’s going to be a bird’s eye view, so if you’re interested you’ll have to read Christian’s thesis (in German) or wait for our academic paper (in English) to be accepted somewhere.

First, some background: One of the things we’re always working on at zynamics is VxClass, our automated malware classification system. The underlying core that drives VxClass is the BinDiff 3 engine (about which I have written elsewhere). An important insight about BinDiff’s algorithms is the following:

BinDiff works like an intersection operator between executables.

This is easily visualized as a Venn diagram: Running BinDiff on two executables identifies functions that are common to both executables and provides a mapping that makes it easy to find the corresponding function in executable B given any function in A.
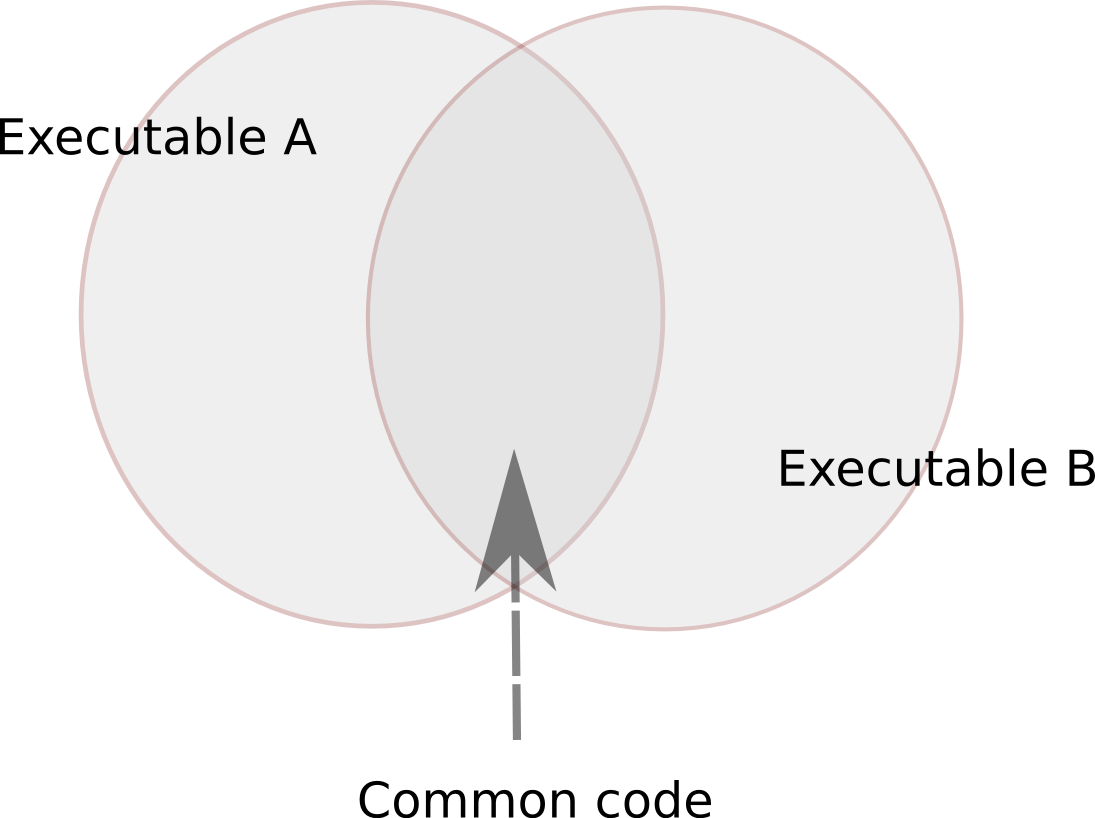
Two executables and the common code

This intersection operator also forms the basis of the similarity score that VxClass calculates when classifying executables. This means that the malware families that are identified using VxClass share code. (Footnote: It might seem obvious that malware families should share code, but there is a lot of confusion around the term “malware family”, and before any confusion arises, it’s better to be explicit)

So when we identify a number of executables to be part of a cluster, what we mean is that pairwise, code is shared — e.g. for each executable in the cluster, there is another executable in the cluster with which it shares a sizeable proportion of the code. Furthermore, the BinDiff algorithms provide us with a way of calculating the intersection of two executables. This means that we can also calculate the intersection of all executables in the cluster, and thus identify the stable core that is present in all samples of a malware family.

What do we want from a “traditional” antivirus signature ? We would like it to match on all known samples of a family, and we would like it to not match on anything else. The signature should be easy to scan for — ideally just a bunch of bytes with wildcards.

The bytes in the stable core form great candidates for the byte signature. The strategy to extract byte sequences then goes like this:

  1. Extract all functions in the stable core that occur in the same order in all executables in question
  2. From this, extract all basic blocks in the stable core that occur in the same order in all executables in question
  3. From this, extract (per basic block) the sequences of bytes that occur in the same order in all executables in question
  4. If any gaps occur, fill them with wildcards

Sounds easy, eh ? 🙂 Let’s understand the first step in the process better by looking at a diagram:
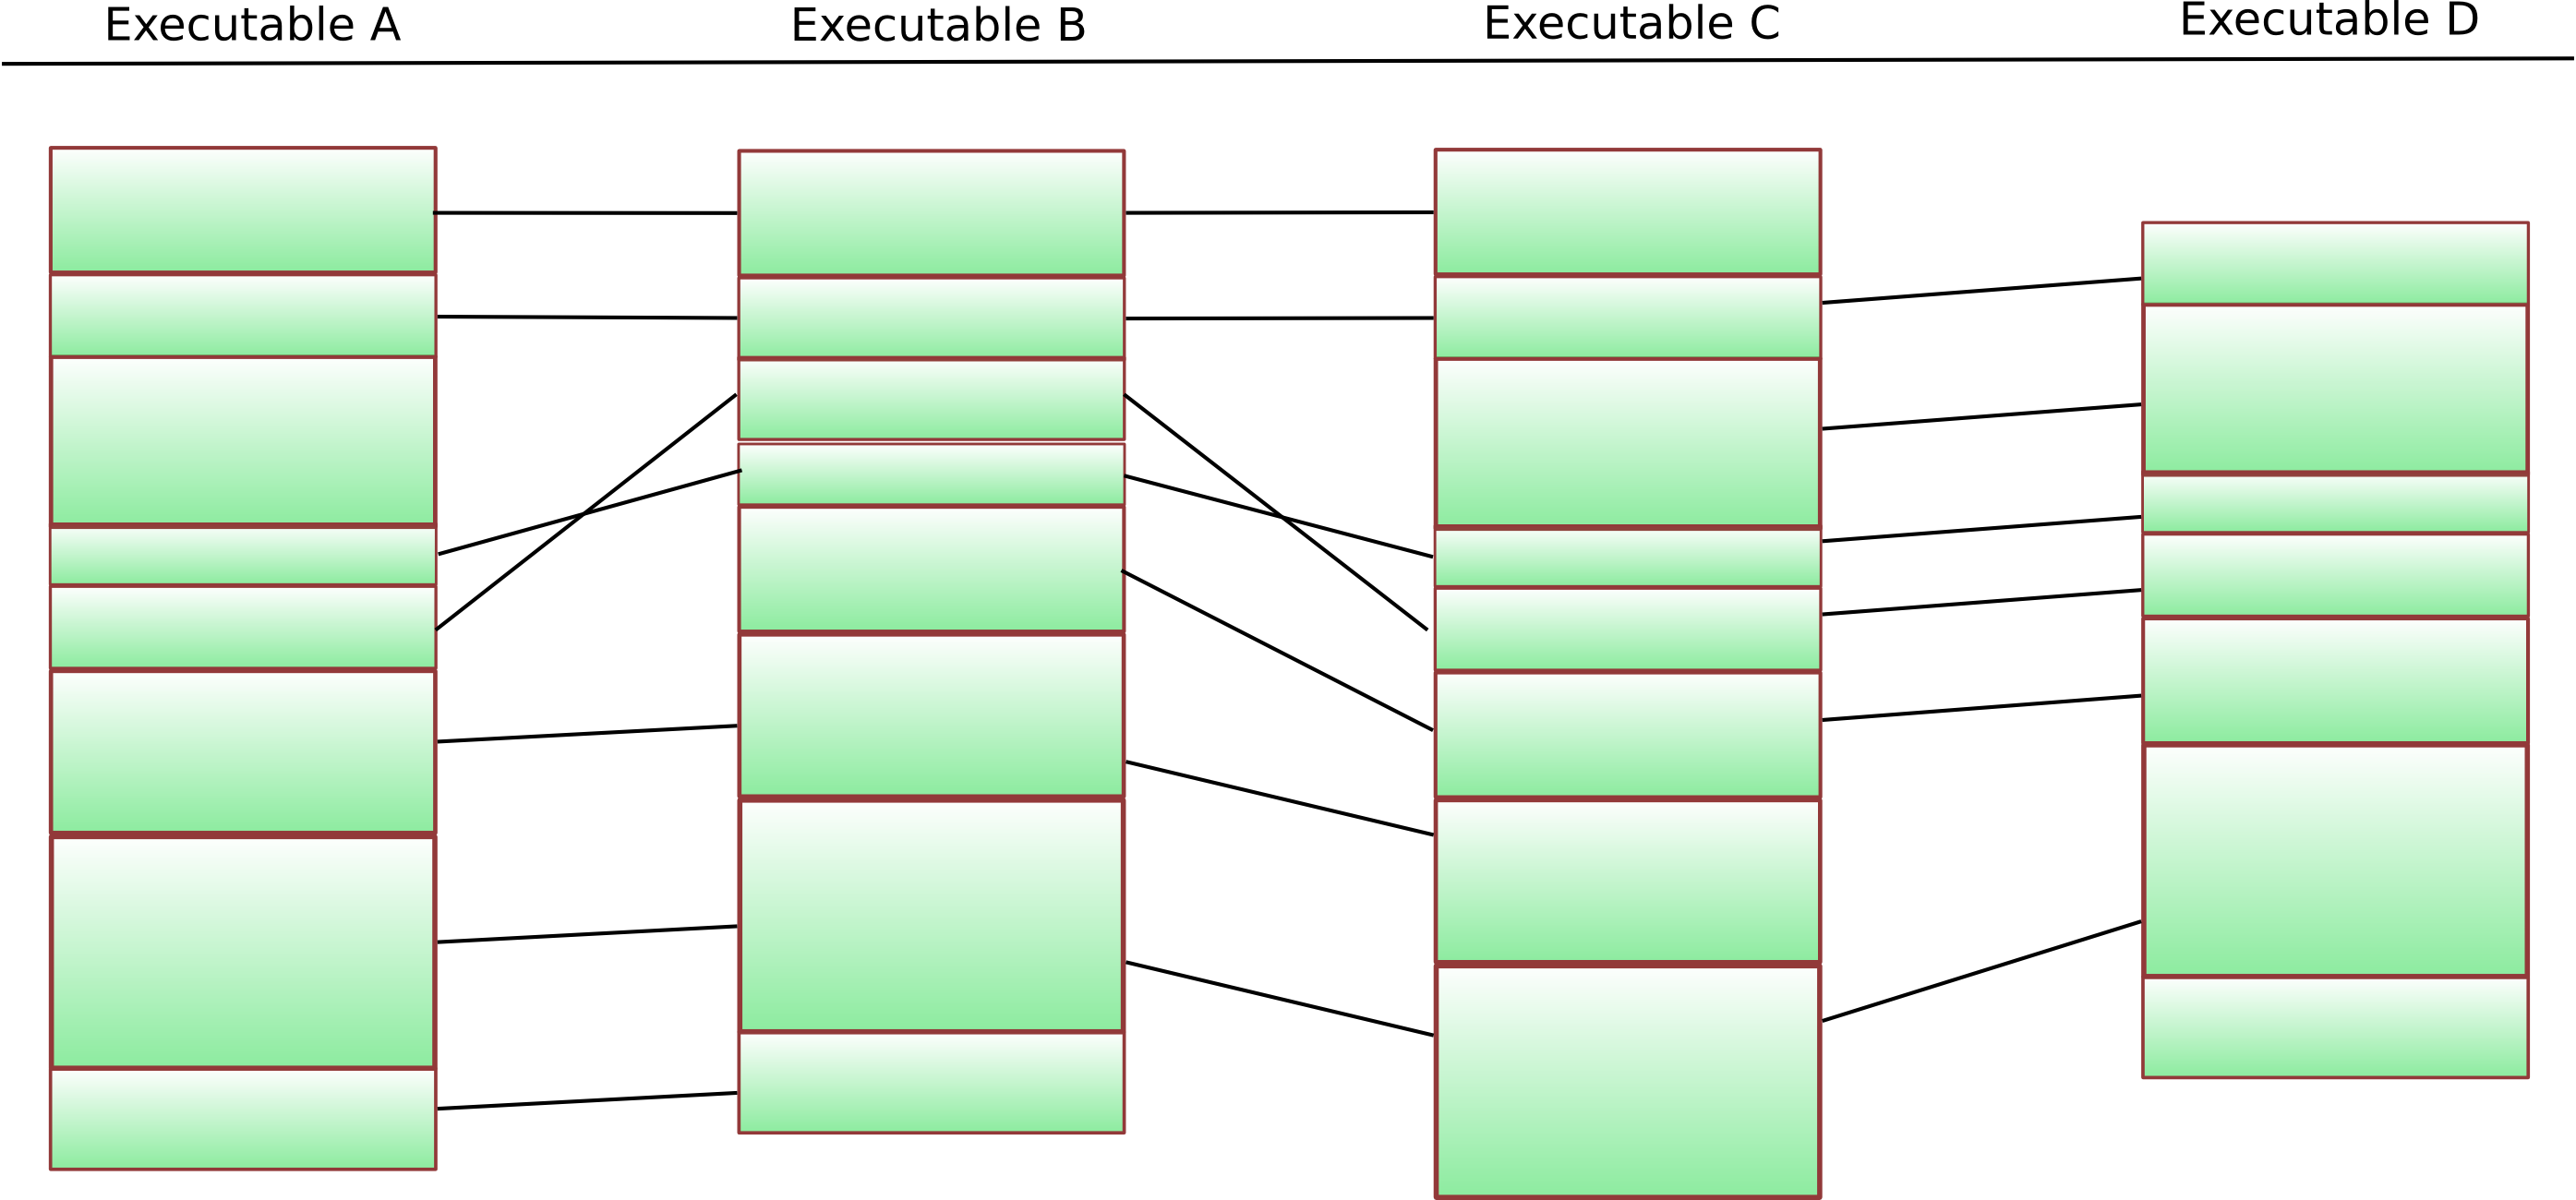
Four executables and the results of BinDiff between them

The columns show four different executables – each green block represents one particular function. The black lines are “matches” that the BinDiff algorithms have identified. The first step is now to identify functions that are present in each of the executables. This is a fairly easy thing to do, and if we remove the functions that do not occur everywhere from our diagram, we get something like this:
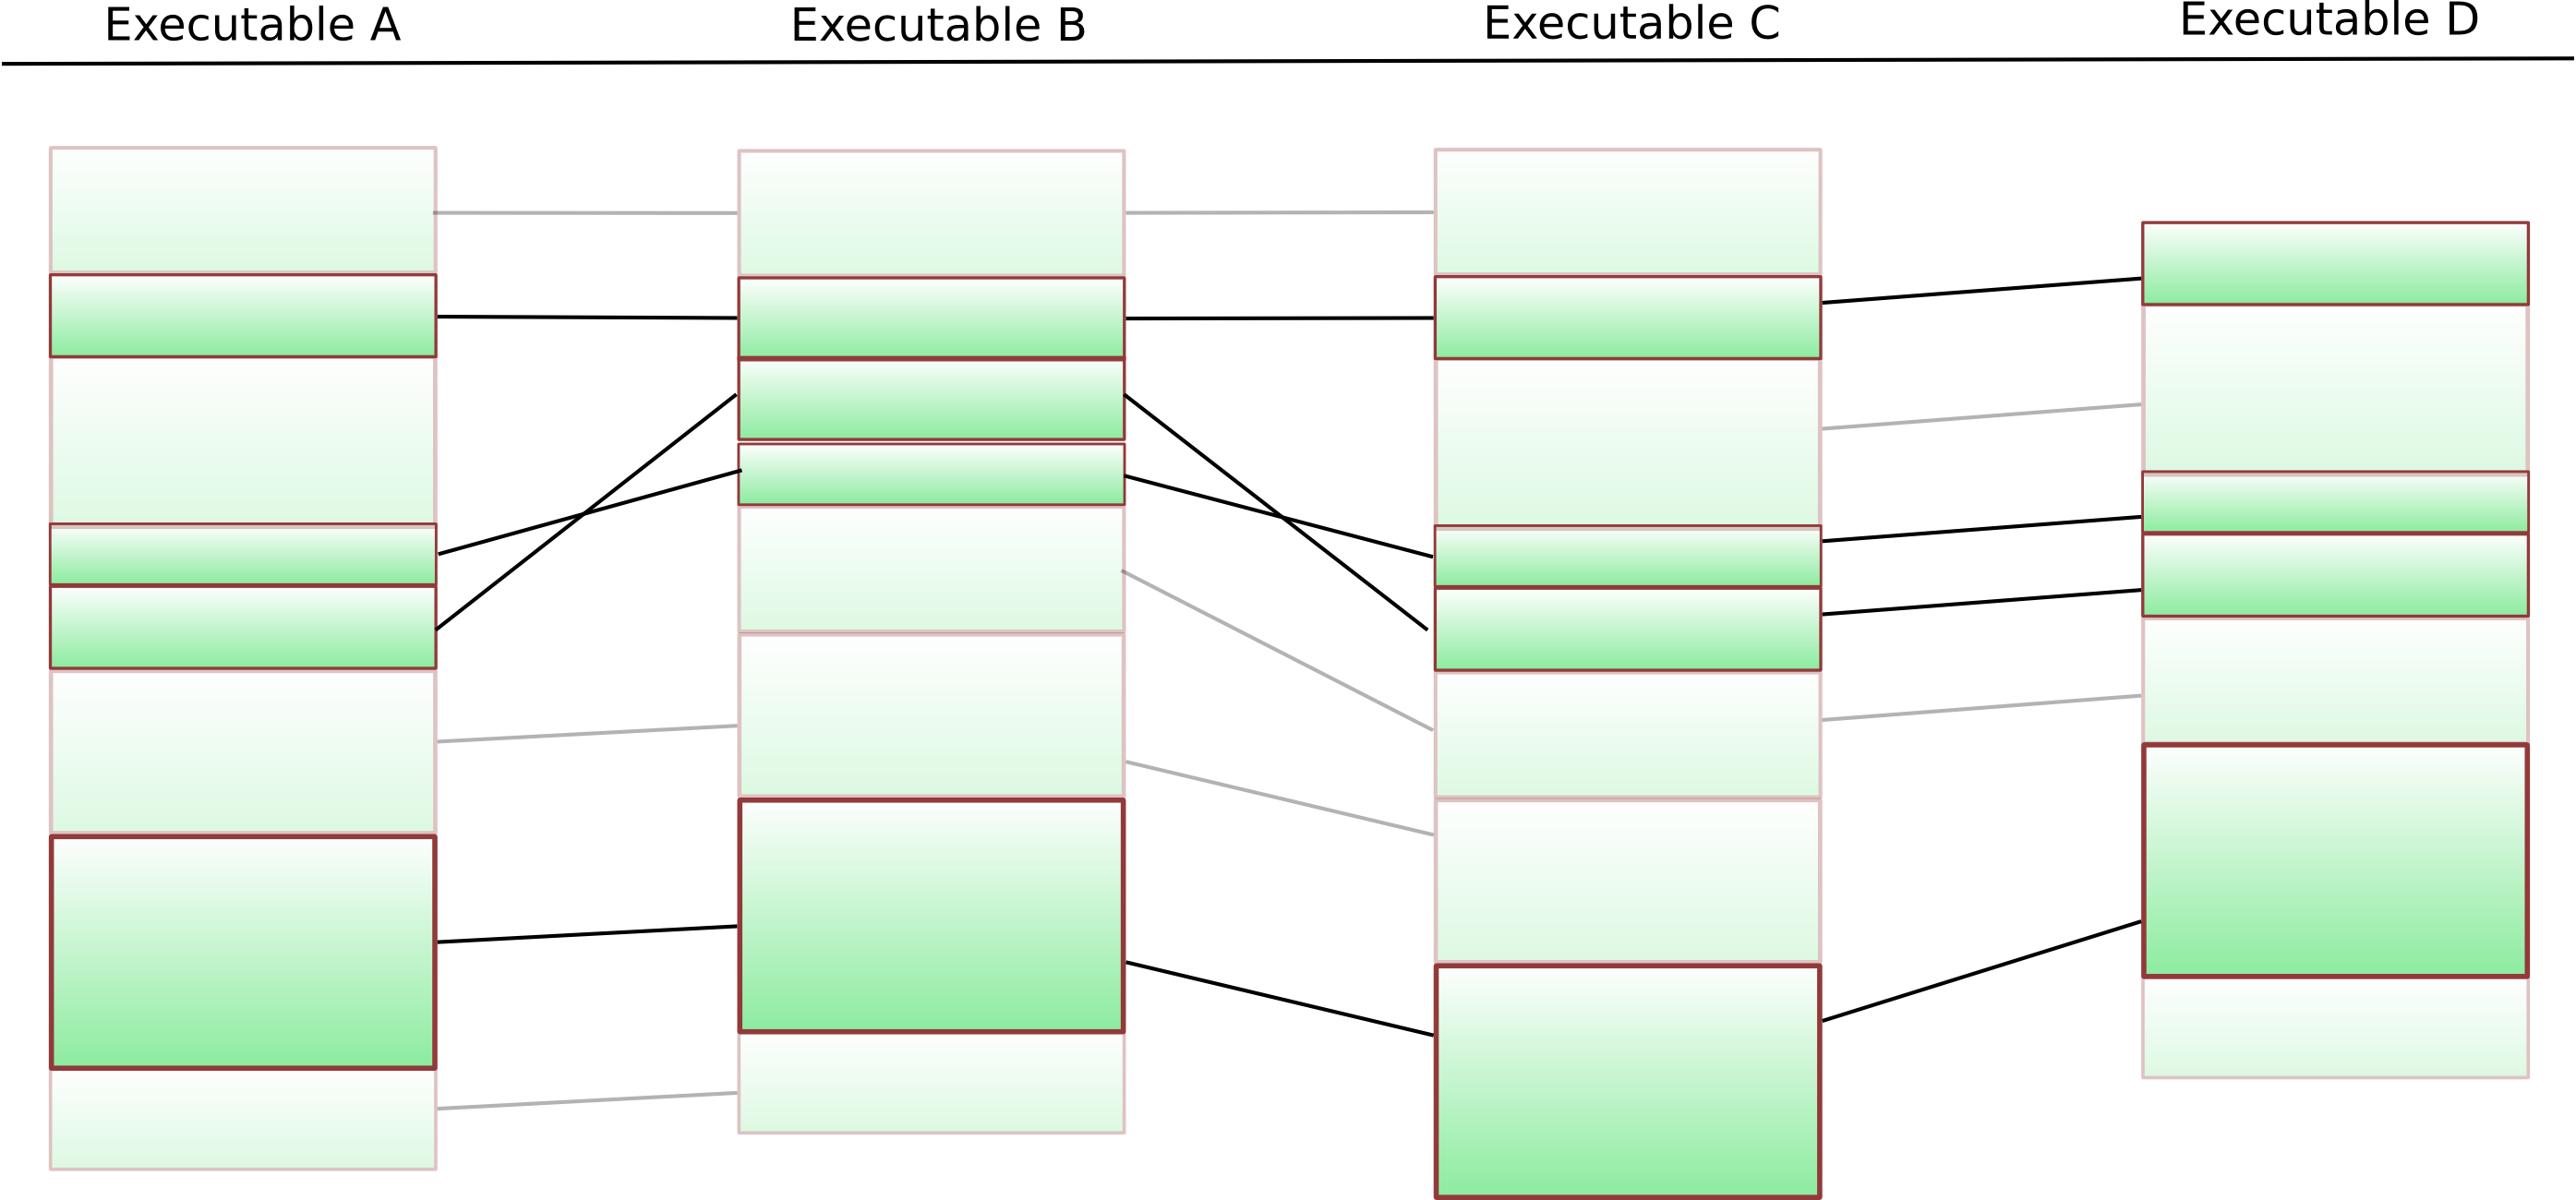
Only functions that appear everywhere left

Now, we of course still have to remove functions that do not appear in the same order in all executables. The best way to do this is using a k-LCS algorithm.

What is a k-LCS algorithm ? LCS stands for longest common subsequence – given two sequences over the same alphabet, an LCS algorithm attempts to find the longest subsequence of both sequences. LCS calculations form the backbone of the UNIX diff command line tool. A natural extension of this problem is finding the longest common subsequence of many sequences (not just two) – and this extension is called k-LCS.

This suffers from the slight drawback that k-LCS on arbitrary sequences is NP-hard — but in our particular case, the situation is much easier: We can simply put an arbitrary ordering on the functions, and our “k-LCS on sequences” gets reduced to “k-LCS on sequences that are permutations of each other” — in which case the entire thing can be efficiently solved (check Christian’s diploma thesis for details). The final result looks like this:
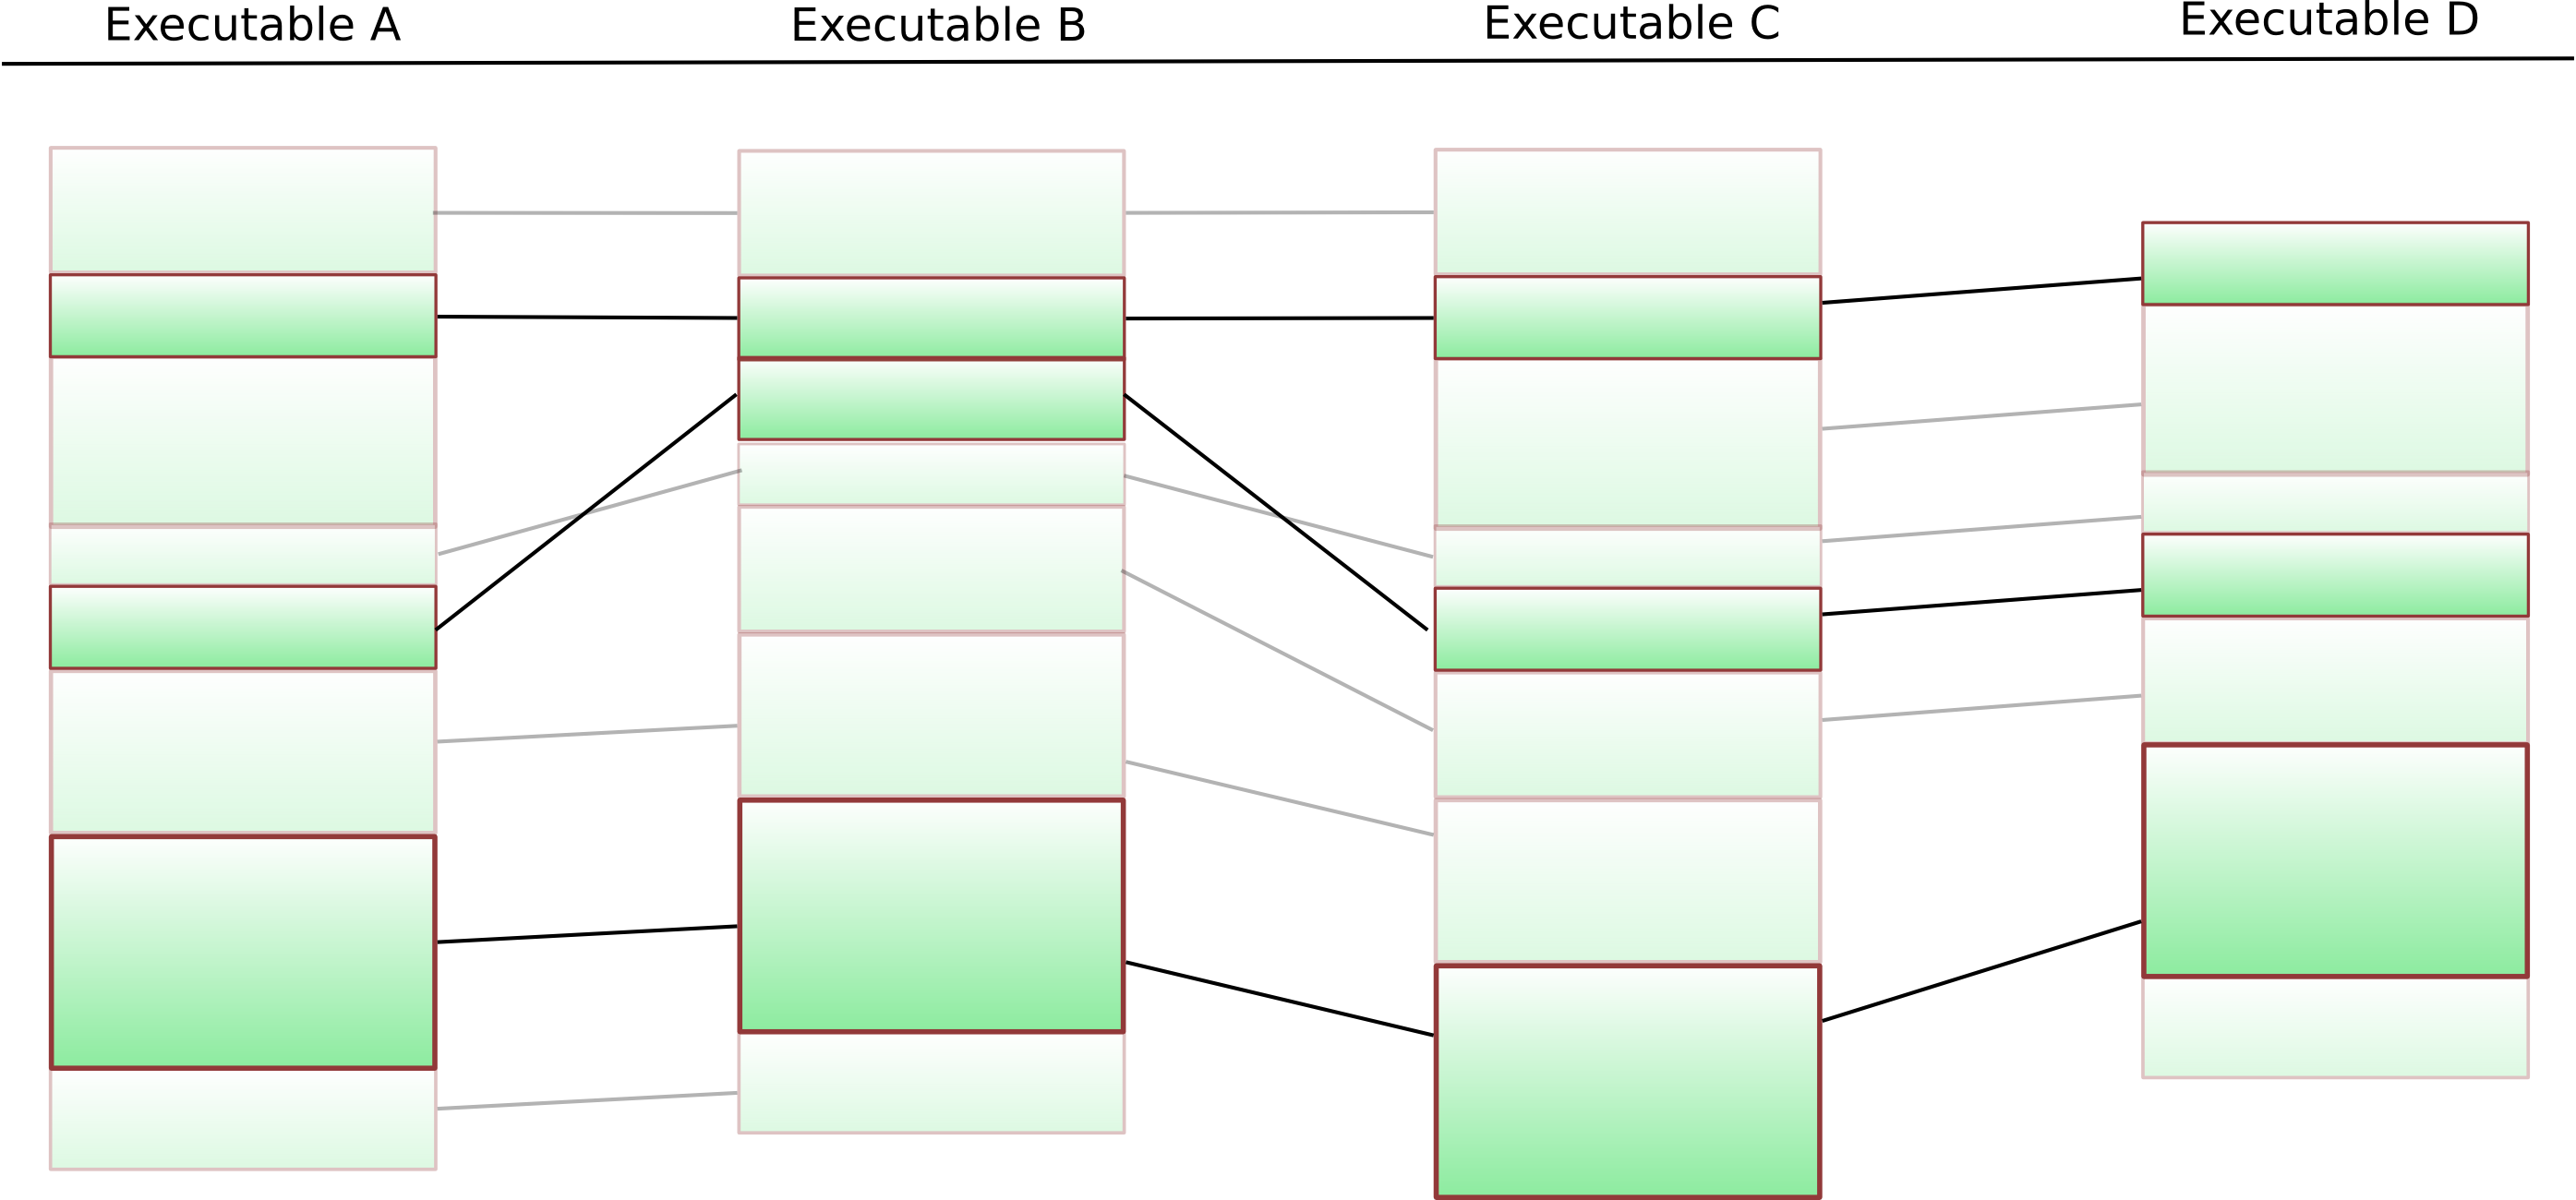
Functions that occur in the same order

Functions that occur in the same order everywhere

Given the remaining functions, the entire process can be repeated on the basic block level. The final result of this is a list of basic blocks that are present in all executables in our cluster in the same order. We switch to a fast approximate k-LCS algorithm on the byte sequences obtained from these basic blocks. Any gaps are filled with “*”-wildcards.

The result is quite cool: VxClass can automatically cluster new malicious software into clusters of similarity – and subsequently generate a traditional AV signature from these clusters. This AV signature will, by construction, match on all members of the cluster. Furthermore it will have some predictive effect: The variable parts of the malware get whittled away as you add more executables to generate the signature from.

We have, of course, glossed over a number of subtleties here: It is possible that the signature obtained in this manner is empty. One also needs to be careful when dealing with statically linked libraries (otherwise the signature will have a large number of false positives).

So how well does this work in practice ?

We will go over a small case study now: We throw a few thousand files into our VxClass test system and run it for a bit. We then take the resulting clusters and automatically generate signatures from them. Some of the signatures can be seen here — they are in ClamAV format, and of course they work on the unpacked binaries — but any good AV engine has  a halfway decent unpacker anyhow.

I will go through the process step-by step for one particular cluster. The cluster itself can be viewed here. A low-resolution shot of it would be the following:

The cluster we're going to generate a signature for

So how do the detection rates for this cluster in traditional AVs look ? Well, I threw the files into VirusTotal, and created the following graphic indicating the detection rates for these files: Each row in this matrix represents an executable, and each column represents a different antivirus product (I have omitted the names). A yellow field at row 5 and column 10 means “the fifth executable in the cluster was detected by the tenth AV”, a white field at row 2 and column 1 means “the second executable in the cluster was not detected by the first AV”.

Detection Matrix for 32 samples from the cluster
Rows are executables
Columns are AV engines
. .
. . . . . . . . . . . . . .
. . .
. . . . . . . . . . . . . . . . . . . . . . . . . . . .
. . . . . . . . . . . .
. . . .
. .
. .
. .
. . .
. . . . . . . .
. . . . . . . .
. . . . . . .
. . . . .
. . . . . . . .
. . . . . . . . . . . . . .
. . . . . . .
. . . . .
. . . . . . . . .
. . . . . . . . .
. . . . . . . . . . .
. . . . . . . .
. . . . .
. . . . . . .
. . . . . . . . . . . . . .
. . . . . .
. . . . . . .
. . . . . . . . . . . . .
. . . . . . . .
. . . . . . .
. . . . . . . . . .
. . . . . .

What we can see here is the following:

  1. No Antivirus product detects all elements of this cluster
  2. Detection rates vary widely for this cluster: Some AVs detect 25 out of 32 files (78%), some … 0/32 (0%)

If we inspect the names along with the detection results  (which you can do in this table), we can also see which different names are assigned by the different AVs to this malware.

So, let’s run our signature generator on this cluster of executables.

time /opt/vxclass/bin/vxsig “7304 vs 9789.BinDiff” “9789 vs 10041.BinDiff” “10041 vs 10202.BinDiff” “10202 vs 10428.BinDiff” “10428 vs 10654.BinDiff” “10654 vs 10794.BinDiff” “10794 vs 11558.BinDiff” “11558 vs 11658.BinDiff” “11658 vs 12137.BinDiff” “12137 vs 12434.BinDiff” “12434 vs 12723.BinDiff” “12723 vs 13426.BinDiff” “13426 vs 13985.BinDiff” “13985 vs 13995.BinDiff” “13995 vs 14007.BinDiff” “14007 vs 14023.BinDiff” “14023 vs 14050.BinDiff” “14050 vs 14100.BinDiff” “14100 vs 14107.BinDiff” “14107 vs 14110.BinDiff” “14110 vs 14145.BinDiff” “14145 vs 14235.BinDiff” “14235 vs 14240.BinDiff” “14240 vs 14323.BinDiff” “14323 vs 14350.BinDiff” “14350 vs 14375.BinDiff” “14375 vs 14378.BinDiff” “14378 vs 14415.BinDiff” “14415 vs 14424.BinDiff” “14424 vs 14486.BinDiff” “14486 vs 14520.BinDiff” “14520 vs 14549.BinDiff” “14549 vs 14615.BinDiff” “14615 vs 14700.BinDiff”

The entire thing takes roughly 40 seconds to run. The resulting signature can be viewed here.

So, to summarize:

  1. Using VxClass, we can quickly sort new malicious executables into clusters based on the amount of code they share
  2. Using the results from our BinDiff and some clever algorithmic trickery, we can generate “traditional” byte signatures automatically
  3. These signatures are guaranteed to match on all executables that were used in the construction of the signature
  4. The signatures have some predictive power, too: In a drastic example we generated a signature from 15 Swizzor variants that then went on to detect 929 new versions of the malware
  5. These are post-unpacking signatures — e.g. your scanning engine needs to do a halfways decent job at unpacking in order for these signatures to work

If you happen to work for an AV company and think this technology might be useful for you, please contact info@zynamics.com 🙂
Resolving dynamic function calls with BinNavi

February 14th, 2010

One of the big problems of static code analysis are function calls with non-static call targets. These function calls can call different target functions depending on the current program state. At first they call one function and in the next moment they might call a completely different function. Popular examples of such dynamic function calls are virtual functions (like in C++) or function pointers to callback functions.

Statically finding the set of potential call targets of a dynamic function call is very difficult. While this is an area of program analysis that has seen a lot of research in the last years, the problem is undecidable in general and can become really ugly really quickly. A simpler way to resolve the call targets of dynamic function calls is to execute the target program and log where dynamic function calls are going.

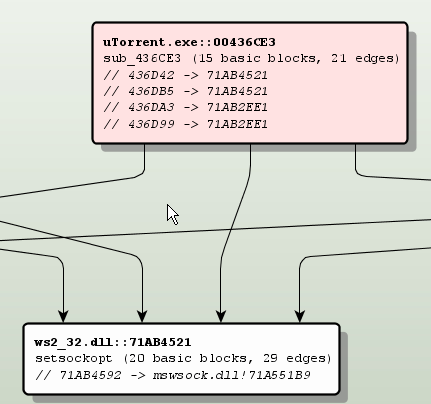
In BinNavi we have implemented a way to resolve dynamic function calls within modules as well as dynamic function calls that cross module boundaries. The general idea behind our code is this:

  • Figure out where the dynamic function calls are located and put breakpoints on them
  • Every time such a breakpoint is hit, execute a single step and find out where the call is going
  • Keep going until enough data has been collected

You can see how it all works in the 5 minutes (13 MB) flash video you can watch when you click on the image below.

Resolved dynamic function calls to ws2_32.dll

Here is some more information about the process which I could not put into the video itself:

The whole Call Resolver functionality is not part of BinNavi itself but implemented as a plugin. This shows how easily users of BinNavi can extend the BinNavi GUI with new functionality and how powerful the debugging and graphing API of BinNavi is. In fact, you can download the code of the plugin here if you want to check it out yourself. This plugin was written in Java but it could have been written in Jython or JRuby as well.

Storing disassembly data in a MySQL database gives the plugin an enormous advantage: It is really, really simple to find the addresses of dynamic function calls. A single SQL query does the trick. In most other reverse engineering tools the plugin would need to go through all functions/basic blocks/instructions of the modules to find the dynamic function call instructions.

Setting breakpoints only on dynamic function call instructions brought a big speed improvement compared to just tracing the whole target program. As you can see in the video, the target program stays responsive enough to be used. This is very useful because it allows the user of the Call Resolver to control what functionality is executed and therefore what dynamic function calls are traced.

Of course the dynamic approach has downsides too. We have to have a way to execute the target program. If all we have is a non-executable memory dump of some suspicious file then we can not use dynamic function call analysis. Even if it is possible to execute the target program, it is easy to miss function calls that are never executed or function call targets that are never reached while the tracer is attached to the process. This is especially true if you have a heuristic like BinNavi has where you stop resolving function calls that “always” (really, more than 20 times) seem to go to the same target address.

So, what about you? I’d like to hear about your experiences with resolving dynamic function calls. Are you more of a fan of a static solution or a dynamic solution?