Archive for the ‘BinNavi’ Category

At zynamics, we like good offense …

Friday, May 7th, 2010

… and therefore we are happy to have sponsored Shawn Dean so he could go to the Wajutsu Keishukai Grappling Tournament in Tokyo – which HE WON.  We are happy to have had to opportunity to sponsor him and even happier to see him succeed.

Also, it is great to see BinNavi-embroidered shorts on the winner 😛

Watch it yourself here:

Shawn Dean receives honors

Algorithms for platform independent return-oriented programming (I of III)

Friday, April 16th, 2010

In my last post about the history of return-oriented programming I showed that we are not dealing with a completely new technology when we are talking about return-oriented programming. However, the technology is evolving to a point where even the world of academia thinks it worth discussing it in theoretical conferences. Until recently return-oriented programming has always been platform dependent so that one specific implementation was only able to work on one single platform. To sharpen the point a little further current approaches only target one specific compiler for one platform in general. Even though this is not necessarily the case for variable length instruction sets like the IA-32/64 instruction set, where the search for instruction sequences can be performed without paying attention to the alignment restrictions, for all platforms where alignment is enforced the current approaches are still very limited.

In this post I will start showing a set of algorithms which can be used platform independently to locate suitable instruction sequences for return-oriented programming.

So let’s get started with defining return-oriented programming to get an idea where we are eventually trying to end up with.

The goal is to build a program from existing code chunks of another program or commonly used libraries. A program built from the parts of another binary is called a return-oriented program. The individual parts that form a return-oriented program are named gadgets. A gadget is a sequence of instructions in the target binary that provides a usable operation, such as addition of two registers. To be able to build a program from gadgets, they must be combinable. Gadgets are combinable if they end in an instruction that changes control flow in a way that can be controlled by the attacker. Instructions at the end of gadgets are named free-branch instructions. A free-branch instruction must satisfy the following properties:

  • The control flow must change at this instruction.
  • The target of the control flow must be controllable (free) such that the input from an attacker controled register or memory offset defines the target.

After this small definition of what we are actually looking for we can now move on and discuss the algorithms which we will use to help us find instruction sequences which satisfy the above definition.

As we need a starting point for our search of useful instruction sequences, the first step is to locate all free-branch instructions in the targeted binary (In BinNavi this is a single SQL query). After we have collected all of the free-branch instructions we start with phase one of our algorithms, data collection within the binary. The goal of the data collection phase is to provide us with the following information:

  • What possible paths are usable for gadgets and end in a free-branch instruction.
  • What does the REIL representation of the instructions on the possible paths look like.

If you are not familiar with REILs ([R]everse [E]ngineering [I]ntermediate [L]anguage) concepts be sure to check our article we have posted a while back to get you started.

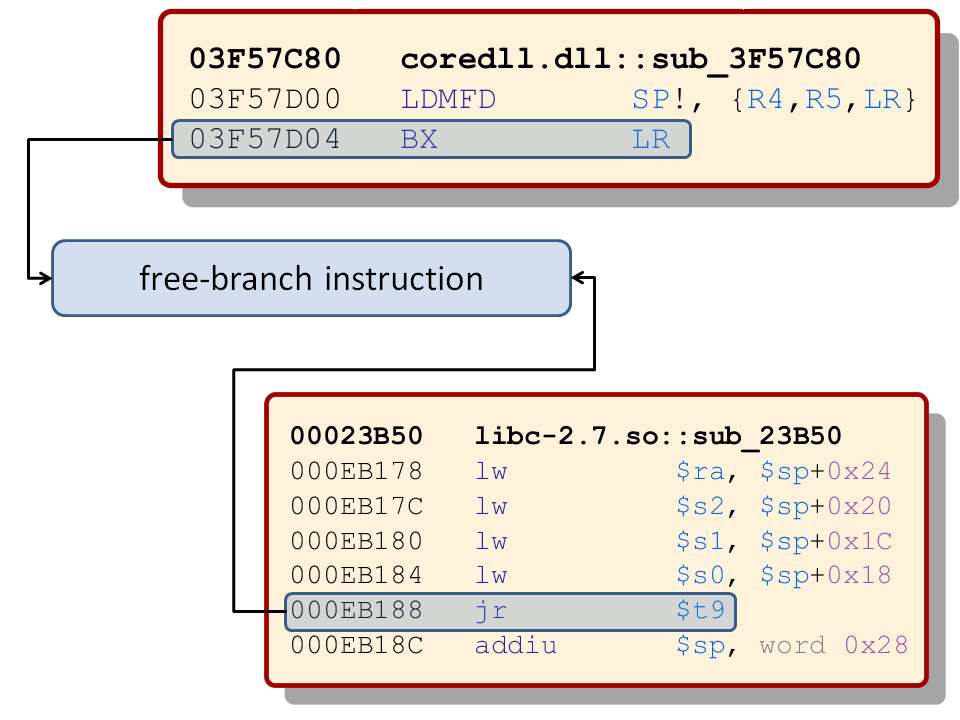
Now that we have a goal definition for our first phase algorithms we can start looking into the algorithms to get the desired data. To find all paths which could provide useful instruction sequences for gadgets we use an algorithm which traverses backwards through the control flow graph of all the functions where we found free-branch instructions. Using the free-branch instruction as our starting point we walk upwards instruction by instruction until no more instructions are contained in the initial basic block. The following graphic shows examples for ARM and MIPS free-branch instructions.

Examples for free-branch instructions (more…)

The REIL language – Part I

Sunday, March 7th, 2010

If you have followed the development of BinNavi over the last two years you might know that we are making heavy use of something called REIL to provide features backed by advanced static code analysis. REIL is short for Reverse Engineering Intermediate Language and at its core it is a platform-independent pseudo-assembly language that can be used to emulate native assembly code.

A few years ago, Thomas spent some time thinking about making reverse engineering tools scale (check out the slides of his Black Hat Windows 2004 talk to learn more). Software today is larger and more complex than it was in the past and there are many more interesting platforms to consider as a security researcher (just think of Mac OS, iPhone, Android, Blackberry, Cisco routers, wireless devices, …). Platform-independent automation of common reverse engineering tasks seemed like the way to go. If you manage to develop powerful tools that help you find interesting parts of binary files without manual intervention you can fight growing complexity and reduce its associated costs. We created REIL as one of the key technologies for our path towards this goal.

We designed REIL with one thing in mind: Create a language that can model the effects of real assembly code but – unlike real assembly code – is very easy to analyze programmatically. To achieve this we carefully designed a minimal instruction set of just 17 different instructions and we made sure that the structure of the instruction operands is regular and comprehensible. We also made sure that all REIL instructions have exactly one obvious purpose because we wanted to avoid side effects like setting flags or implicitly accessing memory. Furthermore we have designed a very simple virtual machine (REIL VM) for REIL code to define the semantic behaviour of REIL code.

In the next few posts I will show you what the instruction set of REIL looks like, how the semantic model behind REIL interpretation works, how to use REIL in BinNavi and what the future of REIL will look like.

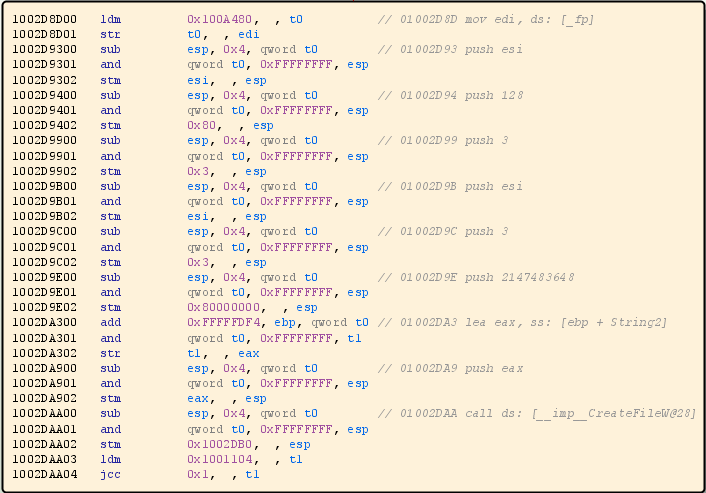
For now I am going to finish this post with a screenshot that shows some REIL code in BinNavi (click to enlarge). Notice the MIPS-like regularity and simplicity of the instructions. The original x86 instructions that were the source of the REIL code are shown as gray line comments.

A basic block of REIL code

If you already want to learn more about REIL you can check out the BinNavi manual. Here you can find everything that is necessary to understand the REIL language and its use in BinNavi.

BinNavi 3.0 Feature Preview

Monday, March 1st, 2010

Hi everyone,

this week we launched the first beta of BinNavi 3.0 to select customers. We are planning to have a beta phase of 8 weeks with the final release of BinNavi 3.0 coming May 1st 2010.

Existing customers who want to get their hands on the beta version please send an email to support@zynamics.com.

In BinNavi 3.0 we have added many valuable features that once again make it faster and easier for you to complete your reverse engineering jobs. You can find the complete list of new features in the manual on our website. It’s quite lengthy so I only want to talk about the Top 10 new features in this post.

Analyze code of MIPS-based devices

In previous versions of BinNavi it was possible to analyze x86 code, ARM code, and PowerPC code. In BinNavi 3.0 we have added support for MIPS code because MIPS was by far the platform we received most requests for.

Of course we have also added MIPS support to our static code analysis language REIL so your platform-independent analysis algorithms work on MIPS code too.

If you are a customer of our GDB Agent add-on, you can also debug MIPS-based Cisco routers like those of the 3600 family now.

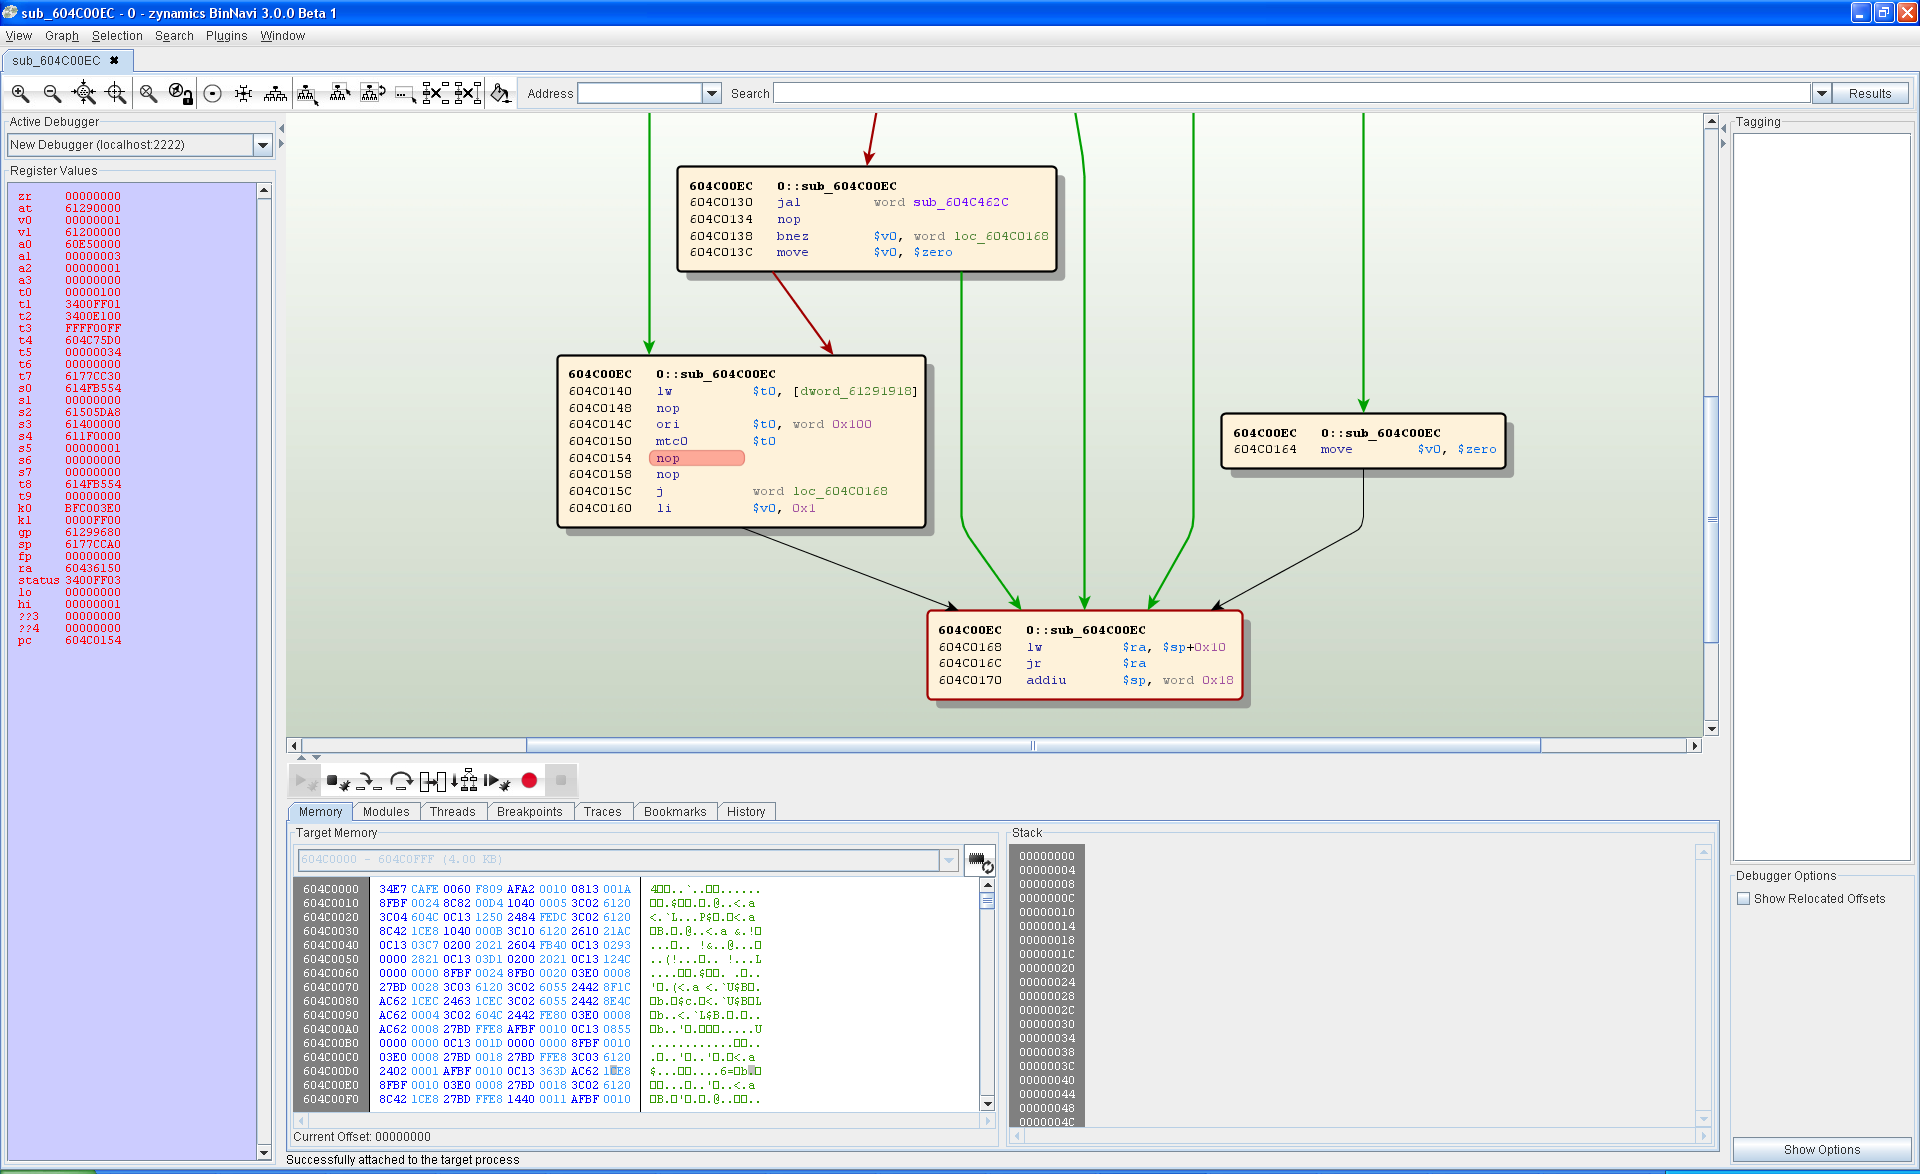
Reverse Engineering MIPS code with BinNavi

Rename local and global variables to understand code

For the longest time BinNavi has had support for fancy stuff like abstract interpretation but not for basic stuff like variable renaming. In BinNavi 3.0 you can now rename local and global variables. This helps you understand code better than with previous versions of BinNavi.

Renaming variables with BinNavi

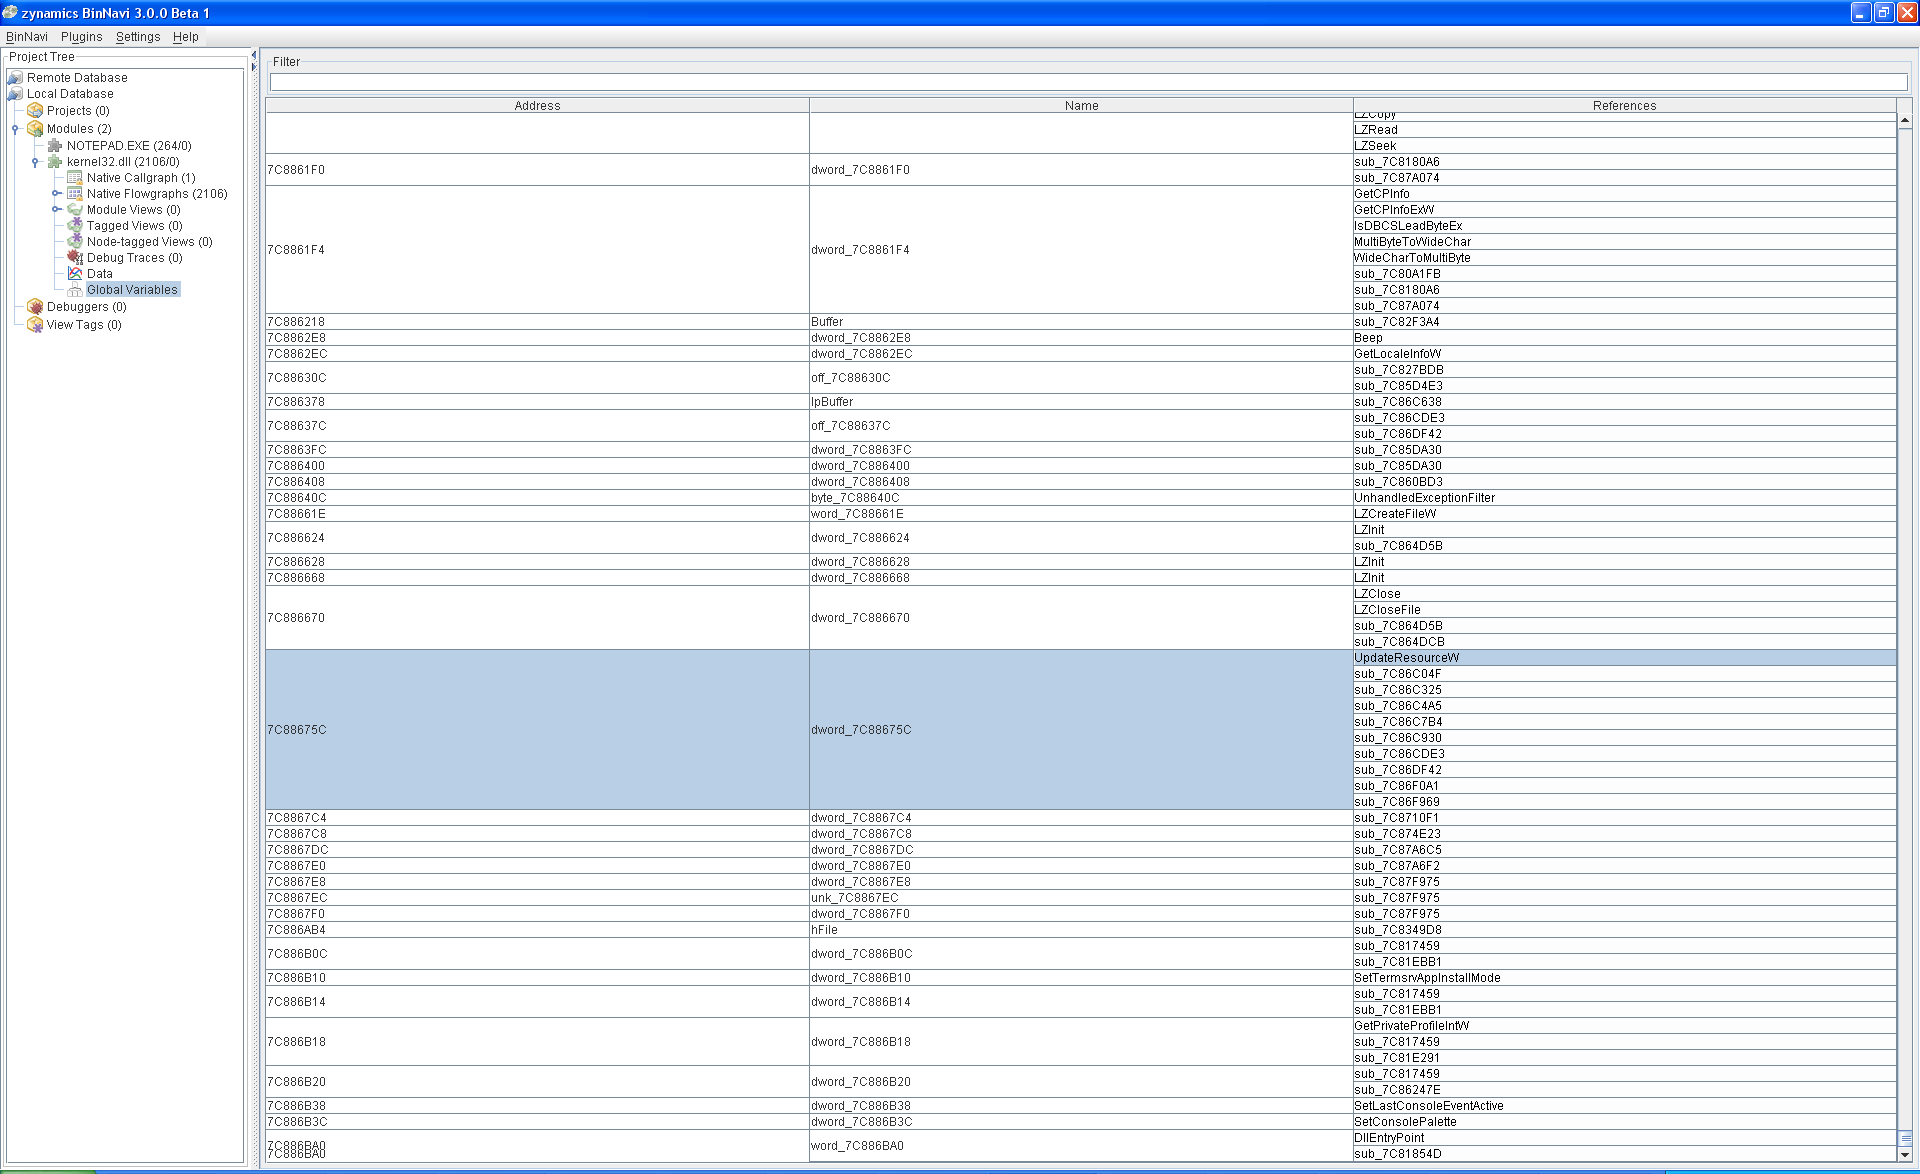
Find out where global variables are used

While improving support for variables we have also added a new view where you can see all global variables of a module and the functions that access them. This is very useful for tracking inter-function side-effects stored in global variables.

Cross-references to global variables

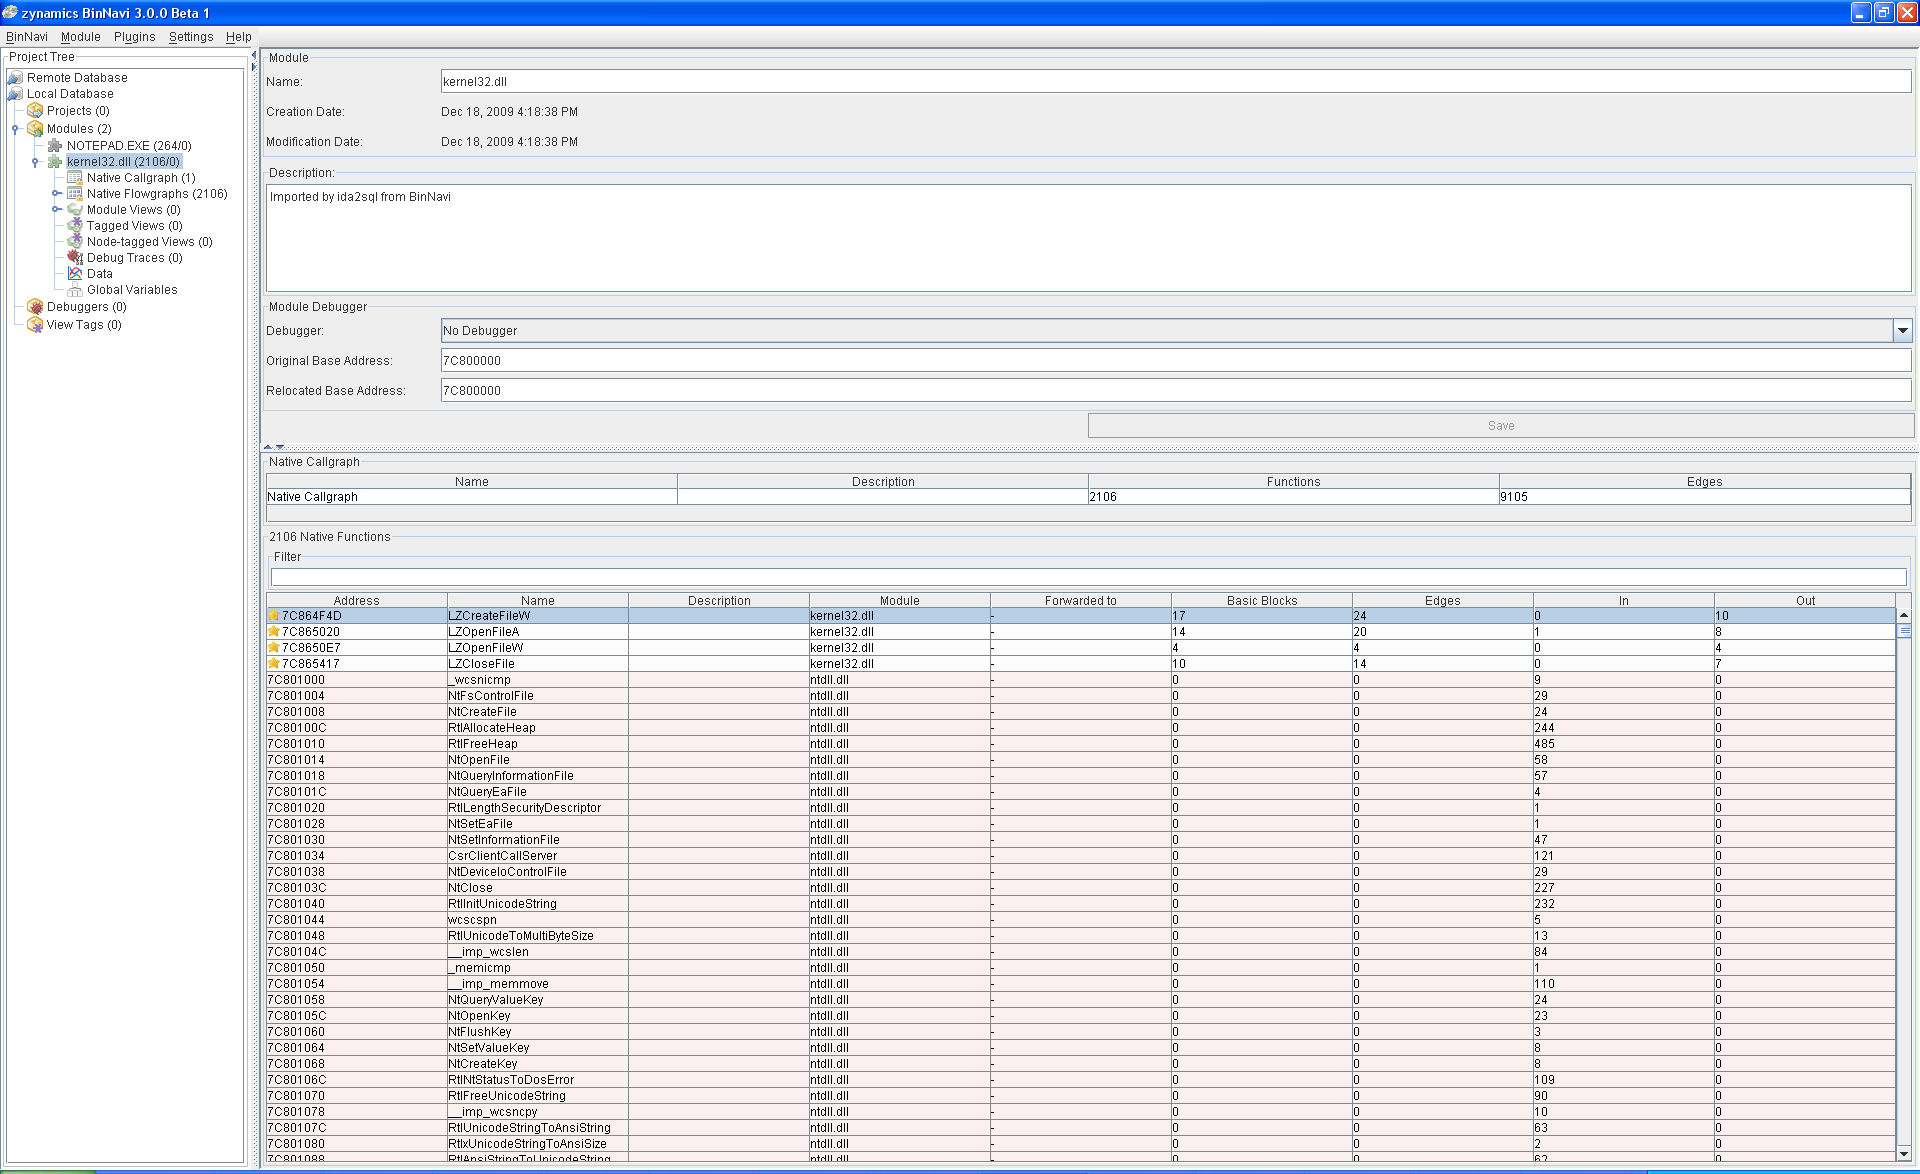
Quickly get back to your favourite projects, modules, and views

The ability to mark projects, modules, and views (like functions) as favorites is a really simple feature which turned out to be incredibly helpful in practice. With just two clicks you can now “star” items you consider important. Starred items have a small star next to their names and they always show up on top of tables. This makes it very simple to find functions again which you previously considered interesting.

Favorite functions are shown on top of the list

Use a faster disassembly data exporter to get started

Before BinNavi 3.0 we used a Python-based exporter to import disassembly from IDA Pro into our BinNavi MySQL databases. This exporter was really slow and required a lot of additional software packages to be installed. In BinNavi 3.0 we have switched to a C++-based exporter which is blazingly fast (we managed to export more than 80,000 functions per hour here) and does not require any additional installs. Once you realize that your exports now go more than twice as fast as they used to you will love this exporter.

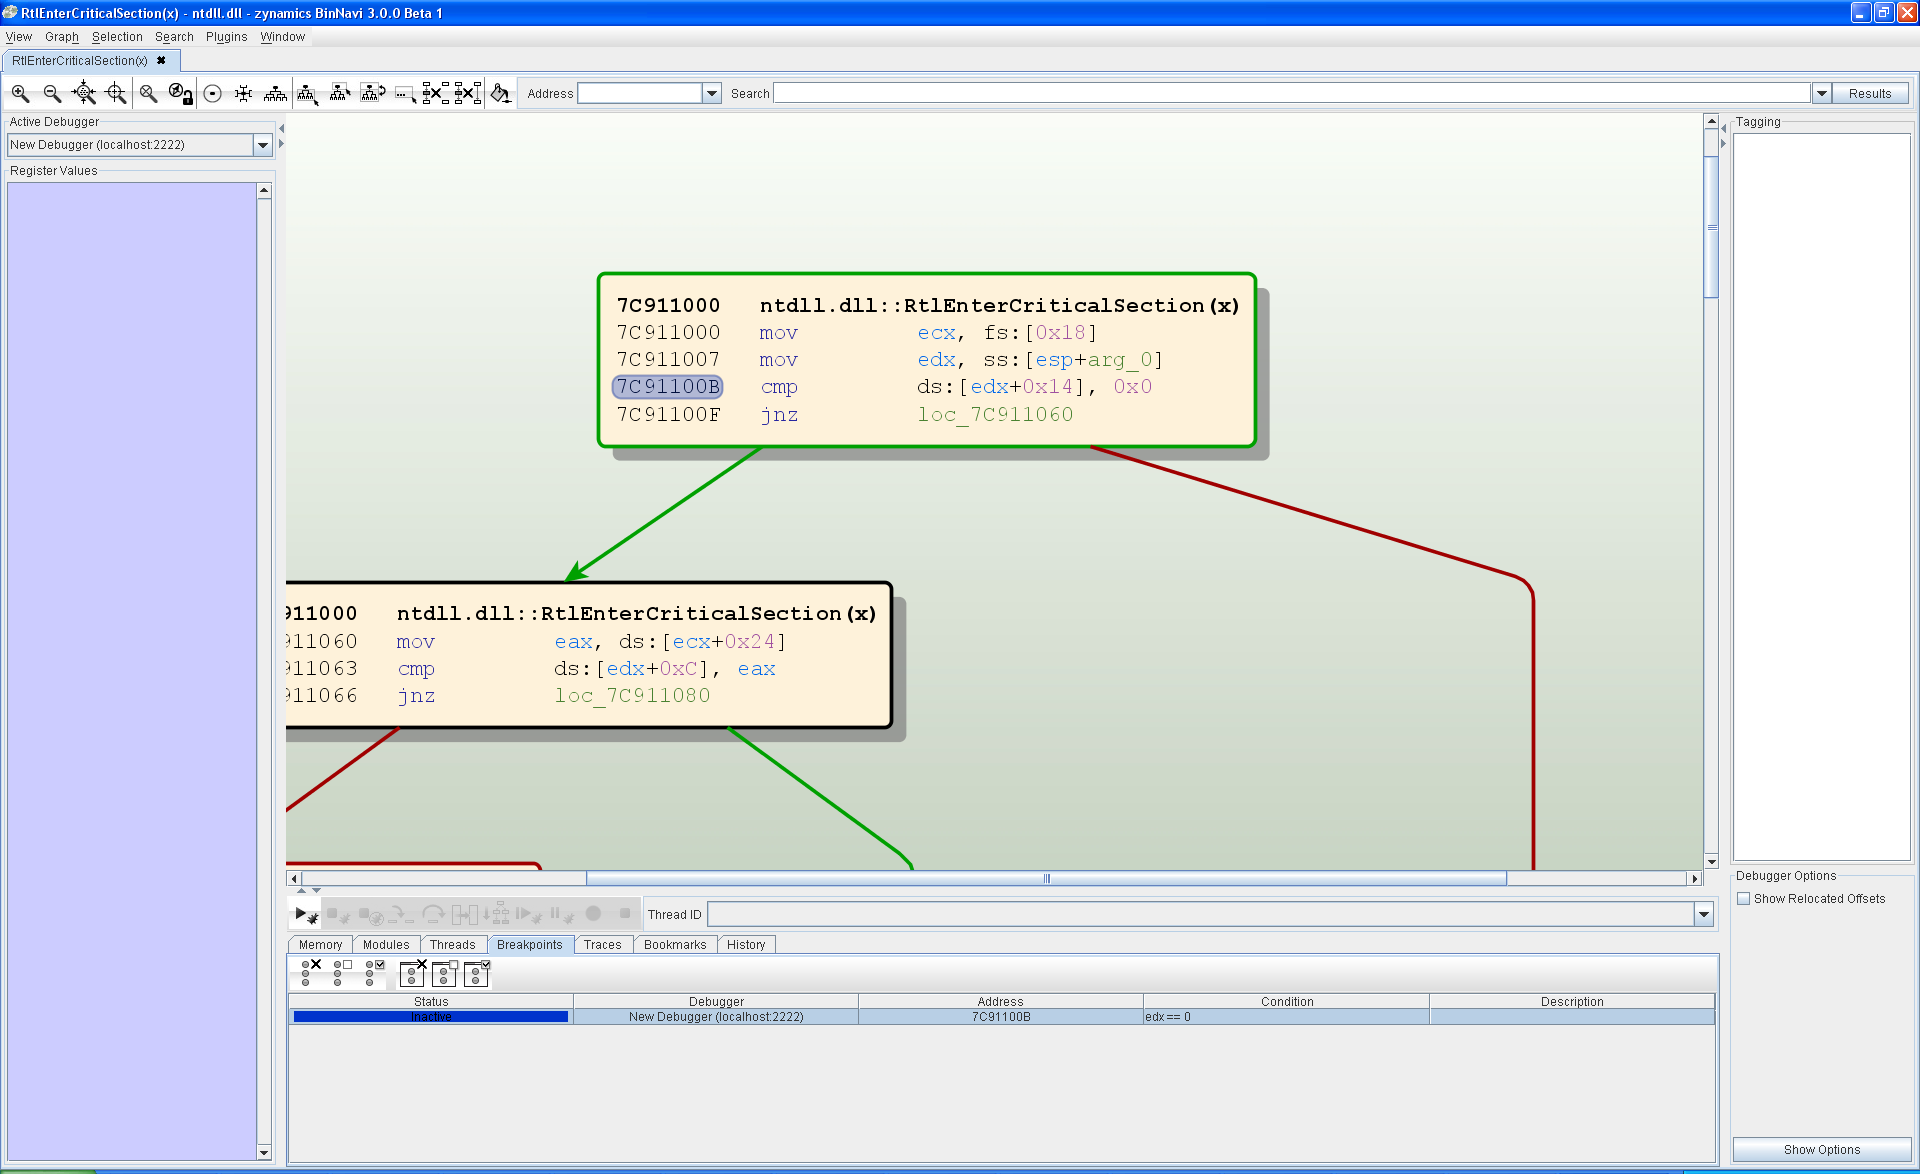
Set conditional breakpoints to make debugging more efficient

Another really useful feature, conditional breakpoints were added to BinNavi 3.0 to allow you to enable or disable breakpoints depending on the current program state.

Breakpoint conditions can include checks for register, flags, and memory values as well as for thread IDs.

Configuring conditional breakpoints

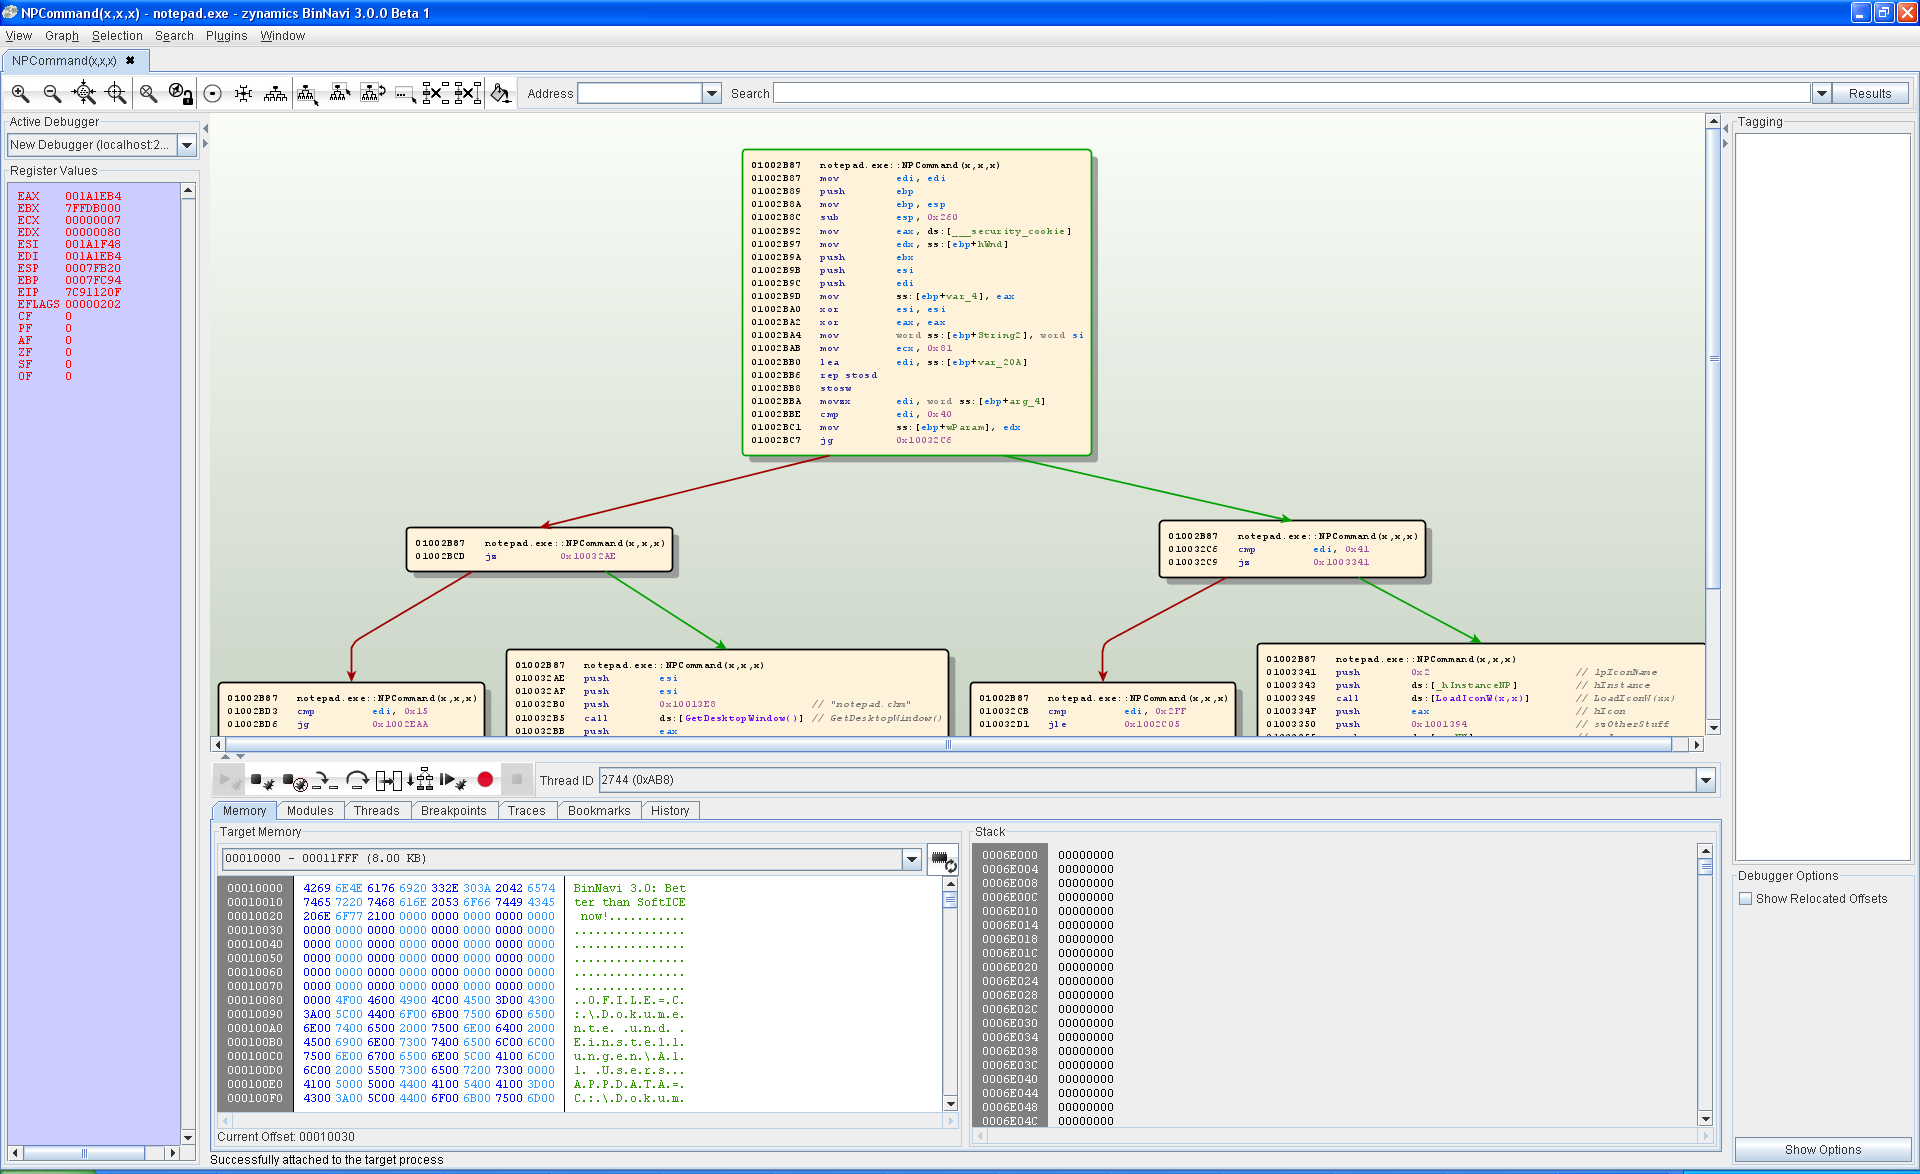
Edit the target process memory to test small patches

Editing the memory of the target process was previously not possible in BinNavi. In BinNavi 3.0 you can edit the memory of whatever process you are debugging using either the GUI or the plugin API.

Editing target process memory

Isolate code quickly using the improved trace mode

I have already written two posts on this blog dedicated to this new feature (see here and here). In essence, we have found a great way to help you find relevant code while debugging.

Improved differential debugging

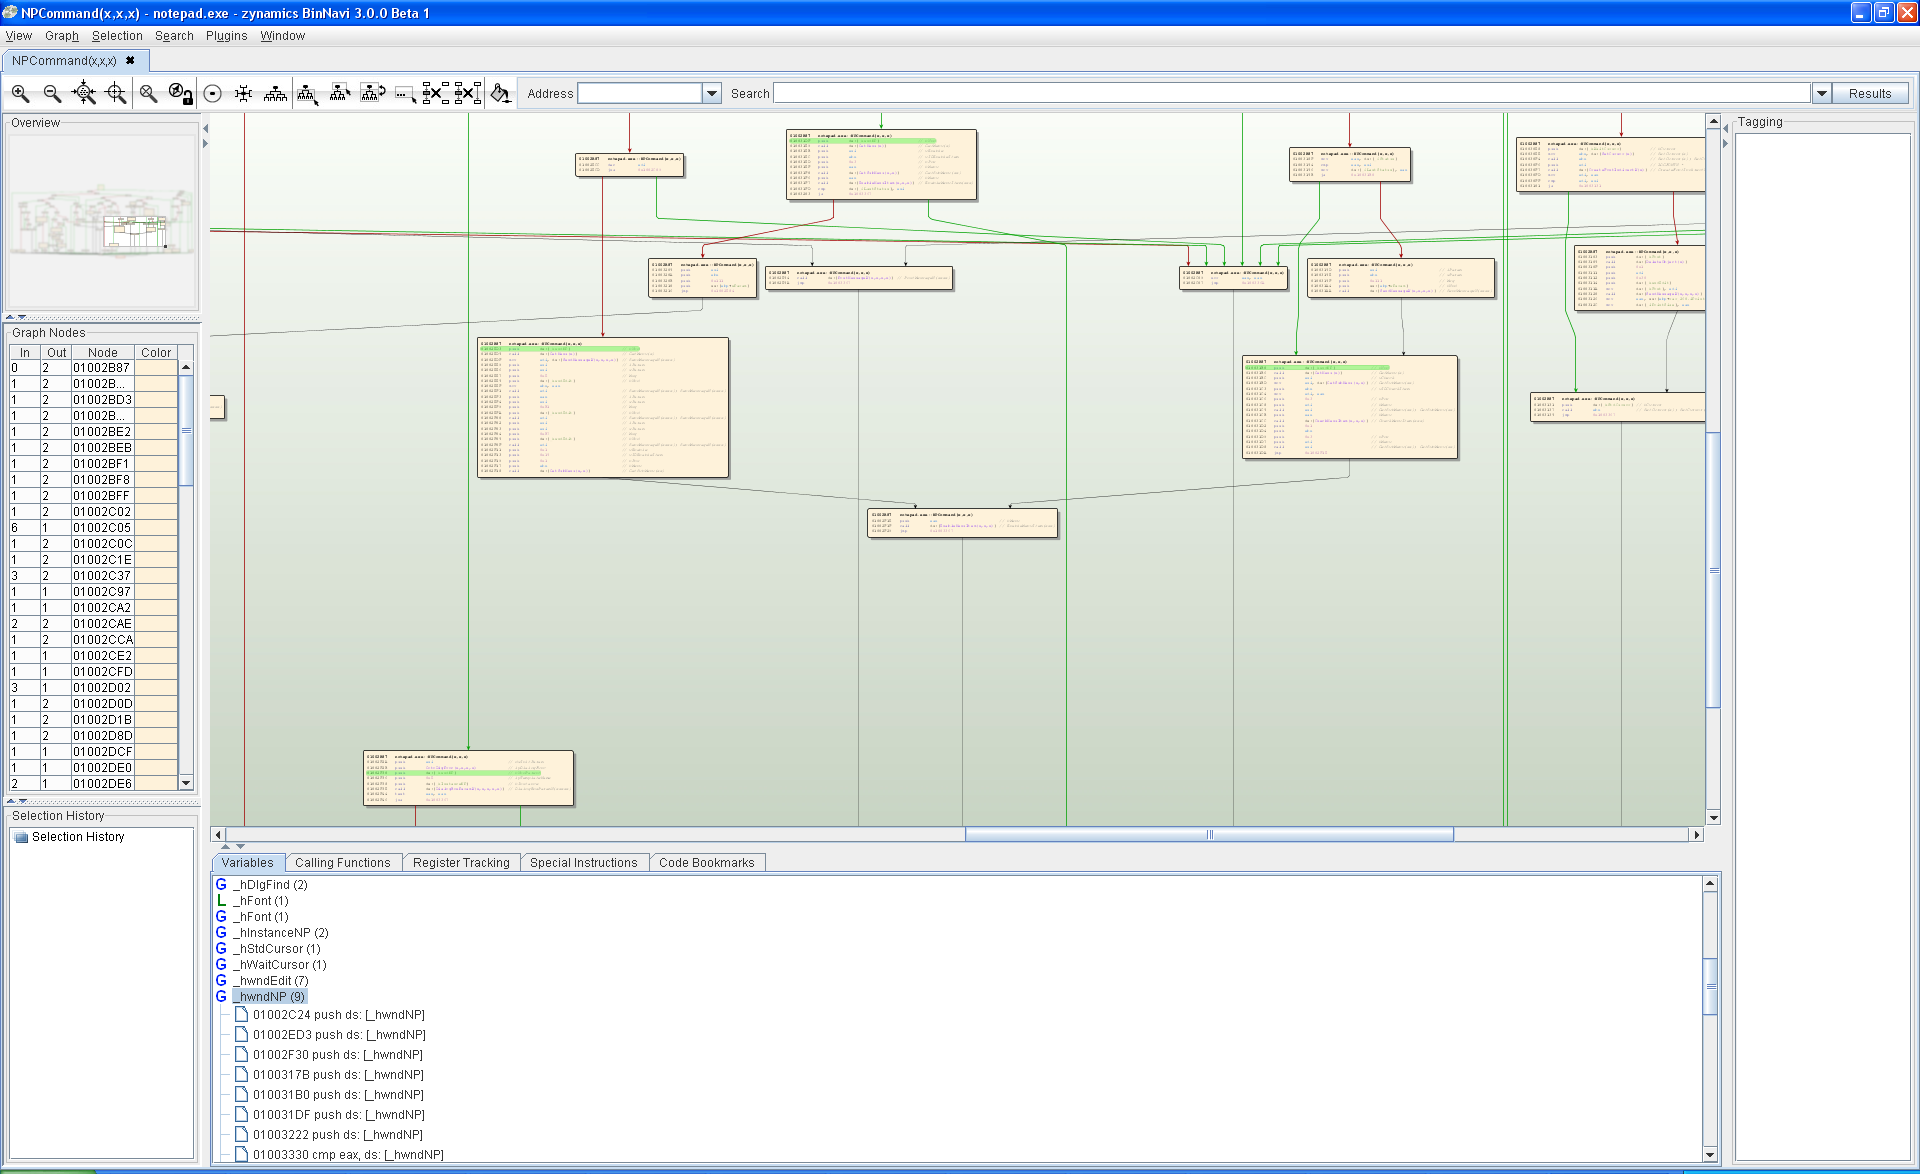
Quickly see where variables are used

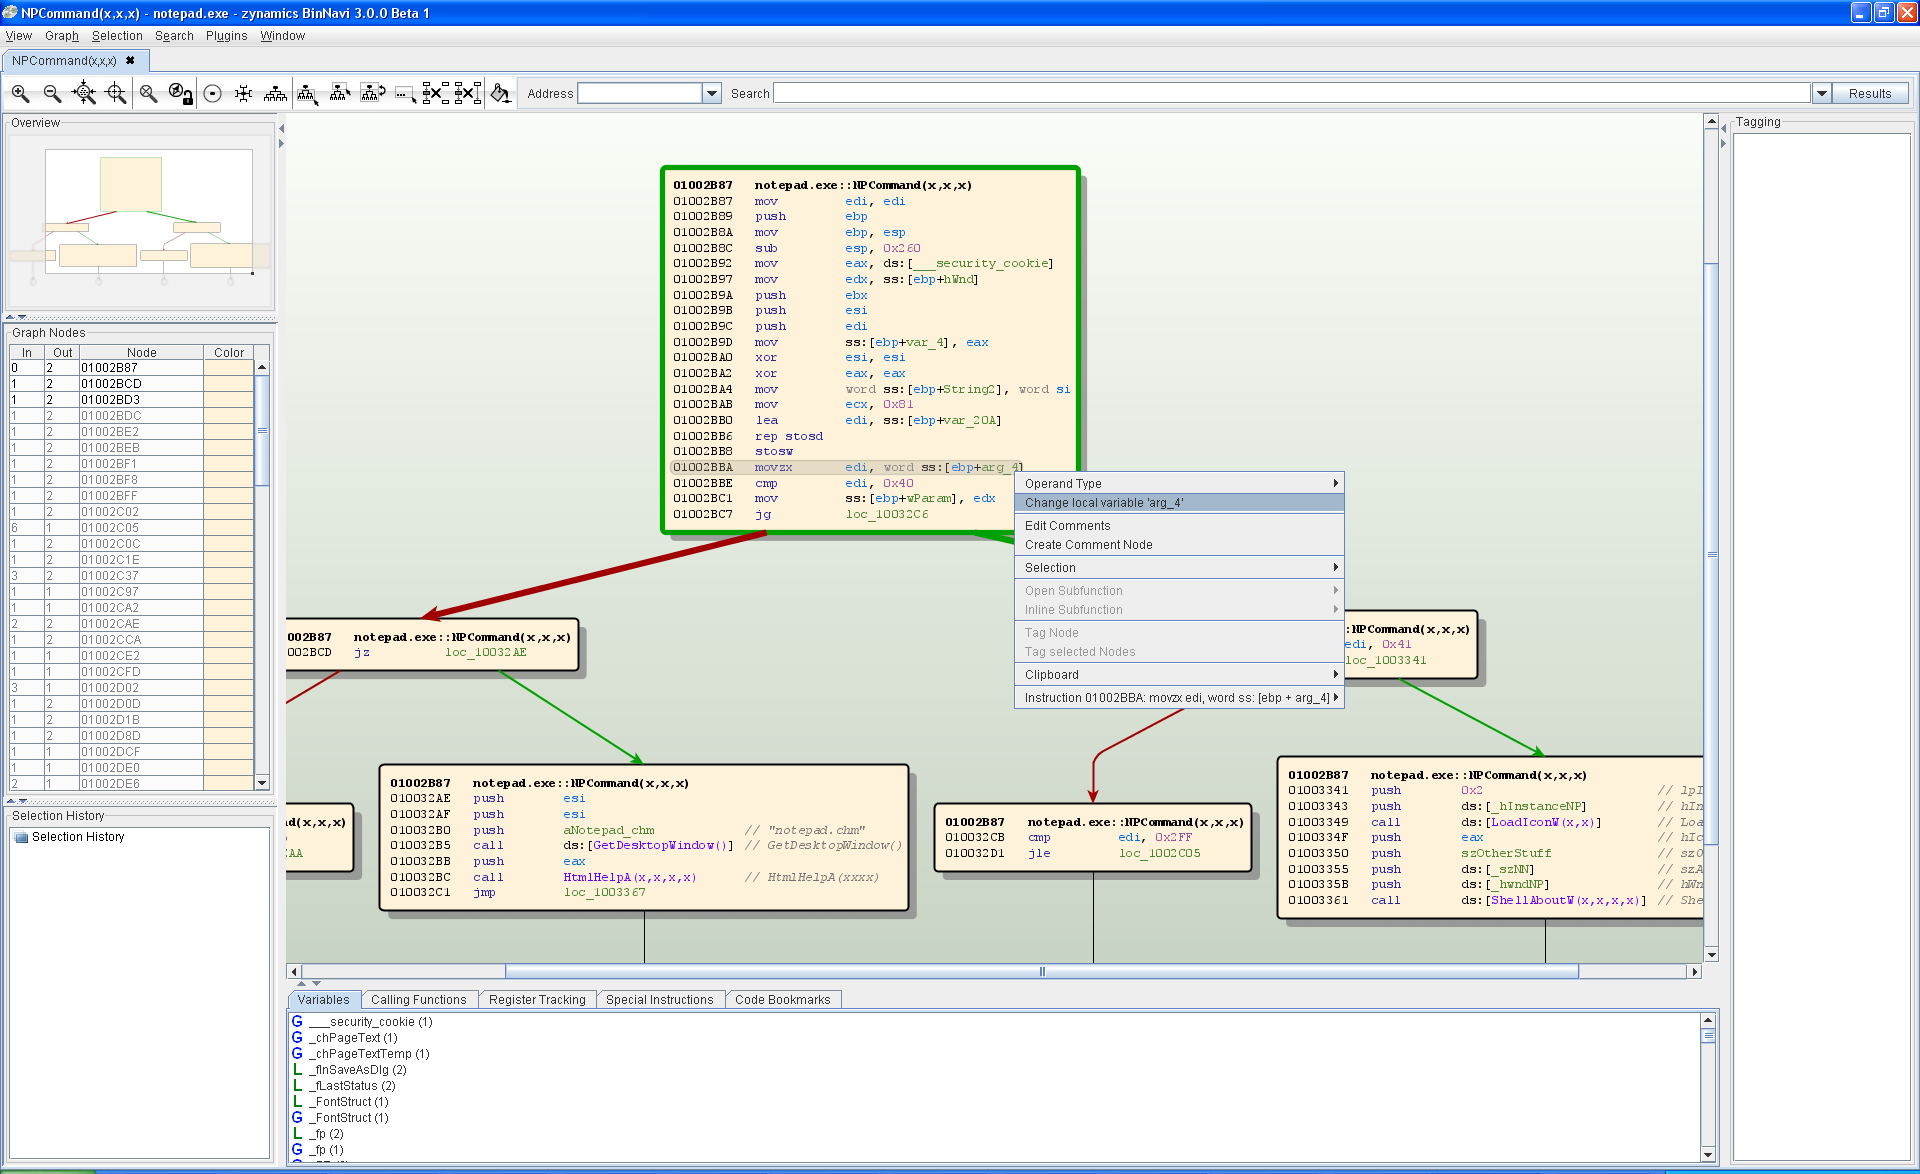
You can now highlight instructions that use a given variable. This helps you quickly see where variables are used in a function.

Highlighting all instructions that access the _hwndNP variable

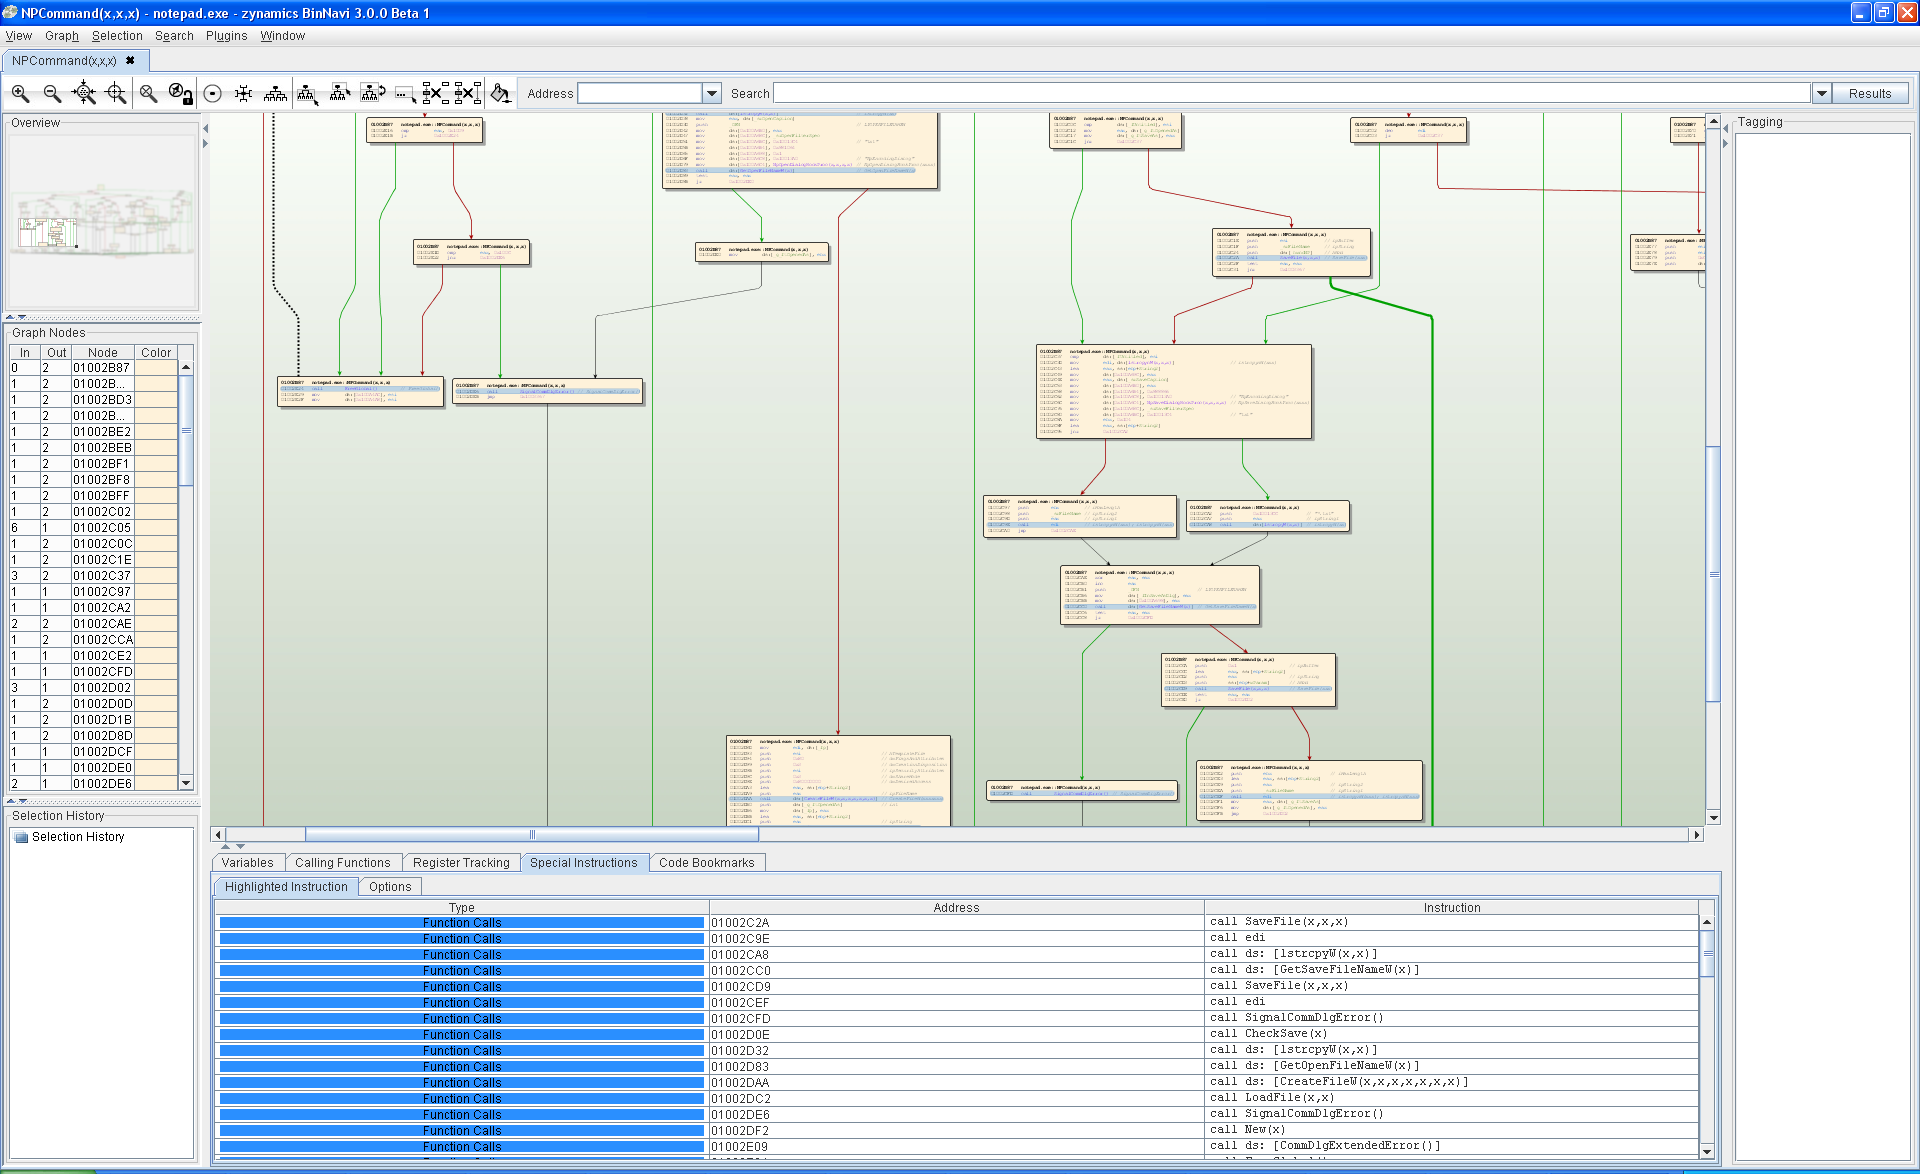
Quickly recognize special instructions

You can also highlight special instructions now. In this release “special” means either function calls, instructions that read from memory, or instructions that write to the memory. Especially the function call highlighting turned out to be really useful while reverse engineering code. We will probably extend this feature in the future.

Highlighting all function call instructions

So, to wrap this up. Once again, many new features were added and many older features were improved. It was really difficult to pick a Top 10 for this blog post and if you have looked through the list of changes in the manual you might consider other improvements to be more important than the ones presented here.

VxClass, automated signature generation, RSA 2010

Wednesday, February 24th, 2010

Everybody is convening in San Francisco next week for RSA2010 it appears — the big annual cocktail & business card exchange event. If you are interested in any of our technology (automated malware classification, automated signature generation, BinDiff, BinNavi) and would like to meet up with me, please contact info@zynamics.com 🙂

Resolving dynamic function calls with BinNavi

Sunday, February 14th, 2010

One of the big problems of static code analysis are function calls with non-static call targets. These function calls can call different target functions depending on the current program state. At first they call one function and in the next moment they might call a completely different function. Popular examples of such dynamic function calls are virtual functions (like in C++) or function pointers to callback functions.

Statically finding the set of potential call targets of a dynamic function call is very difficult. While this is an area of program analysis that has seen a lot of research in the last years, the problem is undecidable in general and can become really ugly really quickly. A simpler way to resolve the call targets of dynamic function calls is to execute the target program and log where dynamic function calls are going.

In BinNavi we have implemented a way to resolve dynamic function calls within modules as well as dynamic function calls that cross module boundaries. The general idea behind our code is this:

  • Figure out where the dynamic function calls are located and put breakpoints on them
  • Every time such a breakpoint is hit, execute a single step and find out where the call is going
  • Keep going until enough data has been collected

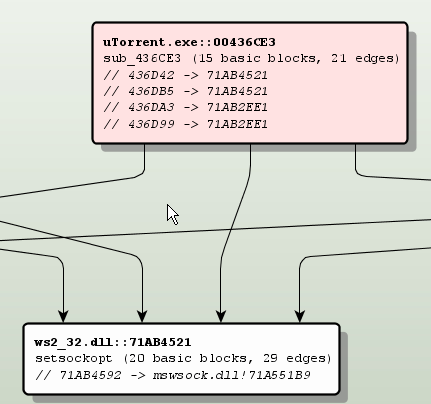
You can see how it all works in the 5 minutes (13 MB) flash video you can watch when you click on the image below.

Resolved dynamic function calls to ws2_32.dll

Here is some more information about the process which I could not put into the video itself:

The whole Call Resolver functionality is not part of BinNavi itself but implemented as a plugin. This shows how easily users of BinNavi can extend the BinNavi GUI with new functionality and how powerful the debugging and graphing API of BinNavi is. In fact, you can download the code of the plugin here if you want to check it out yourself. This plugin was written in Java but it could have been written in Jython or JRuby as well.

Storing disassembly data in a MySQL database gives the plugin an enormous advantage: It is really, really simple to find the addresses of dynamic function calls. A single SQL query does the trick. In most other reverse engineering tools the plugin would need to go through all functions/basic blocks/instructions of the modules to find the dynamic function call instructions.

Setting breakpoints only on dynamic function call instructions brought a big speed improvement compared to just tracing the whole target program. As you can see in the video, the target program stays responsive enough to be used. This is very useful because it allows the user of the Call Resolver to control what functionality is executed and therefore what dynamic function calls are traced.

Of course the dynamic approach has downsides too. We have to have a way to execute the target program. If all we have is a non-executable memory dump of some suspicious file then we can not use dynamic function call analysis. Even if it is possible to execute the target program, it is easy to miss function calls that are never executed or function call targets that are never reached while the tracer is attached to the process. This is especially true if you have a heuristic like BinNavi has where you stop resolving function calls that “always” (really, more than 20 times) seem to go to the same target address.

So, what about you? I’d like to hear about your experiences with resolving dynamic function calls. Are you more of a fan of a static solution or a dynamic solution?

staff++

Wednesday, February 3rd, 2010

Hi everyone,

I am the new member on team zynamics. My name is Tim Kornau. I recently finished my Diploma Thesis at the Ruhr-University Bochum in IT-Security which covered the topic of return-oriented programming for the ARM architecture. I will post a summary of the thesis here in a follow-up blog post soon. For the impatient, you can already go ahead and read it –here-.

Primarily I will be working with Sebastian Porst on BinNavi and extending its capabilities even further. Right now I am working on the new MIPS REIL translator featured in the upcoming BinNavi 3.0 release.

If you have any questions about REIL, BinNavi, ARM, return-oriented programming or are just interested in sharing ideas about the topics, I am happy to talk to you.

I am looking forward to an awesome time at zynamics and a lot of new things to learn and do.

From disassembly to isolating important functions in less than four minutes

Monday, February 1st, 2010

My earlier blog post about the improved Differential Debugging feature of BinNavi 3.0 generated a lot of interest so I have decided to write a follow-up post. Unlike last time I want you to be able to see what BinNavi can do and not just read about it. I have therefore created a short Flash video that shows how to find important code in disassembled files using the BinNavi debugger and its trace mode which is the core of Differential Debugging.

In the video I start with a disassembled IDB file of Pidgin’s liboscar.dll. The first step is to import the data from the IDB file into a BinNavi MySQL database. Afterwards I open the call graph of liboscar.dll and put the BinNavi Win32 debugger into function trace mode. In this mode trace events are generated every time a function of liboscar.dll is executed. This allows me to find the functions responsible for sending messages in just a few seconds.

You can find the video here. (5 MB Flash video with a resolution of 1280 x 1024)

Now this video shows only the most primitive use case of Differential Debugging. Nevertheless, this use case is already incredibly powerful. Finding out what code is responsible for what functionality of a program in just a few seconds is incredibly useful, no matter what you are trying to do.

However, there are situations where this simple use case is not enough. Maybe you are analyzing a daemon process where you can’t just click on some GUI element to isolate events. For these situations we provide more advanced features, like the ability to compare and connect recorded traces using set operations I mentioned in my earlier post.

Code coverage and BinNavi

Sunday, January 24th, 2010

I have already explained in my previous posts how much I love static analysis, nonetheless sometimes you have to get your hands dirty and use a debugger. In this post we will take a look at the BinNavi debugging APIs and how to use them to create a code coverage plugin. In this blog post I have spoken about how to use BinNavi “without BinNavi” so in order to fully understand the rest of the post it is probably better to take a look at it.

We implement code coverage at basic blocks level, that is we set a breakpoint at the beginning of each basic block inside a module. So the first thing to do is to retrieve the basic blocks of a given module. BinNavi exports a method to directly read the start address of each basic block belonging to a given module from the database instead of iterating through the functions and retrieve the basic blocks structures. It should be noticed though that this method cannot be used to modify basic blocks structures.

[sourcecode language=”python”]
for module in mods:
addresses = ModuleHelpers.getBasicBlockAddresses(module)
for address in addresses:
addr = address.toLong()
# filter them using user-supplied lower and upper bound addresses
if start_addr <= addr <= end_addr:
blocks.append(addr)

print "Total basic blocks", len(blocks)[/sourcecode]

Of course those addresses need to be relocated at run-time,  therefore the next task is to locate the module in-memory and relocate each address accordingly. Intuitively in order to do so we need to attach to the remote process and look for loaded modules until we find the one we are interested in:

[sourcecode language=”python”]
def getRunningModule(self, moduleName):

if self.debugger is None:
return None

self.debugger.process.addListener(self)
self.name = moduleName

if self.debugger.isConnected() is False:
print "attaching to the remote target"
self.debugger.connect()

while self.module is None:
continue

self.debugger.suspend()[/sourcecode]

We suspend the target process here because before executing the process we first need to relocate the addresses and set breakpoints. We will resume it after both operations are completed.

As you might have noticed before attaching to the remote target we register a listener for the target process.
There are a few types of listener classes useful for our purposes, most notably IDebuggerListener and IProcessListener. Both of them are notified when common debugging events happen. To learn more about those listeners  I suggest you to take a look at the documentation.
In our class we implement a few methods of the IProcessListener class which are called by the dispatcher inside BinNavi when certain messages are delivered from the remote debugger.

[sourcecode language=”python”]
def changedTargetInformation(self, process):
self.debugger.resume()

def addedModule(self, process, mod):
if self.module != None:
return
for module in process.modules:
if module.name.find(self.name) != -1:
self.module = module[/sourcecode]

The first method is called when the debugger attaches to the target process and retrieves some basic information on it. We need to resume the process at that point as the debugger after the initialization suspends it(notice that the call to suspend() in the previous code snippet happens after we locate the module in memory, that is after we call resume() here).

The second method is called whenever a new image is loaded in the process address space. In our code as soon as we find the module we are looking for we don’t care about other images.

Now that we have the module in-memory we can relocate the addresses:

[sourcecode languge=”python”]
inMemoryAddr = runningModule.baseAddress.toLong()
originBaseAddr = self.naviDB.module.imagebase.toLong()
print "Original Base Address: %x In-Memory one: %x\n Relocating..\n" % (inMemoryAddr, originBaseAddr)
for bb in self.blocks:
addresses.append((bb – originBaseAddr) + inMemoryAddr)[/sourcecode]

I lied when I said we need to set breakpoints, in fact BinNavi takes care of that internally by the means of a TraceLogger!

[sourcecode language=”python”]
for address in addresses:
naviAddresses.append(TracePoint(self.traceEntity, Address(address)))

print "Starting the process…\n"
tracer = TraceLogger(self.debugger, self.traceEntity)
self.traceManager = myTraceListener(addresses)
self.trace = tracer.start("codeCoverage", "", naviAddresses)
self.trace.addListener(self.traceManager)
self.debugger.resume()[/sourcecode]

TraceLogger is a class which let create a log of echo breakpoint events, that is we create a list of TracePoints (locations where the trace logger sets echo breakpoints) and the TraceLogger will take care of the rest.

Echo breakpoints are a ‘lightweight’ version of regular breakpoints. In essence, echo breakpoints get removed after they are initially hit. This leads to better performance of the application that is being debugged, as execution speed of a particular path is only slowed down during the -first- execution.

So first we set up the tracer and then we create the trace. A trace can have a listener which is notified when a new event is added; we use such a listener to keep track of the blocks touched during the execution.

[sourcecode language=”python”]
class myTraceListener(ITraceListener):
def __init__(self, addresses):
self.addyCount = []
for address in addresses:
self.addyCount.append((address, 0))

def addedEvent(self, trace, event):
for addy, counter in self.addyCount:
if addy == event.address:
self.addyCount.remove((addy, counter))
self.addyCount.append((addy, counter + 1))[/sourcecode]

When a new event is added, we retrieve the address and update the address counter accordingly.
At this point we are all set, and we can get the code coverage score:

[sourcecode language=”python”]
def getCodeCoverage(self):
#get the list of all the executed blocks at a given program point
touched_blocks = self.naviTracer.getExecBlocks()
coverage = float(len(touched_blocks)) / float(len(self.getBlocks()))
return coverage

def printStatistics(self):
print "CODE COVERAGE = %f\n" % self.getCodeCoverage()
[/sourcecode]

Let’s run it then! On the target machine we run:

[code]
client32.exe C:\WINDOWS\system32\calc.exe
[/code]

on the local machine

[code]
jython NaviCoverage.py databaseHost databaseUser databasePassword databaseName calc.exe
[/code]

And here’s a screenshot

That’s all for now.

BinNavi 3.0 Preview: Improved Differential Debugging

Tuesday, January 19th, 2010

One of the most popular features of BinNavi is what we call Differential Debugging.  Differential Debugging is the ability to create trace logs of debugged processes and to analyze these logs later.  Although BinNavi has had this feature since version 1.5, the functionality of Differential Debugging was rather limited and remained almost unimproved for the last two years. All it did so far was to record the addresses of the instructions executed during a trace. For BinNavi 3.0 we have improved Differential Debugging significantly.

Data Recording

The first improvement we made is to log more information about the state of the debugged program. For each executed instruction, BinNavi 3.0 is not only recording the address of the instruction but the values of all CPU registers when that instruction was executed. If any of the registers point to valid memory, up to 128 bytes starting from where the register is pointing to are recorded too. All of this information is stored in the database and can later be analyzed by the user.

Recording register values and memory chunks is useful but it quickly became clear that even small trace logs contain a lot of data that can easily overwhelm the user. To make the data more accessible to the user we added ways to search through lists of trace events. It is possible to display only those trace events that contain registers of a given value or only those trace events whose memory chunks contain a given byte sequence. This is very useful to quickly find exactly those trace events that access critical data.

Switching Traces

The next improvement we made is to give the user the option to create a new trace record while the debugger is already in trace mode. In the past it was only possible to start trace mode for a given graph and to turn it off again later. In BinNavi 3.0 it is possible to switch the trace log which receives recorded events on the fly. This is very useful in any situation where you want to discard all trace events before a given moment or to sort trace events into different trace logs.

Imagine you want to record how an instant messenger program sends a message. You can start the instant messenger program and begin to record a trace. At first, all the breakpoints of the random background noise (like GUI handlers) are hit. These events are not important and go into the first log which is later discarded. Once all unimportant breakpoints have been hit you can tell BinNavi to put all further trace events into a new trace log. Then you can send an IM message. The trace events triggered by the message sending code are all put into the second list. To find the code that processes a received message you can do the same again. Tell BinNavi to put all trace events that arrive from now on into a new trace list, then send a message to your IM client.

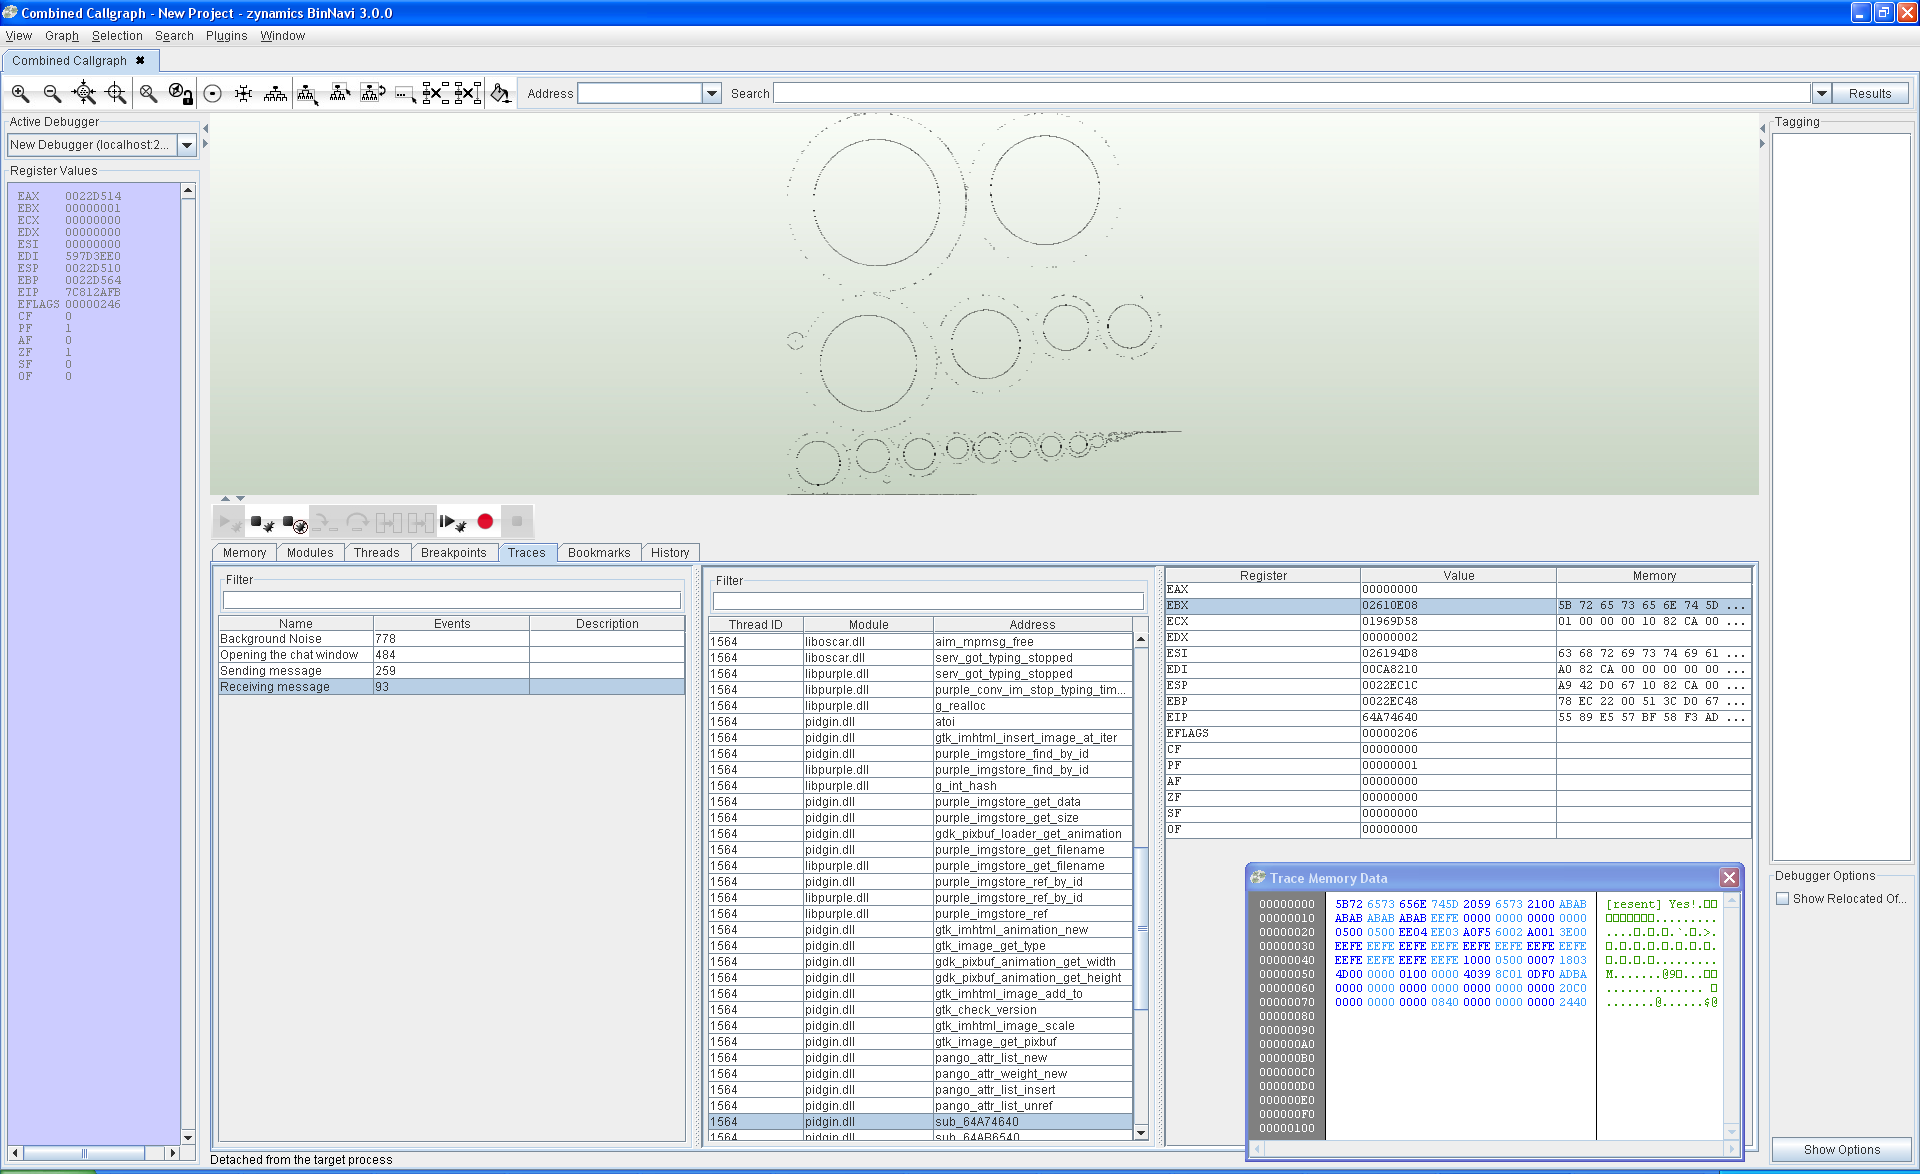
The result of all of this is shown in the following screenshot which shows the results of a Pidgin debugging session. What I did to produce these trace logs was to start Pidgin and switch the attached debugger to trace mode. The first trace log (Background Noise) contains all the breakpoint events that were triggered immediately or when I did unrelated things like move my mouse over the Pidgin window. Once the background noise events stopped I spawned off a new trace (Opening the chat window) and opened a chat window. This second trace contains only those events that were triggered while the chat window was opened. Then I spawned off another  trace (Sending message) and sent a message to someone. Afterwards I waited for an incoming chat message from the person I was chatting with.

BinNavi 3.0 trace mode demonstration

Differential Debugging of Pidgin message sending

In the end I had four neatly separated trace logs which contain trace events for exactly those functions that are responsible for opening a chat window (second log), for sending a message (third log), and for receiving a message (fourth log).

Combining Trace Logs

While the ability to sort trace events into different trace logs on the fly is incredibly useful, it is not really useful in situations where the user does not know when exactly to create a new log. To make it more comfortable to find pieces of code in these situations, we have added the option to combine recorded traces. It is now possible to combine previously recorded traces using set-union, set-intersection, and set-difference operations.

Especially the set-difference operation is very useful in practice. Imagine you have a program that accepts input and performs a sanity check on the input. Now you can simply record a trace of a program execution where you give the program well-formed input and another trace where you give the program malformed input. Doing a set-difference on the two recorded traces shows you exactly where the program traces deviate and you can easily find the part of the code that checks whether the input was wellformed or not.

The last improvement we made to Differential Debugging is to give the user the option to configure how often trace events at individual addresses are recorded. In the past, each address was only recorded once. This was useful to get a quick overview of the executed code but in other situations this was simply not good enough. We have had users who wanted to generate more complex trace logs that record trace events every time an instruction is executed. This is useful if you want to profile code for speed or if you want to do code coverage that considers how often an instruction is executed. Using Differential Debugging in BinNavi 3.0 this is now possible.

That’s it for Differential Debugging in BinNavi 3.0. These improvements should make it much easier for users to find exactly those parts of a debugged program they are looking for.