Archive for June, 2010

ida2sql: exporting IDA databases to MySQL

Tuesday, June 29th, 2010

Today we are finally making it easier to get your hands on ida2sql, our set of scripts to export information contained in an IDA database into MySQL.

As a short recap, ida2sql is a set of IDAPython scripts to export most of the information contained in an IDB into a MySQL database. It has existed and evolved already for a few years and has been the main connection between IDA and BinNavi for the most of the life of the latter.

The last development efforts have been geared towards making the schema a bit more friendly (see below) and making it work in a fair range of IDA (5.4 to 5.7) and IDAPython versions (including some that shipped with IDA which had minor problems, ida2sql will automatically work around those issues). The script runs under Windows, Linux and OSX.

ida2sql is comprised of a ZIP archive containing the bulk of the scripts that simply needs to be copied to IDA’s plugin folder. No need to extract its contents. A second script, ida2sql.py, needs to be run from within IDA when we are ready to export data. You can keep it in any folder, it should be able to automatically locate the ZIP file within the plugins folder. You can download here a ready built package containing the ZIP file, the main script, a README and an example configuration file.

When the main Python file is executed in IDA and if all the dependencies are successfully imported the user will be presented with a set of dialogs to enter the database information. If the database is empty there will also be a message informing that the basic set of tables is about to be created at that point. Once all configuration steps have been completed the script will start processing the database, gathering data and finally inserting it all into the database.

The configuration process can be simplified by creating a config file ida2sql.cfg in IDA’s main directory (or by pointing to it the IDA2SQLCFG environment variable). If ida2sql can find that file it will not ask for any of the configuration options and go straight into the exporting.

Automation

ida2sql has a batch mode that comes handy when you need to export a collection of IDBs into the database. To run ida2sql in batch mode it’s enough to set the corresponding option in the configuration file.

mode: batch

An operation mode of “batch” or “auto” indicates that no questions or other kind of interaction should be requested from the user. (Beware though that IDA might still show dialogs like those reminding of a license or free-updates period about to expire. In those cases run IDA through the GUI and select to never show again those reminders). The batch mode is specially useful when running ida2sql from the command line, for instance:

idag.exe -A -OIDAPython:ida2sql.py database.idb|filename.exe

Requirements

  • mysql-python
  • A relatively recent IDA (tested with 5.4, 5.5, 5.6 and the latest beta of 5.7)
  • IDAPython. Chances are that you already have it if you are running a recent IDA version
  • A MySQL database. It does not need to reside on the same host

The schema

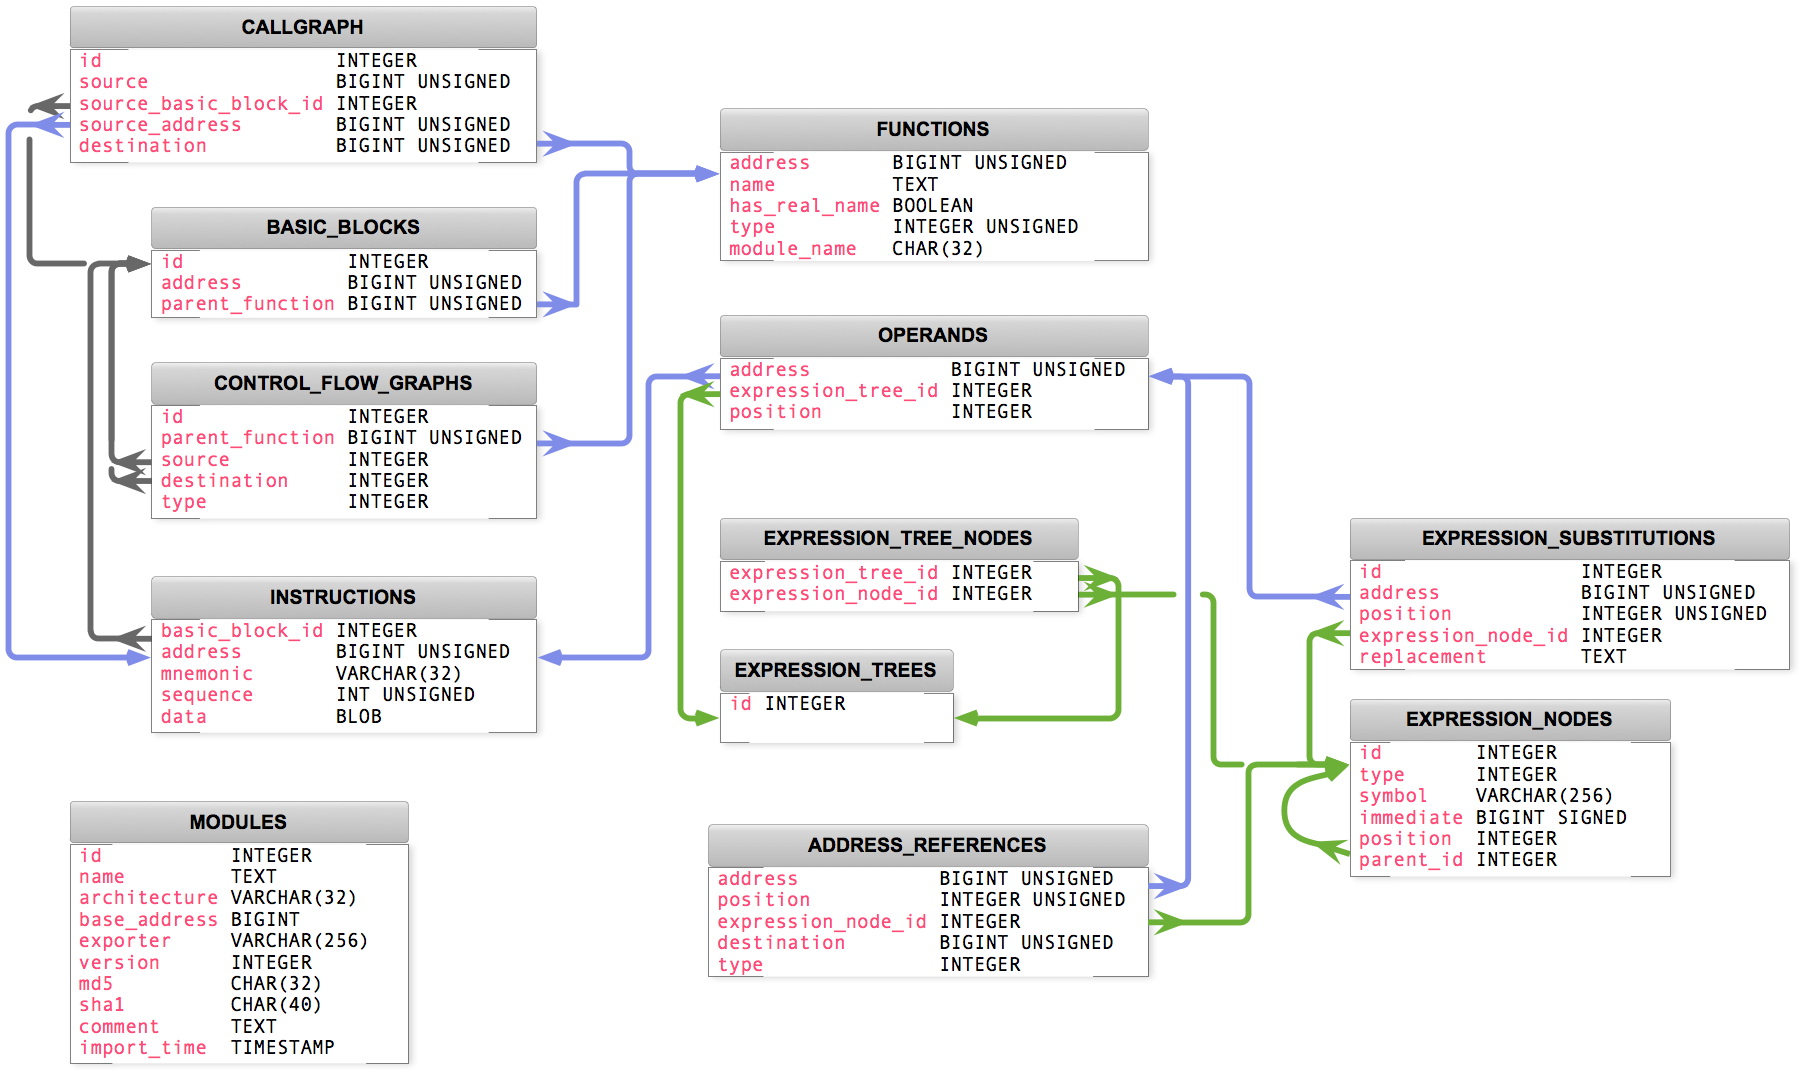
A frequent criticism to the schema design has always been the use of a set of tables per each module. People have asked why not use instead using a common table-set for all modules in the database. While we considered this approach in the original design, we opted for using a set of tables per module. We are storing operand trees in an optimized way aiming at reducing redundant information by keeping a single copy of all the common components of the operand’s expression tree. Such feature would be extremely difficult to support were we to use a different a different schema. Additionally tables can easily grow to many tens of millions of rows for large modules. Exporting hundreds of large modules could lead to real performance problems.

The table “modules” keeps track of all IDBs that have been exported into the database and a set of all the other tables exists for each module.

BinNavi DB Version 2

BinNavi DB Version 2

The following, rather massive, SQL statement shows how to retrieve a basic instruction dump for all exported code from an IDB. (beware of the placeholder “_?_”)

[sourcecode language=”sql”]
SELECT
HEX( functions.address ) AS functionAddress,
HEX( basicBlocks.address ) AS basicBlockAddress,
HEX( instructions.address ) AS instructionAddress,
mnemonic, operands.position,
expressionNodes.id, parent_id,
expressionNodes.position, symbol, HEX( immediate )
FROM
ex_?_functions AS functions
INNER JOIN ex_?_basic_blocks AS basicBlocks ON
basicBlocks.parent_function = functions.address
INNER JOIN ex_?_instructions AS instructions ON
basicBlocks.id = instructions.basic_block_id
INNER JOIN ex_?_operands AS operands ON
operands.address = instructions.address
INNER JOIN ex_?_expression_tree_nodes AS operandExpressions ON
operandExpressions.expression_tree_id = operands.expression_tree_id
INNER JOIN ex_?_expression_nodes AS expressionNodes ON
expressionNodes.id = operandExpressions.expression_node_id
ORDER BY
functions.address, basicBlocks.address,
instructions.sequence, operands.position,
expressionNodes.parent_id,
expressionNodes.position;
[/sourcecode]

Limitations and shortcomings

The only architectures supported are x86 (IDA’s metapc), ARM and PPC. The design is pretty modular and supports adding new architectures by simply adding a new script. The best way to go about it would be to take a look at one of the existing scripts (PPC and ARM being the simplest and most manageable) and modify them as needed.

ida2sql has been designed with the goal in mind of providing an information storage for our products, such as BinNavi. It will only export code that is contained within functions. If you have an IDB that has not been properly cleaned or analyzed and contains snippets/chunks of code not related to functions, those will not be exported. Examples of some cases would be exception handlers that might only be referenced through a data reference (if at all) or switch-case statements that haven’t been fully resolved by IDA.

The scripts have exported IDBs with hundreds of thousands of instructions and many thousands of functions. Nonetheless the larger the IDB the more memory the export process is going to require. ida2sql’s performance scales mostly linearly when exporting. It should not degrade drastically for larger files. It will also make use of temporary files that can grow large (few hundred MBs if the IDB is tens of MBs in size when compressed). Those should not be major limitations for most uses of ida2sql.

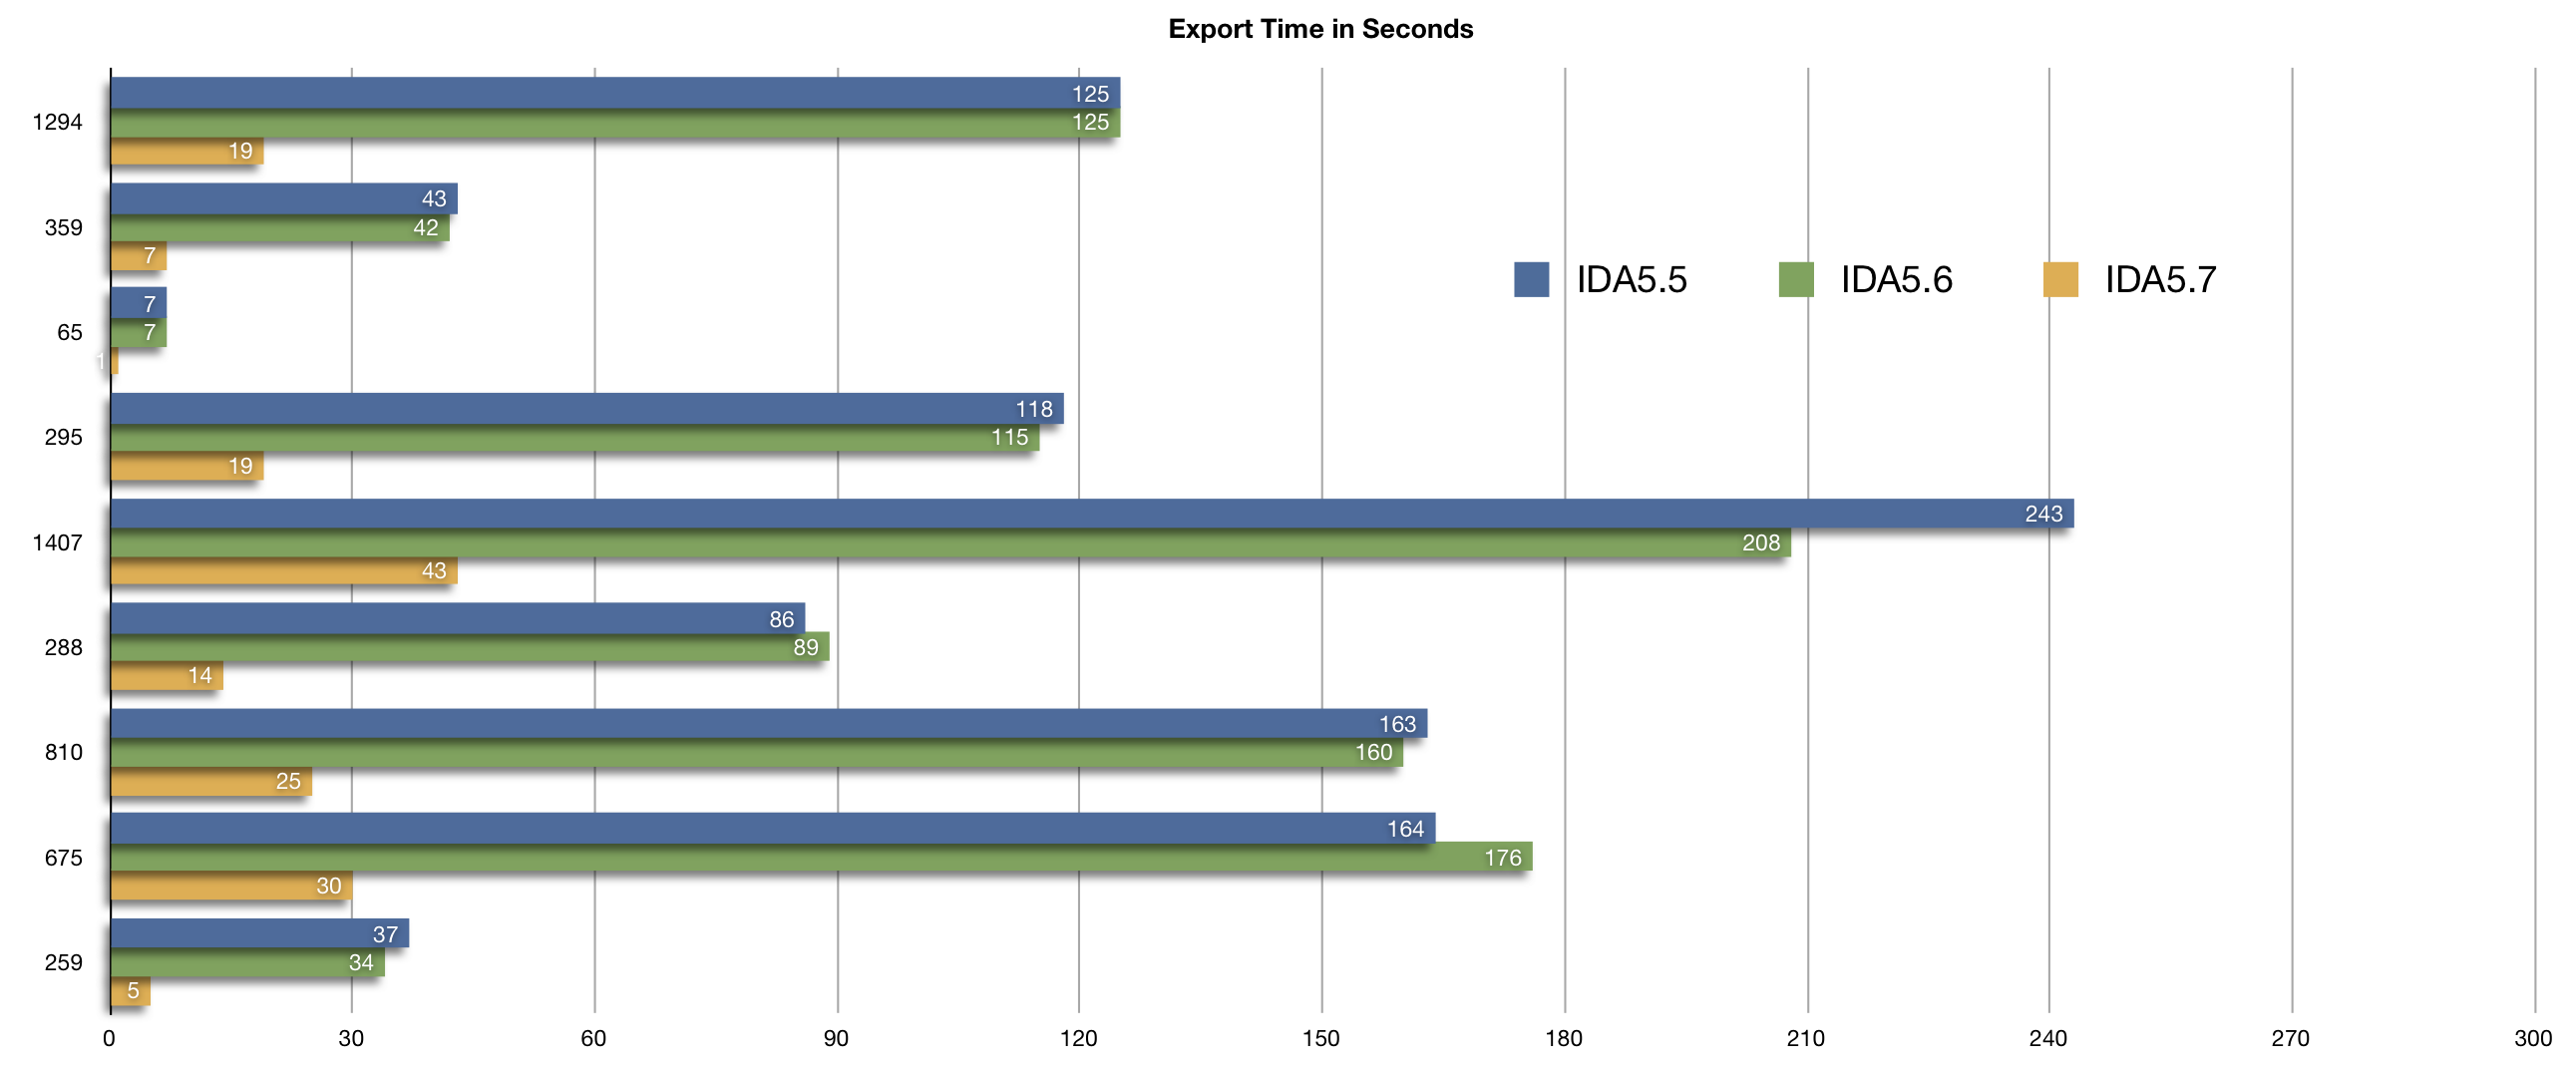
Also it’s worth noting that IDA 5.7 has introduced changes to the core of IDAPython and the tests we have made so far with the current beta the performance of ida2sql has improved significantly. In the following figures you can see the export times in seconds for some IDBs exported with IDA 5.5, 5.6 and 5.7.

ida2sql export times

ida2sql export times for a medium size file

ida2sql export times

ida2sql export times for a set of small IDBs

Summing up. We hope this tool will come handy for anyone looking into automating mass analysis and has been bitten by the opaque and cumbersome IDBs. Give it a spin, look at the source code, break it and don’t forget to let us know how it could be improved! (patches are welcome! 😉 )

The REIL language – Part II

Tuesday, June 22nd, 2010

In the first part of this series I gave a brief overview of the REIL language (Reverse Engineering Intermediate Language), the intermediate language we use in our internal binary code analysis algorithms. I talked about the language in general and what motivated us to create it. In this second part I am going to talk about the REIL instruction set.

As mentioned in the first part of the series, there are only 17 different REIL instructions. We deliberately decided to reduce the instruction set as much as possible without losing too much of the semantics of the original instructions. This was important for us because we primarily use REIL code in abstract interpretation algorithms and the fewer instructions an instruction set has, the less code you have to implement in your abstract interpretation algorithms. It is much easier and faster to write code that processes the effects of 17 different instructions on the program state than it is for 100 instructions.

The REIL instruction set can loosely be divided into five different groups of instructions: Arithmetic instructions, bitwise instructions, data transfer instructions, logical instructions, and other instructions.

Arithmetic instructions

With six different instructions, the group of arithmetic instructions is the biggest group. It contains the instructions ADD (Addition), SUB (Subtraction), MUL (Unsigned multiplication), DIV (Unsigned division), MOD (Unsigned modulo), and BSH (Bitwise shift). Each of these instructions takes two input operands and one output operand where the result of the operation is stored.

[sourcecode]
add eax, 5, ebx // ebx = eax + 5
sub t0, 10, t1 // t1 = t0 – 10
mul t1, 10, t2 // t2 = t1 * 10
div t1, 10, t2 // t2 = t1 / 10
mod t1, 10, t2 // t2 = t1 % 10
bsh t1, -5, t2 // t2 = t1 << 5
[/sourcecode]

ADD and SUB work just like you would expect addition and subtraction to work. The two input operands are added or subtracted and the result of the operation is stored in the output operand.

It is a bit unusual that REIL only supports unsigned multiplication and division operations but it turned out that it is simple to simulate signed multiplication and division using their unsigned counterparts.

The BSH instruction is one of the design mistakes we made in REIL 1.0. We encoded the direction of the shift (bitwise left shift or bitwise right shift) in the sign of the second operand. If the operand is negative, a left shift is executed. If it is positive, a right shift is executed. This makes the interpretation of BSH instructions very difficult especially if the shift-amount is not a constant value (think shl eax, cl on x86) We are planning to replace the BSH instruction with two instructions, LSH and RSH, in future versions of REIL.

Bitwise instructions

The second group of instructions, the bitwise instructions, contains the three instructions AND, OR, and XOR. These instructions behave just the way you expect bitwise AND, OR, and XOR to behave. Each instruction takes two input operands and connects the bits of the input operands using the truth table of the bitwise operation specified in the mnemonic. The result of the bitwise operation is stored in the output operand.

[sourcecode]
and eax, 5, ebx // ebx = eax & 5
or t0, 10, t1 // t1 = t0 | 10
xor t1, 10, t2 // t2 = t1 ^ 10
[/sourcecode]

Data transfer instructions

The third group of instructions, the data transfer instructions, is more interesting again. It contains the instructions STR, LDM, and STM.

The STR instruction (Store Register) copies an integer literal or the content of a register to another register. The source operand is the first operand of the instruction, the target operand is the third operand.

LDM (Load Memory) and STM (Store Memory) are used to access the memory of the simulated process. In the LDM instruction, the first operand specifies the memory address from where a value is loaded. The third operand is the register operand where the loaded value is stored. In the STM instruction, the order of operands is reversed. The first operand specifies the value to be written to memory, the third operand specifies the memory address.

Both LDM and STM can access memory regions of any size in one go. In case of LDM,  the size of the accessed memory equals the size of the REIL operand where the loaded value is stored. In case of STM, the size of the accessed memory equals the size of the REIL operand that contains the value to store.

[sourcecode]
str t0, , t1 // t1 = t0
ldm t0, , t1 // t1 = [t0]
stm 33, , t1 // [t1] = 33
[/sourcecode]

Logical instructions

The fourth group of instructions is the group of logical instructions. With two instructions, BISZ and JCC, this group is rather small.

The BISZ instruction (Boolean Is Zero) takes a value in the first operand and checks whether the operand is zero or not. If it is zero, the output operand of the instruction is set to one. Otherwise it is set to zero.

JCC (Jump Conditional) is the only way to execute a branch in the REIL language. The instruction takes a condition in the first operand and if the condition operand evaluates to anything but zero, control is transferred to the instruction at the address specified in the third operand.

[sourcecode]
bisz t0, , t1 // t1 = t0 == 0 ? 1 : 0
jcc t1, , t2 // jump if t1 != 0
[/sourcecode]

Other instructions

The group of other instructions contains the remaining REIL instructions that do not really fit into any other group.

The first instruction is the NOP instruction (no operation). This instruction does not have an effect on the program state. At first it seems useless to have this instruction in the REIL instruction set but it turned out that having this instruction simplifies the translation process from native assembly instructions to REIL instructions in certain edge cases. Of course, we also could have simulated NOP using the other REIL instructions.

The second instruction of this group is the UNDEF instructions. This instruction is used to indicate that a REIL register has an undefined state. The UNDEF instruction became necessary because there are x86 instructions that leave flags in an undefined state.

The third and last instruction of this group is the UNKN instruction. This instruction is a placeholder instruction that is emitted by the REIL translator every time it encounters a native assembly instruction it can not translate.

[sourcecode]
nop , , // Does nothing
undef , , eax // Marks eax as undefined
unkn , , // Translator found an unknown instruction
[/sourcecode]

A word about operands

In the example code above you have already seen that REIL operands are very simple. In fact, REIL operands can only be of three different types:

  • Integer literals: Decimal, positive integer numbers
  • Registers: String literals like t0 or eax
  • REIL addresses: Two integer literals separated by a period character (400.20)

The purpose of integer literals and register operands is the same for REIL as it is for native assembly instructions. REIL addresses are necessary because there are certain native assembly instructions that contain branches within itself (think of the x86 REP instructions). These internal branches are simulated by REIL JCC instructions with REIL addresses as the third operand. I will talk more about REIL addresses in the third part of this series.

All REIL instructions have three of those operands. However, not all instructions require all three operands to be present. Unnecessary operands have a special type ’empty’ that is not printed when you write down a REIL instruction. That’s why in the example code above you see instructions that have operands separated by commas but without any operand names between the commas. What operands are omitted depends on the functionality of the operands. We have always tried to have the first two operands act as input operands while the third operand is the output operand. The BISZ instruction, for example, has the first and third operand but not the unnecessary second input operand.

That’s it for the second part of this series. In the next part I will talk about translating native code to REIL code.

PDF Dissector 1.1.0 released

Wednesday, June 16th, 2010

Today we are releasing PDF Dissector 1.1.0. Here are the changes compared to PDF Dissector 1.0.0.

  • Feature: Raw and decoded content of streams can now be dumped to files
  • Feature: Decoded streams can now be viewed in hexadecimal view
  • Feature: PDF browsing tree now shows the types of PDF objects
  • Feature: Long-running JavaScript scripts can now be cancelled
  • Bugfix: Improved PDF parsing for objects that do not end with ‘endobj’
  • Bugfix: Removed function names of two emulated functions from the variable inspector of the debugger
  • Bugfix: Added the previously missing tutorials directory that contains sample files for the tutorial
  • API: Made it possible to access dictionary entries, array elements, and indirect references

I think the most important change was the API improvement. It is now possible to do really cool things with Python scripts and the PDF Dissector API. Having the ability to dump streams to a file is also really useful when you are analyzing malicious PDF files like the recent 0-day which made use of an embedded Flash file.

For more information about PDF Dissector please see the manual.

A brief analysis of a malicious PDF file which exploits this week's Flash 0-day

Wednesday, June 9th, 2010

I spent the last two days with a friend of mine, Frank Boldewin of reconstructer.org, analyzing the Adobe Reader/Flash 0-day that’s being exploited in the wild this week.   We had received a sample of a malicious PDF file which exploits the still unpatched vulnerability (MD5: 721601bdbec57cb103a9717eeef0bfca) and it turned out more interesting than we had expected. Here is what we found:

Part I: The PDF file

The PDF file itself is rather large. Analyzing the file with PDF Dissector, I found two interesting streams inside the PDF file. Later I will describe that there is actually a third interesting stream, belonging to object 17, in the PDF file. This stream contains an encrypted EXE file which will be dropped and executed by the shellcode. This can not be known before analyzing the shellcode though.

The first interesting stream can be found in PDF object 1. It is a binary stream that starts with the three characters CWS, the magic value of compressed Flash SWF files headers. I dumped this stream to a file and it turned out to be a valid Flash file.
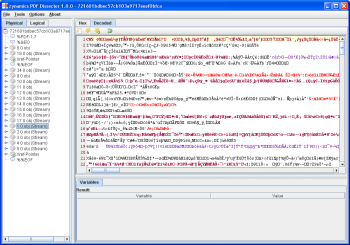
The second interesting stream belongs to PDF object 10. This stream contains a very short JavaScript code snippet that heap-sprays a huge array onto the heap. In the screenshot below you can see the original code.
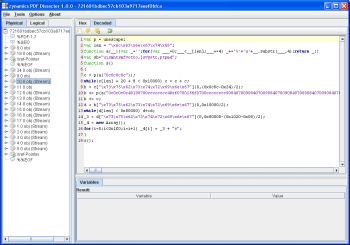
I then used PDF Dissector to execute the JavaScript code. The byte array that gets heap-sprayed is stored in the variable _3 after execution. I dumped this byte array to a file (see heapspray.bin in the ZIP file at the end of this post) and disassembled it with IDA Pro.

Later it will become clear that the embedded SWF file is actually exploiting the Flash player and not Adobe Reader (or rather it exploits the Flash player DLL that is shipped with Adobe Reader). The purpose of the PDF file is primarily to massage the heap into a predictable state for the Flash player exploit.

Part II: The shellcode – Stage I

In the disassembled file I expected to see a nop-sled followed by regular x86 code but this is not what I found. There is something that looks like a huge nop-sled (a long list of ‘or al, 0Ch’ instructions) but no valid code follows that nop-sled (which will later turn out not to be a nop-sled at all). Rather, following the ‘nop-sled’ I found a list of addresses that point into code of an Adobe Reader DLL called BIB.DLL. We were dealing with return-oriented shellcode here.

You can find the documented IDB of the shellcode in the ZIP file at the end of this post. For now please click on this link for a text file that contains the documented code. The beginning looks like

[code]
seg000:00000BEC     dd 7004919h             ; pop ecx
seg000:00000BEC                             ; pop ecx
seg000:00000BEC                             ; mov dword ptr [eax+0Ch], 1
seg000:00000BEC                             ; pop esi
seg000:00000BEC                             ; pop ebx
seg000:00000BEC                             ; retn
seg000:00000BF0     dd 0CCCCCCCCh           ; ecx = 0xCCCCCCCC
seg000:00000BF4     dd 70048EFh             ; ecx = 0x070048EF
seg000:00000BF8     dd 700156Fh             ; esi = 0x0700156F
seg000:00000BFC     dd 0CCCCCCCCh           ; ebx = 0xCCCCCCCC
seg000:00000C00     dd 7009084h             ; retn
seg000:00000C04     dd 7009084h             ; retn
[/code]

and continues for quite a while. The first column shows the address. The second column shows the values on the stack (primarily addresses to ROP gadgets in BIB.DLL). The third column shows what instructions can be found at the given addresses in BIB.DLL and what effects the shellcode has.

The ROP shellcode is a variant of the code found in this exploit POC by villy. At first, the shellcode allocates memory using NtAllocateVirtualMemory (accessed through sysenter). Then, it copies a second stage shellcode to the allocated memory and executes it.

BIB.DLL is actually a DLL file that gets randomly relocated if you have address-space layout randomization enabled on your system. Systems with enabled ASLR can not be exploited by this malicious PDF file. This does not mean that the vulnerability can not be exploited if ASLR is enabled, it’s just that the particular sample we looked at will not work in that case.

Part III: The shellcode – Stage II

The second stage shellcode is rather short. All it does is to copy the third stage shellcode to the memory allocated by the first stage. Afterwards the third stage is executed. An IDB file for the second stage is included in the ZIP file at the end of this post.

[code]seg000:00000000  pop     edx
seg000:00000001  nop
seg000:00000002  push    esp
seg000:00000003  nop
seg000:00000004  pop     edx
seg000:00000005  jmp     short loc_1C
seg000:00000007
seg000:00000007 loc_7:
seg000:00000007  pop     eax
seg000:00000008
seg000:00000008 In this loop of the second stage of
the shellcode, the third stage of the shellcode
seg000:00000008 is copied to a known address (memory allocated
by the first ROP stage) and executed afterwards.
seg000:00000008
seg000:00000008 CopyLoop:
seg000:00000008  mov     ebx, [edx]
seg000:0000000A  mov     [eax], ebx
seg000:0000000C  add     eax, 4
seg000:0000000F  add     edx, 4
seg000:00000012  cmp     ebx, 0C0C0C0Ch  ; Search for this signature to stop copying.
seg000:00000018  jnz     short CopyLoop
seg000:0000001A  jmp     short CopyTarget
seg000:0000001C
seg000:0000001C loc_1C:
seg000:0000001C  call    loc_7
seg000:00000021
seg000:00000021 After the copy loop is complete, the third stage of the shellcode begins here.
seg000:00000021
seg000:00000021 CopyTarget:
seg000:00000021  nop
[/code]

Part IV: The shellcode – Stage III

The third stage is larger again. First, it resolves a bunch of Windows API functions through name hashes. Then, it tries to figure out which open file handle points to the malicious PDF file itself. This is done by estimating the file size of the malicious PDF file and by scanning potential candidate files for two characteristic signatures. If the malicious PDF file is found, a section of the PDF file (the third interesting stream I mentioned above) is decrypted using a simple XOR decryption and then written to the file C:\-.exe. This file is then executed.

Since the third stage is part of the heap-sprayed data you can actually find the third stage code in the IDB file of the ROP stage.  The third stage code begins right after the ROP stage ends. If you want to check out the code of the third stage right now, please click on this link to see the text dump.

Part V: The dropped file -.exe

Inside the ZIP package at the end of this post you can find the commented IDB file of -.exe. Once again, this file is rather simple. Here is what it does:

  • It checks whether the current user is an administrator account.
  • If it’s not, download http://210.211.31.214/img/xslu.exe and execute it. Then shut down -.exe.
  • If it is, it extracts a file called C:\windows\EventSystem.dll and a file called C:\windows\system32\es.ini from its own resource section.
  • The BITS service (Background Intelligent Transfer Service) is shut down.
  • Windows file protection is disabled.
  • The original qmgr.dll file is moved to kernel64.dll
  • EventSystem.dll replaces the original C:\windows\system32\qmgr.dll, C:\windows\system32\dllcache\qmgr.dll and c:\windows\servicepackfiles\i386\qmgr.dll
  • qmgr.dll, EventSystem.dll, and es.ini get the timestamp of the original qmgr.dll
  • The BITS service is started again, now with the dropped qmgr.dll instead of the original qmgr.dll

If you want to check out the code right now, you can click on this link to see the disassembled file.

Part VI: The dropped file EventSystem.dll

The primary purpose of EventSystem.dll, the DLL file that was registered as a service by -.exe, is to collect information about the user’s system and to send it to a server controlled by the attacker. You can see a dump of what information is collected and sent in this log file.

Additionally, the EventSystem.dll file also contains code that can download new files from the internet and execute them afterwards. You can check out the IDB file in the ZIP file at the end of this post for a complete disassembly.

Part VII: Finding the vulnerability in the Flash player

The description of the shellcode is now complete, but one question remains: What is actually the vulnerability in the Flash player? Here is what we found:

The first step was to figure out when control flow is transferred from regular Flash player code to the first stage of the shellcode. At zynamics we have a Pin tool plugin we use to automatically recognize  shellcode and dump it to a file. You can find the complete trace generated by the Pin tool plugin in the ZIP file (pin_trace.txt). Here is the important part:

[code]0x0700156F::BIB.dll  8B 41 34                mov eax, dword ptr [ecx+0x34]
0x07001572::BIB.dll  FF 71 24                push dword ptr [ecx+0x24]
0x07001575::BIB.dll  FF 50 08                call dword ptr [eax+0x8]
0x070048EF::BIB.dll  94                      xchg esp, eax
0x070048F0::BIB.dll  C3                      ret
0x07004919::BIB.dll  59                      pop ecx
0x0700491A::BIB.dll  59                      pop ecx
0x0700491B::BIB.dll  C7 40 0C 01 00 00 00    mov dword ptr [eax+0xc], 0x1[/code]

At address 0x07004919 of BIB.dll, the ROP code of the first stage is executed. Two instructions before, at address 0x070048EF, the original stack of the executing thread is replaced by something controlled by the attacker.

To figure out where control flow is coming from it is possible to set a breakpoint on the XCHG instruction and take a look at the stack. The return value of the active stack frame will point to memory on the heap where you can find code. This code does not belong to any code section of any module, so where does it come from? Turns out that this code is just-in-time compiled ActionScript code that is created from the malicious SWF file inside the malicious PDF file.

To analyze exactly how control flow is transferred from the JIT-ed ActionScript code to the ROP stage of the shellcode, I have created a trace with OllyDbg that shows all instructions that are executed after the just-in-time compilation of the ActionScript code but before the ROP code. You can find the trace in the ZIP file at the end of this post (olly_trace.txt). Here are the important parts:

[code]28CDE2A0  mov eax,dword ptr ss:[ebp-44]

28CDE2C0  mov edx,dword ptr ds:[eax+10]     EAX=25966241

28CDE2C6  mov ecx,dword ptr ds:[edx+2b8]    EAX=25966241, EDX=20259384

28CDE2D5  mov dword ptr ss:[ebp-60],ecx     EAX=25966241, ECX=0C0C0C0C, EDX=00259685

28CDE2EF  mov ecx,dword ptr ss:[ebp-60]     EAX=25966241, ECX=0012F5D0, EDX=00259685

28CDE2F8  call dword ptr ds:[ecx+0c]        EAX=25966241, ECX=0C0C0C0C, EDX=00259685[/code]

The call at 28CDE2F8 goes directly to 0x0700156F in BIB.dll (see the Pin tool trace). So what is going on here? To understand these six lines of code you have to know a bit about the memory layout at address 0x25966241 (the value in EAX) and about the internals of just-in-time compiled ActionScript code.

Let’s start with the memory layout. Here is what I saw at 0x25966241 (note that the dump starts at 0x25966240).

[code]0x25966240   C8 0E 3D 30  05 00 00 20  00 00 00 00 00 00 00 00
0x25966250   78 84 93 25  20 44 90 25[/code]

Now eax (0x25966241) is used as a pointer in instruction 0x28CDE2C0. You might already notice that the pointer is not aligned at all. This is unusual. Now comes the part where you need to know about compiled ActionScript internals.

When values like integer numbers or objects are created by ActionScript scripts, pointers to these objects are created and stored. Interestingly, all ActionScript values must be 8-byte aligned because the lowest three bits of pointers to such values are used to encode type information about the values. For example, if the lowest three bits of such a pointer are 101, then the pointed-to value is a boolean value. 111 identifies a double value and so on.

So apparently what is happening in the above code is that a pointer that includes type information is used as a regular pointer without stripping the type information first. If you debug this piece of code and manually clear the lowest three bits to remove the type information, the value 25966241 turns into 25966240 (which itself contains a pointer to a v-table of a class called ScriptObject, lending more credence to the theory I am exploring here). So, when [eax+10] is read without stripping the type information, the pointer 0x20259384 is read. This pointer points to the binary data that was heap-sprayed by the JavaScript code of the PDF file. If you do strip the type information though, you get the pointer 0x25938478 which is a legitimate pointer to another part of the just-in-time compiled ActionScript code.

After instruction 28CDE2C0 the register EDX points to the heap-sprayed values. Most of the heap-sprayed values are 0x0C0C0C0C DWORD values, so edx+2b8 most likely points to such a DWORD value and 0x0C0C0C0C is moved into register ECX. Through some clever heap-spraying, one iteration of the heap-sprayed data actually starts at address 0x0C0C0C0C so the memory layout starting from 0x0C0C0C0C is controlled by the attacker. He then controls the value of [ecx+0c], the address of the function to be executed next.

If you go back to the JavaScript code in the malicious PDF file now, you can see the value 156f0700 close to the beginning of the heap-sprayed string. This is just the value 0x0700156F which is the entry point to the attacker-controlled control-flow in BIB.dll (see the Pin trace above again).

We know now how control flow is transferred from the just-in-time compiled code to the shellcode. The question that remains is why does the JIT-compiler produce code that leads to incorrect pointer usage?

There are two possible options here. The first one is that the JIT-compiler has a bug and emits wrong x86 code, code that forgets to strip off the type information. I don’t think this is the case because the emitted code that leads to the control-flow hijack is generated in benign cases too. I think it is far more likely that the compiler assumes pre-conditions about the generated code that are not true in this particular situation. In all of the benign cases I have observed, the type information was stripped from the pointer before the JIT code was even executed. In the malicious case this does not happen which leads me to believe that the compiler emits code that assumes that all input pointers to that code segment have been stripped of their type information but apparently this is not always the case.

Let’s look at what could trip up the JIT compiler.

Part VII: The malformed Flash file

Using the SWFTools disassembler we had a look at the Flash file that was embedded in the PDF file. It quickly turned out (by looking at characteristic strings) that the Flash file is a modified version of AES-PHP.swf from http://flashdynamix.com/. Disassembling and comparing the original SWF file to the malicious PDF file generated just a single difference.

[code]00206) + 0:1 getlex <q>[protected]fl.controls:LabelButton::icon</q>
00207) + 1:1 getlex <q>[public]::Math</q>
00208) + 2:1 getlocal_2
00209) + 3:1 getlex <q>[public]fl.controls::ButtonLabelPlacement</q>
00210) + 4:1 getproperty <q>[public]::BOTTOM</q>
00211) + 4:1 ifne ->218[/code]

[code]00206) + 0:1 getlex <q>[protected]fl.controls:LabelButton::icon</q>
00207) + 1:1 getlex <q>[public]::Math</q>
00208) + 2:1 getlocal_2
00209) + 3:1 getlex <q>[public]fl.controls::ButtonLabelPlacement</q>
00210) + 4:1 newfunction [method 000001ba ]
00211) + 5:1 ifne ->218[/code]

The only difference can be found in line 210. While the benign Flash file tries to access the property BOTTOM, the malicious Flash file tries to create a new function object. This simple change messes up the internal ActionScript stack (as can be seen in the differing stack depth numbers after the +) because getproperty and newfunction have different effects on the ActionScript stack. Subsequent ActionScript instructions then assume a stack layout which is simply wrong. Nevertheless, the JIT compiler seems to accept this code and generates x86 code for it. The consequence of this change seems to be that preconditions for JIT-compiled code that were previously true do not hold anymore and the attacker can control the control flow as seen above.

Part VIII: The end

Now it would be interesting to figure out exactly what trips up the JIT code generation to see how it gets into this situation. I think we are going to wait for the patch for this and just use BinDiff to compare the patched version of the Flash player with the unpatched version. 🙂

You can get the malicious PDF file and all the IDB files and traces we generated from this ZIP file. We have also submitted -.exe to CWSandbox. You can see the generated report about the file’s activity here.

Oh yeah, the malicious PDF file is in the ZIP package too. Pay some attention there and don’t backdoor yourself accidentaly. The password to the ZIP file is ‘infected’.
Objective-C phun on Mac OS X

Tuesday, June 8th, 2010

A few posts ago Jose showed a script to clean-up ARM iPhone binaries.The x86 counterparts suffer from the same problems, so I thought it would have been useful to have something similar for it.Both the behaviour and the algorithm behind the script are pretty much the same as the one Jose wrote.
The real difference is in the “dumbish” dataflow tracing method we use. In fact the calling convention on Iphone and OS X is different; so instead of tracing register assignments we have to trace stack variables and of course we are on x86. We currently don’t track function arguments and complex operands. Of course, it can be improved, but it still yields good results as it is:)

Another problem you sometimes encounter when analyzing OSX binaries is that sections are not interpreted correctly. For this purpose I wrote a very simple script that cleans up an OSX binary IDB.Basically it will aggressively make functions in the __text segment and make sure that __cstring is effectively interpreted as a segment containing strings and not code.
You can find both scripts on our company github repository.

If you want to learn a bit more about OS X hacking and reversing consider taking the
class
I and Dino Dai Zovi are going to teach at Black Hat USA.

BinCrowd server can now be licensed

Friday, June 4th, 2010

After a long beta phase with our public BinCrowd community server, we are now releasing the BinCrowd server itself. If you are interested in having your own BinCrowd server to exchange reverse engineered information in your team or organization please contact info@zynamics.com.

See the official product website or the BinCrowd manual for more details about BinCrowd and the BinCrowd server.

The BinCrowd community server will remain free to use for everyone.

Defcon CTF quals: bin400 writeup

Wednesday, June 2nd, 2010

A few days ago, between May 21st – 24th, DDTEK organized the Defcon 18 Capture The Flag qualifiers. For all of you that are not familiar with this kind of contest, Defcon CTF is a hacking offense/defense contest held during the conference in Vegas. In order to play the final round, a previous online competition takes place to select 9 top-teams that will join last year’s winner. The qualification contest contained 30 challenges through different categories like Pursuits Trivial (general questions), Crypto Badness (cryptography), Packet Madness (network traffic analysis), Binary L33tness (reversing), Pwtent Pwnables (exploiting) and Forensics. We at zynamics had a couple of guys playing in different teams so we decided to join the writeup fever and release a solution for the Binary L33tness 400 challenge

(more…)